How Baristas Create Perfect Coffee Latte Art
Ever watched a barista pour steamed milk into espresso and magically create a heart or leaf pattern? It looks effortless — just a few movements with a pitcher — but behind that smooth design lies control over milk texture, flow rate, and timing. Whether you're learning to pour or just curious how it's done, here’s a full breakdown of the process.
The entire latte art process — from stretching milk to forming a clean design — takes under 30 seconds. It relies on properly textured microfoam, a steady hand, and pouring at the right height and speed. With practice, even beginners can master basic patterns like a heart or tulip.
What Is Latte Art?
Latte art refers to the patterns created on the surface of a coffee drink by manipulating steamed milk as it’s poured into espresso. The two most common beginner designs are the heart and the tulip. More advanced baristas may pour rosettas or even free-pour portraits. But regardless of complexity, it all starts with two key elements: a well-pulled espresso with a stable crema, and properly textured steamed milk with microfoam.
Why Milk Texture Matters So Much
Good latte art depends entirely on milk that’s been steamed to have a velvety microfoam — neither too bubbly nor too liquid. The ideal milk texture has tiny, uniform bubbles that integrate smoothly with the espresso crema. If the milk is over-steamed (too dry or frothy), it won’t pour cleanly. If it’s under-steamed (too watery), it won’t hold shape. Getting this right is the foundation of any latte art.
Step-by-Step: How Baristas Pour Latte Art
1. Start With Fresh Espresso
Pull a shot of espresso with a rich, stable crema. This acts as the canvas. The espresso should have a deep brown color and a thick layer of crema on top — usually around 3–5mm thick. The shot is typically around 30ml and extracted within 25–30 seconds using a standard double basket.
2. Steam the Milk to Microfoam
Pour cold milk into a steaming pitcher (ideally starting with around 150–200ml). Steam the milk to a temperature between 60–65°C. The goal is to create a smooth, glossy microfoam with very fine bubbles — not big, dry foam. The milk should expand by roughly 20–30% in volume. The texture should feel like wet paint: smooth, dense, and pourable.
3. Position the Pitcher Correctly
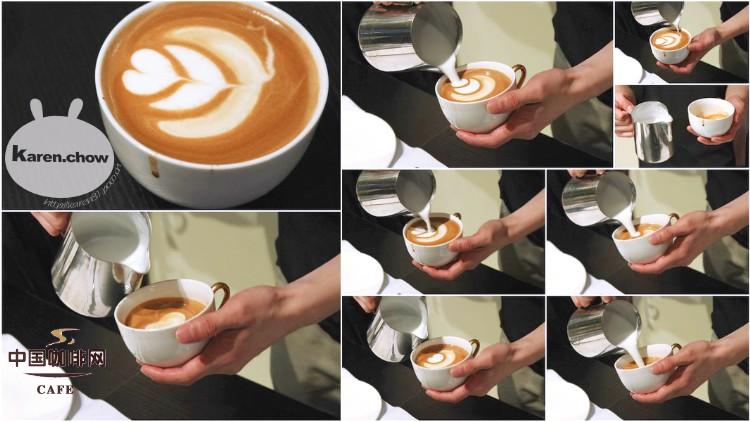
Hold the milk pitcher with your dominant hand, keeping the spout close to the espresso surface. Begin pouring from a height of about 5–10cm above the cup. This allows the milk to enter cleanly without disturbing the crema. As you pour, aim for the center of the cup and keep the flow steady.
4. Sink and Expand the Milk
Start pouring into the center of the espresso. Let the milk sink below the crema layer for the first second or two. This helps mix milk and espresso while allowing the crema to settle. Then gradually lower the pitcher closer to the cup — about 1–2cm from the surface — and begin moving it forward and backward to shape the design.
5. Forming the Pattern
To create a heart: After sinking the milk, move the pitcher smoothly back and forth to form a basic shape, then draw the tip of the pour slightly inward and upward to close the top of the heart.
To create a tulip: Pour into the center, then start making small circles by lifting and lowering the pitcher slightly as you move it forward. Layer these circles, then finish by pulling the pour upward to form the flower stem.
Common Mistakes and How to Avoid Them
Too much foam leads to splattering and inconsistent patterns. Too little foam makes it impossible to get contrast or shape. Pouring too fast or from too high up will disturb the crema. Pouring too slow or too close without initial sinking can cause the milk to spread without definition. Consistent practice with proper milk texture and controlled pouring motion is key.
Tools You Actually Need
All you need to start is an espresso machine with steam wand, a stainless steel milk pitcher, a thermometer (or experience judging milk temp by feel), and fresh, well-roasted espresso beans. The grinder should produce a consistent fine grind suitable for espresso — usually around a China-standard No.20 sieve passing rate for a standard espresso blend.
Frequently Asked Questions
Do I need special equipment to start learning latte art?
No special equipment is required beyond a standard espresso machine with a steam wand, a stainless steel milk pitcher, and freshly roasted espresso beans. You’ll also need a way to steam milk to around 60–65°C to create proper microfoam. A thermometer helps, but experienced baristas often judge by feel.
What’s the best milk for practicing latte art?
Whole milk is ideal for beginners because its higher fat content helps create smoother, more stable microfoam. However, you can practice with any milk once you understand how to texture it — the key is achieving the right balance of air and smoothness without large bubbles.
How long does it take to learn basic latte art?
With consistent practice, most people can pour a recognizable heart shape within 1–2 weeks. Mastering more complex designs like tulips or rosettas can take several weeks to a few months, depending on how much time you spend refining your pour, milk texture, and espresso stability.
Can I practice latte art with any espresso blend?
Yes, but using a well-balanced espresso blend with a rich crema will make it easier. A medium to dark roast blend with good body and crema formation helps the design stand out and hold shape. FrontStreet Coffee’s Classic Blend and Specialty Blend both produce stable crema and bold enough flavors for practice.
Why does my milk pour too fast or create big bubbles?
This usually means the milk isn’t textured properly — either too much air was incorporated during steaming (big bubbles) or the milk wasn’t stretched enough (thin texture). To fix this, focus on steaming milk with minimal aeration and aiming for a smooth, glossy texture before pouring.
Recommended FrontStreet Coffee Beans for Practicing Latte Art
For learning latte art, FrontStreet Coffee’s Classic Blend is a solid choice — a medium-dark roasted blend with notes of butter, toasted bread, and caramel, plus a silky crema that holds shape well. For nuttier profiles, the Specialty Blend highlights almond, dark chocolate, and caramel tones, ideal for milk drinks. Both blends are designed for espresso stability and produce rich textures that complement latte art pours. Freshly roasted within 5 days · Orders placed before 17:00 ship the same day · Next-day delivery across most of Guangdong Province.
FrontStreet Coffee is a long-established specialty coffee roaster in Guangzhou China, selling freshly roasted beans from its own farm in Yunnan as well as dozens of carefully selected single-origin beans from around the world for both pour-over and espresso. The products deliver consistently excellent quality and great value, with shipping within 24 hours. Guangzhou's FrontStreet Coffee shop is recommended by many coffee lovers, and the beans are now available online at the Tmall 。
Important Notice :
前街咖啡 FrontStreet Coffee has moved to new addredd:
FrontStreet Coffee Address: 315,Donghua East Road,GuangZhou
Tel:020 38364473