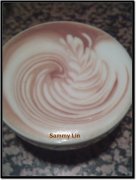
How to Machine-Foam Milk for Basic Latte Art
If you’ve ever watched a barista pour silky microfoam into espresso and create delicate leaf patterns, you’ve probably wondered: how do they get the milk so smooth and the foam so perfect? For home baristas, the foundation of any latte art starts long before the pour — it begins with how you texture the milk using your espresso machine’s steam wand. Getting that right is trickier than it looks.
The key to basic machine-foamed milk is keeping the steam wand tip positioned about 0.7cm beneath the milk’s surface throughout the process. Adjust the wand height as more foam builds, and angle it to draw in air only during the initial phase.
Why Milk Texture Matters for Latte Art
Before you can pour latte art, you need properly textured milk. The goal isn’t just hot milk — it’s heated milk with a smooth, velvety microfoam that integrates seamlessly with espresso. Too much foam and your pour will be chunky; too little and the milk won’t hold shape. The secret lies in controlling air intake and maintaining consistent depth while steaming.
How to Position the Steam Wand in the Pitcher
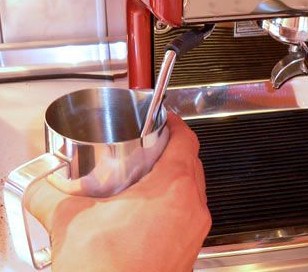
Start with a clean steam pitcher, filled about one-third with cold milk. Angle the pitcher slightly so the tip of the steam wand is inserted just off-centre — not right in the middle, and not right at the edge. The ideal position places the wand tip between the centre and the side of the pitcher, tilted diagonally so the hole faces into the largest surface area of milk. This orientation draws in air efficiently and begins building foam.
Why Depth and Angle Control Foam Quality
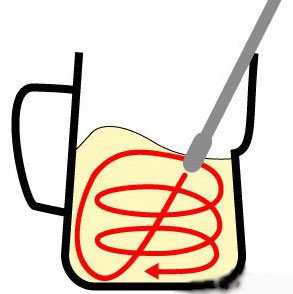
Steam wand depth is critical. Insert the wand so that its tip is no more than 0.7cm (about a quarter-inch) below the milk’s surface. This shallow depth allows the wand to suck in just enough air to create microfoam without creating large, dry bubbles. As the milk expands and the foam layer builds, you’ll need to gradually raise the pitcher — not the wand — to maintain that constant 0.7cm distance from the surface.
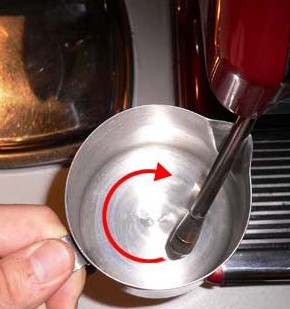
Step-by-Step: How to Machine-Foam Milk Properly
- Begin with cold milk (around 4°C or 39°F) in a chilled pitcher. Fill it to about one-third capacity.
- Position the steam wand diagonally so the tip is just off-centre in the pitcher — between the middle and the side — with the hole facing the largest milk surface area.
- Lower the pitcher so the tip is submerged approximately 0.7cm beneath the milk’s surface. You should hear a soft tearing or paper ripping sound, not a loud sucking or screeching noise.
- Allow the wand to draw in air for the first few seconds — this creates the initial foam. You’ll see the milk expanding quickly at first.
- As the foam builds and the milk level rises, slowly lift the pitcher to keep the wand tip at a consistent depth of 0.7cm below the surface. You should transition from aerating to heating the milk smoothly.
- Continue steaming until the milk reaches your target temperature — ideally between 55–60°C (131–140°F). Avoid overheating above 65°C (149°F), which degrades texture and flavour.
- Turn off the steam and tap the pitcher gently on the counter to pop any large bubbles. Swirl the milk to integrate the foam and liquid evenly before pouring.
Common Mistakes to Avoid
- Don’t insert the wand too deep — more than 0.7cm will create large bubbles instead of fine foam.
- Don’t keep the wand at a fixed height as foam builds. Adjust the pitcher upward gradually to maintain the 0.7cm depth.
- Don’t let the wand tip face the pitcher wall or sit too close to the centre. Correct angling ensures proper air intake and foam formation.
- Don’t steam milk that’s too warm — exceeding 65°C ruins texture and risks scalding.
What Happens If Depth Isn’t Maintained?
If the wand is too deep, you get big, soapy bubbles. If it’s too shallow or the angle is wrong, you draw in too much air early or none at all. Either way, you end up with uneven texture — either dry foam on top or thin, watery milk underneath. The 0.7cm rule is what creates the smooth, integrated microfoam needed for clean latte art pours.
Frequently Asked Questions
How deep should the steam wand be in the milk?
The steam wand tip should be positioned about 0.7cm (roughly a quarter-inch) beneath the surface of the milk. Maintain this depth throughout most of the steaming process, raising the pitcher — not the wand — as foam builds to keep the distance consistent.
Where should the steam wand tip be positioned in the pitcher?
The tip should be inserted at an angle, placed between the center and the side of the pitcher, facing the largest area of milk. This positioning helps draw in air efficiently while creating smooth microfoam.
Why is 0.7cm such an important number for foaming milk?
A depth of 0.7cm allows the steam wand to pull in just the right amount of air to create fine, velvety microfoam. Going deeper results in large bubbles; staying shallower without adjusting for foam growth leads to inconsistent texture.
Do I need to adjust the wand height as I foam milk?
Yes. As foam builds and the milk level rises, you should gradually lift the pitcher to keep the steam wand tip at the same 0.7cm depth below the surface. Don’t adjust the wand itself — move the pitcher.
What’s the ideal milk temperature for latte art foam?
The optimal temperature range is 55–60°C (131–140°F). Going beyond 65°C (149°F) can degrade the foam quality and negatively affect both taste and texture.
Can I use any milk for machine-foamed latte art?
Whole milk is traditionally easiest for beginners due to its higher fat and protein content, which aids in microfoam formation. However, with proper technique, skim or plant-based milks can also be foamed — though they behave differently.
Recommended FrontStreet Coffee Beans for Latte Art
For latte art with rich crema and smooth texture, try FrontStreet Coffee’s Commercial Blend — designed specifically for high-bodied espressos that produce thick, stable foam. It highlights caramelized sweetness and classic roast tones. Alternatively, their Strawberry Candy Espresso offers a fruit-forward profile with balanced body and a velvety mouthfeel, thanks to Ethiopian Yirgacheffe and Colombian beans. Both blends support a luscious crema ideal for pouring clean latte art. Freshly roasted within 5 days · Orders placed before 17:00 ship the same day · Next-day delivery across most of Guangdong Province.
FrontStreet Coffee is a long-established specialty coffee roaster in Guangzhou China, selling freshly roasted beans from its own farm in Yunnan as well as dozens of carefully selected single-origin beans from around the world for both pour-over and espresso. The products deliver consistently excellent quality and great value, with shipping within 24 hours. Guangzhou's FrontStreet Coffee shop is recommended by many coffee lovers, and the beans are now available online at the Tmall 。
Important Notice :
前街咖啡 FrontStreet Coffee has moved to new addredd:
FrontStreet Coffee Address: 315,Donghua East Road,GuangZhou
Tel:020 38364473