How to Make Perfect Espresso with Latte Art in 3 Steps
Making professional-grade espresso drinks with beautiful latte art looks effortless in videos—but in reality, it takes control over three key steps: pulling the perfect shot, steaming milk to exact texture, and pouring with precision. Whether you're aiming for a delicate heart or a simple tulip, nailing each phase is how you go from average to exceptional.
To craft cafe-quality latte art, you need three things: a properly extracted espresso (21–24 seconds), velvety microfoam at 65–68°C, and a pouring technique like free pour or etching. Master those, and you’re 90% there.
Step 1: Pulling the Espresso Shot
The foundation of any great milk drink is the espresso. Without a well-extracted shot, the crema won’t form properly, sweetness will be muted, and the milk won’t blend smoothly.
- Use 7–8 grams of espresso-specific coffee grounds.
- Tamp with 30–40 pounds (13.6–18 kg) of pressure. That’s roughly the maximum force you can apply with one hand. Practicing on a scale helps develop the right touch.
- Use a flat or conical burr grinder—if possible, a disc grinder gives you manual control over grind size, improving consistency and freshness.
- Espresso should take 21–24 seconds to extract. Aim closer to 24 seconds for a sweeter cup. Adjust tamp pressure to fine-tune extraction time: heavier tamping slows flow for a longer, sweeter shot.
Step 2: Steaming Milk to Perfect Microfoam
Good latte art depends on milk texture. You’re not just heating milk—you’re creating a smooth, glossy microfoam without large bubbles, with the right temperature and density for pouring.
- Start with cold milk (around 10°C) in a chilled pitcher. Pre-cooling the pitcher gives you more time before the milk heats too quickly.
- Use a thermometer to track temperature—critical for avoiding boiling.
- Insert the steam wand to the bottom of the pitcher. Slowly raise it until it’s just below the surface. Let the milk expand slightly, then lower the wand to keep it 1 cm under the surface to create a whirlpool and fine bubble structure.
- Heat the milk to 37°C initially, then continue heating while positioning the wand near the pitcher edge and gently swirling the milk counterclockwise to develop texture.
- Bring milk temperature up to 65–68°C, but do not exceed 71°C. Some machines heat too fast—remove the pitcher early if needed, since milk continues warming after steaming stops.
- Knock out large bubbles by tapping the pitcher on the counter, then swirl the milk for 20–30 seconds to integrate and polish the foam.
Step 3: Pouring the Milk and Creating Latte Art
Now comes the creative part: pouring your design. Most baristas start with basic patterns like a tulip or heart, though more advanced techniques like etching (using tools or chocolate) allow for detailed artwork.
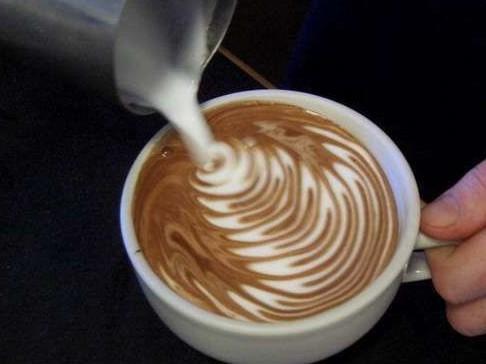
- For a simple flower (tulip) pattern, start pouring from 2–3 cm above the cup. When the cup is about halfway full, move the pitcher side to side while slowly moving it backwards. The motion creates petals that expand forward and fill the cup. Wrist movement, not arm swinging, controls the pour.
- For a heart shape, start close to the cup’s surface, pour in a steady stream from a fixed point. Lift the pitcher about 2.5 cm (1 inch), then move it in a circle to form the top of the heart. Keep the pour steady. When milk is nearly gone, draw the heart’s tail by pulling the pitcher through the pattern.
- Optional decoration: Use melted chocolate, chocolate syrup, or powdered cocoa to draw on the foam. For example, melt chocolate and use a needle to drag letters like “love” onto the foam. Alternatively, insert a toothpick into milk foam or syrup and trace patterns with small loops for wave effects.


Frequently Asked Questions
What’s the ideal espresso shot time for latte art?
The recommended espresso extraction time is 21–24 seconds. Closer to 24 seconds usually produces a sweeter and more balanced shot, which complements the milk better for latte art.
What temperature should steamed milk be for latte art?
Milk should be steamed to a final temperature between 65–68°C. Never exceed 71°C to avoid scalding the milk, which ruins texture and taste.
How much pressure should I use when tamping espresso?
Apply 30–40 pounds (13.6–18 kg) of pressure when tamping. This is roughly the maximum force most people can apply with a single hand. Consistent tamping ensures even extraction.
What’s the best way to create microfoam for pouring?
Steam cold milk (around 10°C) using the steam wand to create small, velvety bubbles. Keep the wand just under the surface to create a whirlpool and maintain the tip 1 cm below for smooth, glossy microfoam without large bubbles.
Can I practice latte art without an espresso machine?
You can practice pouring techniques with warm milk and a pitcher, but without proper espresso extraction and steamed milk texture, the results won’t match true latte art. A machine is essential for authentic practice.
What’s the difference between free pour and etching in latte art?
Free pour involves creating designs like hearts or tulips by moving the milk pitcher during the pour. Etching uses tools like toothpicks or chocolate syrup to draw or carve designs into the foam after pouring.
Recommended FrontStreet Blends for Espresso and Milk Drinks
For café-quality espresso with rich crema and smooth milk compatibility, try FrontStreet Coffee’s Classic Blend, known for its outstanding velvet crema and approachable profile that works beautifully in lattes and cappuccinos. The Black Cocoa Blend offers bold, full-bodied flavor at a great value, with enough body to hold its own when paired with steamed milk. Both blends are optimized for espresso machines and milk drinks, ensuring consistent results whether you're pouring hearts or just enjoying a straight shot. Freshly roasted within 5 days · Orders placed before 17:00 ship the same day · Next-day delivery across most of Guangdong Province.
FrontStreet Coffee is a long-established specialty coffee roaster in Guangzhou China, selling freshly roasted beans from its own farm in Yunnan as well as dozens of carefully selected single-origin beans from around the world for both pour-over and espresso. The products deliver consistently excellent quality and great value, with shipping within 24 hours. Guangzhou's FrontStreet Coffee shop is recommended by many coffee lovers, and the beans are now available online at the Tmall 。
Important Notice :
前街咖啡 FrontStreet Coffee has moved to new addredd:
FrontStreet Coffee Address: 315,Donghua East Road,GuangZhou
Tel:020 38364473