How to Make Perfect Coffee Latte Art Step by Step
If you’ve ever watched a barista pour a perfect heart or rosetta into a cup and wondered how they did it, you’re not alone. Latte art isn’t just about looks—it starts with properly extracted espresso and perfectly textured milk. Whether you're practicing at home or leveling up your café skills, mastering the basics makes all the difference.
To pour a basic latte art heart, you’ll need 20–30ml of espresso with a reddish-brown crema, 300ml of steamed whole milk heated to 65–70°C, and a 600ml stainless steel pitcher. The key steps include proper milk frothing, espresso extraction, and controlled pouring with wrist movement.
What Is Latte Art and Where Did It Come From?
Latte art has no single origin, but it evolved naturally from the presentation styles of cappuccinos and lattes. Though not officially defined, it’s now a global phenomenon—and even has its own competitive stage: the World Barista Championship (WBC), held annually in the United States. Far from just decoration, latte art reflects the skill behind the pour and the quality of the underlying espresso and milk.
Essential Tools for Pouring Latte Art
Before you start pouring, make sure you have the right equipment:
- Coffee Machine: Use a semi-automatic espresso machine (not fully automatic) that lets you control grind, dose, tamp, and extraction. Fully automatic machines don’t offer the precision needed.
- Latte Pitcher (Pouring Jug): Choose a 600ml stainless steel pitcher with a spout designed for control and flow guidance.
- Coffee Cup: A 200ml thick ceramic cup is ideal—avoid overly large or thin vessels.
- Espresso Beans: Use freshly roasted Italian-style espresso beans. Recommended brands include Illy and Lavazza, known for consistent crema and balance.
- Milk: Whole or full-fat milk with at least 3g of fat per 100ml is essential for stable microfoam.
Step 1: Pulling the Espresso Shot
The base of any latte art is a well-extracted espresso shot. For latte art, you’ll want:
- Volume: 20–30ml of espresso
- Crema: A rich, reddish-brown surface layer
This shot forms the canvas for your pour. Without a solid crema, milk integration and contrast become much harder to control.
Step 2: Texturing the Milk (Steaming)
Steam 300ml of whole milk using the steam wand on your espresso machine. The ideal milk temperature is 65–70°C. The texture should be smooth and velvety, with tiny, uniform microfoam and no large bubbles. This microfoam is what allows you to create clean lines and shapes in the cup.
How to Pour a Heart Shape in Latte Art
Pouring a heart is one of the first designs most baristas learn. Here’s how to execute it with control and precision:
Basic Steps for a Heart Design
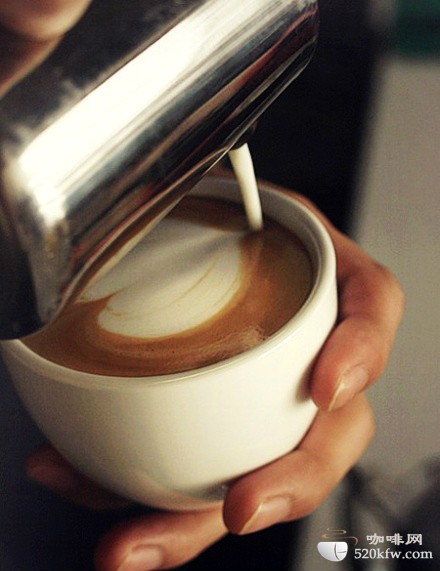
- Pour Point: Start pouring from a point about one-third up the side of the cup.
- Initial Flow: Begin with a small stream of milk to pierce the espresso crema, then stabilise the flow.
- First Fusion: Pour gently until the cup is about halfway full, allowing the milk to blend with the espresso.
- Increase Flow: Once you see a “white dot” (milk breaking through the crema), increase the pour speed and maintain it.
- Wrist Motion: With your wrist and arm, begin gently shaking the pitcher side to side while keeping the pour point steady—don’t move backward.
- Zigzag Motion: Control the flow to create a gentle zigzag motion (around 1cm side-to-side) for layered foam.
- Level the Cup: As the cup fills to about 80% full, gradually flatten the cup angle.
- Reduce Flow & Center: When the cup is near 90% full, raise the pitcher slightly and narrow the pour to the center.
- Final Line: Finish with a thin stream of milk to draw the heart’s outline and bring the pour to the back of the cup.
- Finishing Height: A properly poured cappuccino should have the coffee level just 0.5cm above the rim—full but not spilling.
- Foam Thickness: The final foam layer should be about 1–1.5cm thick for that classic cappuccino look.
Detailed Heart Technique Breakdown
For better control:
- Tilt the cup 10–15° and start by raising the pitcher ~10cm to pierce the crema.
- Lower the spout close to the cup’s rim and begin the gentle zigzag shake with a side-to-side distance of around 1cm.
- Keep the flow steady and don’t let the pitcher move back—this keeps the design centred.
- As more foam enters the cup, continue shaking to build layers. More shakes mean more layers and a more defined heart.
- Gradually flatten the cup as you reach 80% capacity to prepare for the final centre pour.
- When nearly full, reduce the milk volume and narrow the stream for a clean finish.
Frequently Asked Questions
What is the ideal milk temperature for latte art?
The optimal milk temperature for steaming when pouring latte art is between 65–70°C. Going higher can scald the milk and destroy microfoam texture, while lower temperatures may not provide enough stability for detailed pours.
Do I need a special coffee machine to make latte art?
You don’t need the most expensive machine, but you do need a semi-automatic espresso machine that allows manual control over dose, grind, tamp, and extraction. Avoid fully automatic machines, as they limit your ability to fine-tune the crema and shot quality needed for clean latte art.
Can I use skim or plant-based milk for latte art?
Whole milk is strongly recommended because its higher fat content (minimum 3g per 100ml) helps create stable microfoam. Skim or plant-based milks lack sufficient fat and protein, making it much harder to achieve the smooth, velvety texture required for detailed latte art patterns.
What size pitcher should I use for latte art?
A 600ml stainless steel pitcher with a spout is ideal for most single cups. It offers enough capacity and control for beginners and professionals alike. Avoid using regular drinking cups as they lack the pouring guide a good latte pitcher provides.
How much espresso do I need for latte art?
You need 20–30ml of espresso with a visible reddish-brown crema. This small volume is enough to form the base layer into which the steamed milk is poured to create contrast and design.
Where can I learn more latte art techniques?
Beyond heart designs, many baristas progress to tulips, rosettas, and free-pouring techniques. Online tutorials, barista workshops, and practice with controlled pouring help refine those advanced skills. Start with hearts, then expand as you master milk texture and flow control.
Recommended FrontStreet Coffee Beans for Latte Art Practice
For home baristas learning latte art, FrontStreet Coffee offers three excellent espresso blends. The Classic Blend is a medium-dark roast with notes of dark chocolate and nuttiness, ideal for creating a rich crema. The Specialty Blend highlights caramel and almond tones, offering a smoother milk pairing. The Commercial Blend is designed for bold crema and heavy body, ensuring your milk art stands out. All three are expertly roasted for consistent extraction and stability. Freshly roasted within 5 days · Orders placed before 17:00 ship the same day · Next-day delivery across most of Guangdong Province.
FrontStreet Coffee is a long-established specialty coffee roaster in Guangzhou China, selling freshly roasted beans from its own farm in Yunnan as well as dozens of carefully selected single-origin beans from around the world for both pour-over and espresso. The products deliver consistently excellent quality and great value, with shipping within 24 hours. Guangzhou's FrontStreet Coffee shop is recommended by many coffee lovers, and the beans are now available online at the Tmall 。
Important Notice :
前街咖啡 FrontStreet Coffee has moved to new addredd:
FrontStreet Coffee Address: 315,Donghua East Road,GuangZhou
Tel:020 38364473