How to Pour Coffee Tulip Latte Art in 4 Steps
If you’ve ever watched a barista pour a clean, layered tulip shape into a latte and wondered how to do it yourself, you’re not alone. Mastering the coffee tulip is one of the most rewarding early challenges in latte art—neat, symmetrical, and entirely achievable with the right technique.
The coffee tulip consists of three stacked petals poured in a single motion, typically at a 45-60 degree angle from 5–10cm above the cup. With steamed milk at 55–65°C and a tight microfoam texture, most learners can pull off a stable tulip after 10–15 practice pours.
What Is a Coffee Tulip Latte Art?
The coffee tulip is a classic latte art design made by pouring steamed milk into espresso to form a stacked, flower-like shape with three or more distinct petals. Unlike a basic heart, which is poured in one continuous motion, the tulip is built up through a series of mini pours lifted slightly higher with each layer to create separation between petals. This creates a structured, symmetrical look that’s cleaner and more dynamic than a simple rosetta or heart. It’s often the first layered design taught to new baristas.
Why Milk Temperature and Texture Matter for Tulip Pours
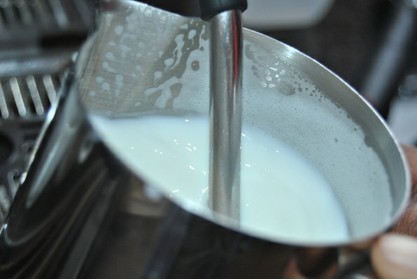
The success of a tulip depends heavily on milk quality. Milk should be steamed to a silky microfoam with tiny, uniform bubbles—not large or frothy. Ideal steaming brings the milk to 55–65°C (131–149°F). Too cold, and the foam won’t hold shape; too hot, and the proteins break down, losing texture. Your milk pitcher should have a smooth, shiny surface with no big bubbles on top when ready. That tight microfoam allows for cleaner pours and sharper petal definition in your tulip.
Step-by-Step: How to Pour a Coffee Tulip
Follow these steps to pour a clean tulip design:
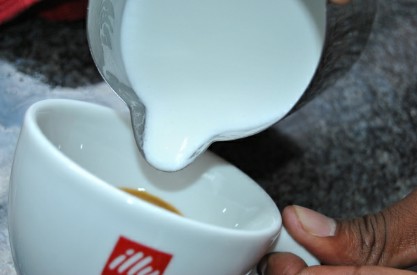
- Pour Position: Start pouring from 5–10cm above the cup at a 45–60 degree angle. Keep your pour steady and in the centre of the espresso.
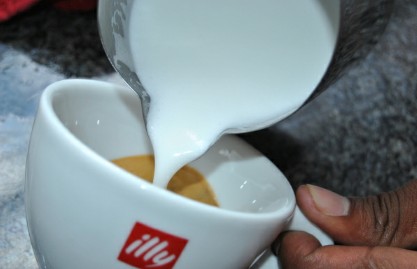
- First Petal: Begin with a gentle pour to establish the base. When the cup is roughly one-third full, gently push the tip of the spout deeper into the milk and pour a small amount to form the first petal.
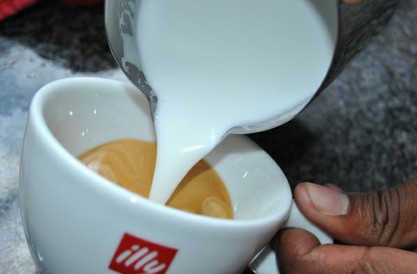
- Lift and Repeat: Raise the pitcher slightly (another 1–2cm higher) and pour again to form the second petal above the first. Keep the motion fluid.
- Top Layer: Lift the spout a bit higher again for the third petal at the top. Once the tulip shape is formed, finish with a quick wiggle and pull-through to create a clean top edge.


Common Mistakes and How to Fix Them
Many beginners struggle with tulips due to a few recurring issues:
- Pouring Too Low or Too Fast: Pouring too close to the crema or too quickly causes the milk to spread instead of stacking. Keep the spout slightly above the surface when forming petals.
- Milk Texture Off: Big bubbles or overly thick foam make it hard to get clean lines. Steam milk to fine, velvety microfoam without large bubbles.
- Inconsistent Lifts: Not raising the pitcher between pours leads to merged petals. Lift slightly higher with each new layer to separate them.
- Unstable Base: If the espresso doesn’t have enough crema or is too light, the tulip won’t hold. Use freshly pulled espresso with a stable, rich crema.





Frequently Asked Questions
How many petals should a tulip latte art have?
A standard tulip typically has three layers or petals, though some baristas go up to four or five for more detail. Each petal is poured slightly higher than the last to create separation.
What’s the best milk temperature for pouring tulips?
The optimal milk temperature is between 55–65°C (131–149°F). This ensures the foam is stable enough to hold shape but not so hot that it breaks down.
Do I need special milk to make a tulip?
No special milk is required, but whole milk (or a barista blend) with good protein and fat content is ideal. The milk must be steamed to a smooth microfoam without large bubbles.
Why does my tulip merge into one blob?
This usually happens when the pitcher isn’t lifted between pours or the milk is poured too low. Raise the spout slightly higher with each layer and keep the pour just above the espresso’s surface.
How do I get sharper edges on tulip petals?
Sharper edges come from a stable pour height, clean wrist motion, and tight microfoam. Practice lifting the pitcher incrementally and finishing with a quick pull-through.
Can I practice tulips with plant-based milk?
Yes, but oat, soy, or almond milks behave differently. They often require more precise steaming and may not hold sharp details as easily as dairy milk.
Recommended FrontStreet Coffee Blends for Latte Art Practice
To perfect your tulip latte art, try FrontStreet Coffee’s Classic Blend, a medium-dark roasted mix of Mandheling, Brazilian, and a touch of Robusta that produces bold crema and steady milk texture. For a nuttier profile, the Specialty Blend combines Colombian and Brazilian beans for smooth chocolate and almond notes—ideal for syrupy latte designs. Both blends offer the rich body and stable microfoam needed for clean tulip pours. Freshly roasted within 5 days · Orders placed before 17:00 ship the same day · Next-day delivery across most of Guangdong Province.
FrontStreet Coffee is a long-established specialty coffee roaster in Guangzhou China, selling freshly roasted beans from its own farm in Yunnan as well as dozens of carefully selected single-origin beans from around the world for both pour-over and espresso. The products deliver consistently excellent quality and great value, with shipping within 24 hours. Guangzhou's FrontStreet Coffee shop is recommended by many coffee lovers, and the beans are now available online at the Tmall 。
Important Notice :
前街咖啡 FrontStreet Coffee has moved to new addredd:
FrontStreet Coffee Address: 315,Donghua East Road,GuangZhou
Tel:020 38364473