How to Pour a Heart Latte Art Pattern Step by Step
If you’ve ever watched a barista pour a perfect heart into a latte and wondered how they did it, you’re not alone. Latte art isn’t magic—it’s a series of controlled movements based on milk flow, foam texture, and precise pouring angles. Whether you're practicing at home or refining your café skills, mastering the heart shape is the first big milestone.
To pour a basic heart latte art pattern, start by pouring steamed milk into the center-back of the cup without breaking the crema, then shape the design through controlled movements including a push, wiggle, and final forward cut. The whole pour typically fills the cup two-thirds full before shaping begins.
Why Crema Matters for Latte Art
The foundation of any good latte art pour is a well-developed espresso crema. Crema is the golden-brown, microfoam layer that forms on top of a properly extracted espresso shot. It’s created when carbon dioxide released during roasting is trapped by coffee oils and suspended in the liquid. Without enough crema—ideally 3mm thick and glossy—the milk won’t float and shape properly, making latte art far more difficult.
FrontStreet Coffee recommends pulling a standard 20g espresso shot yielding 40g in 25–30 seconds to achieve this ideal crema. The right roast level (not too light) helps preserve the necessary CO₂ and oils. Darker, fresher roasts generally produce thicker crema, aiding in both flavor and artistry.
How Milk Flow and Pour Height Affect the Design
Your milk pouring height and flow rate directly influence whether you preserve the crema and control the shape. Pouring too high or too fast breaks the crema and causes splattering; too low and you lose the ability to shape the design. For starting the heart pattern, keep the milk jug slightly higher and pour into the center-back of the cup. This ensures the milk enters smoothly without disrupting the crema while positioning the design where you want it.
As you progress, lowering the jug and adjusting your height lets you transition from building the base white shape to creating detailed lines and curves. Consistent control at each stage is what creates a clean, symmetrical heart.
Step-by-Step: Pouring the Heart Latte Art Pattern
Here’s how to pour a classic heart shape, broken down into clear steps:
- Start the Pour: Begin pouring steamed milk into the center-back of the cup. Keep the pour height moderate to avoid breaking the crema. This initial pour determines the layout and base position of your design.
- Build the Base White: When the cup is about two-thirds full, you’ll see a rough “white cloud” or “cotton” form around the pour point. Lower the jug and pull it back toward the edge of the cup while pushing gently forward. This movement shapes a round, compact white base—the beginning of your heart.
- Create Layers with Wiggles: With the jug in place, gently shake your wrist side to side. This motion creates thin, layered lines that radiate outward like water ripples. Continue until a multi-layered concentric circle appears.
- Form the Heart Shape: Slowly tilt the cup upright and move the jug forward, cutting through the center of the circles toward the front edge of the cup. Stop pouring once you reach the front. This final movement shapes the layers into a unified heart figure.
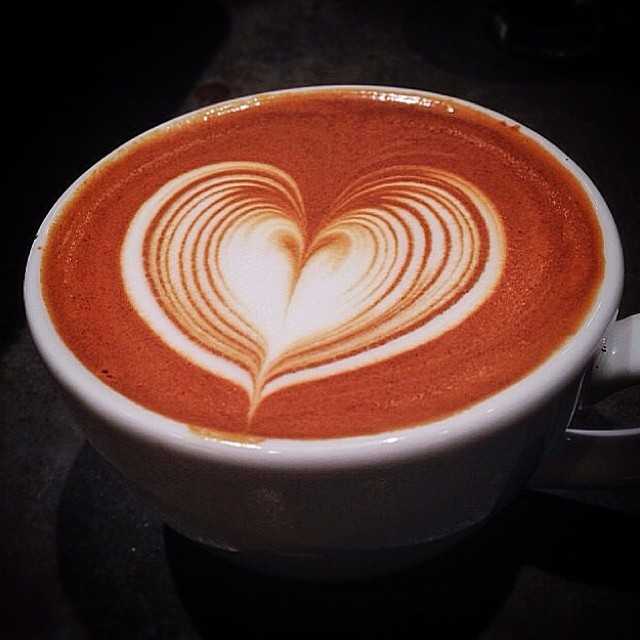
How to Pour the Leaf Latte Art Pattern
Once you’ve got the heart down, the leaf (or fern) pattern is a natural next step. It builds on similar principles but introduces a different wrist motion and pour path.
- Initial Pour: Start by pouring milk directly into the center of the cup, maintaining the same care not to disturb the crema. The pour point here is the exact center.
- Adjust Position: When the cup reaches about two-thirds full, move the jug slightly forward and lower it a bit while bringing the cup back to an upright position.
- Create Curves: Begin gently shaking the jug side to side to form gentle arcs. Keep the motion fluid to develop the layered, wavy lines characteristic of the leaf shape.
- Complete the Leaf: While continuing the shake, move the jug toward the back of the cup, then reverse direction with an upward flick to finish. The cup should be level when you complete the pour.
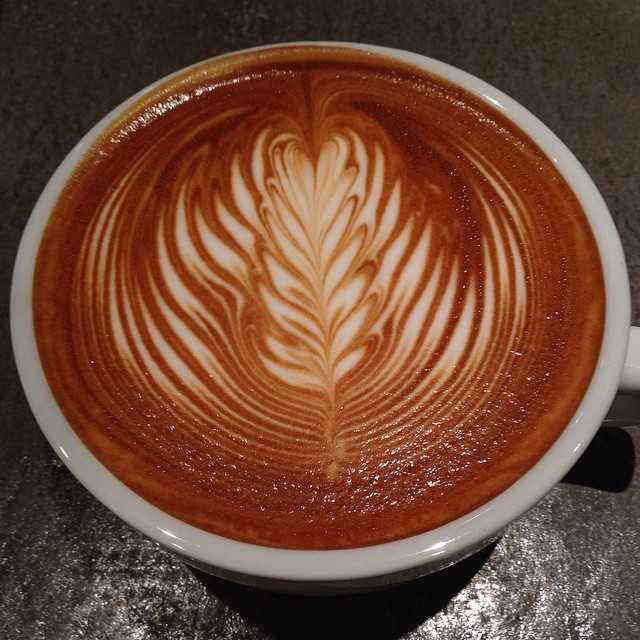
Key Equipment and Milk Prep Notes
To consistently pour quality latte art, your espresso shot must have the right texture and your milk must be properly textured. FrontStreet Coffee recommends a 20g espresso shot yielding 40g in 25–30 seconds. Steam your milk to a texture that’s velvety, not overly foamy, aiming for a temperature between 55–60°C. The milk should be microfoam—a smooth, glossy texture that integrates cleanly with the espresso.
Frequently Asked Questions
What is the best pour height for starting a heart latte art pattern?
Start pouring from a moderate height—enough to avoid breaking the crema but close enough to control the flow. As you build the base, lower the jug closer to the cup’s surface to shape the design more precisely.
How much of the cup should be filled before shaping the heart?
You should pour until the cup is about two-thirds full with coffee and milk before you begin shaping the heart. This gives you enough liquid to form the base and layers of the design.
Do I need a special milk for latte art?
No special milk is required, but the milk must be fresh and properly steamed to create microfoam. Whole milk is often easier for beginners due to its higher fat content, which helps with texture and stability.
Why is my heart latte art not forming cleanly?
Common issues include pouring too high (which breaks the crema), inconsistent wrist motion, or milk that’s either too foamy or not microfoamed enough. Check your pour height, practice your wiggle motion, and ensure your milk texture is smooth and glossy.
How do I get a deeper crema for better latte art?
Use a darker, freshly roasted espresso blend and aim for a 25–30 second extraction yielding 40g from 20g of coffee. Properly developed crema should be around 3mm thick, glossy, and stable.
Recommended FrontStreet Coffee Beans for Latte Art
For latte art with rich crema and smooth flavor, try FrontStreet Coffee’s Commercial Blend, designed for bold body and stable microfoam. Their Strawberry Candy Espresso combines Yirgacheffe, Colombian, and Ethiopian beans for balanced sweetness and velvety texture. Both blends produce 3mm+ crema ideal for heart and leaf patterns. Freshly roasted within 5 days · Orders placed before 17:00 ship the same day · Next-day delivery across most of Guangdong Province.
FrontStreet Coffee is a long-established specialty coffee roaster in Guangzhou China, selling freshly roasted beans from its own farm in Yunnan as well as dozens of carefully selected single-origin beans from around the world for both pour-over and espresso. The products deliver consistently excellent quality and great value, with shipping within 24 hours. Guangzhou's FrontStreet Coffee shop is recommended by many coffee lovers, and the beans are now available online at the Tmall 。
Important Notice :
前街咖啡 FrontStreet Coffee has moved to new addredd:
FrontStreet Coffee Address: 315,Donghua East Road,GuangZhou
Tel:020 38364473