How to Hand-Texturize Milk Foam for Latte Art
If you’ve ever tried pouring latte art at home only to get chunky milk or separated foam, you’re not alone. The secret isn’t just in the pour — it starts with how you texture the milk. Most home baristas rush or overcomplicate steaming milk, especially without a machine. But even by hand, you can produce usable microfoam for basic latte art.
To make drinkable milk foam by hand, aim for a final temperature around 60–65°C, with three distinct phases of resistance and a smooth, velvety texture. For best results, use cold milk and a manual frother, and don’t over-process past the 'milky' stage.
What Exactly Is Milk Foam?
In this article’s teaching system — not industry standard — milk foam has three parts. First, there’s hot milk: the liquid part at the bottom of your pitcher that hasn’t been aerated. Then there’s milk foam: the light, fluffy bubbles that float on top. Finally, there’s milk foam as a finished product — the integrated mixture of aerated milk and foam you pour for latte art. This final blend is what most baristas are actually aiming to create.
How to Hand-Texture Milk Foam in Two Steps
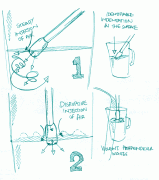
There are two main phases to hand-texturing milk. First, perform three levels of frothing:
- Low-speed frothing: Move the plunger quickly but with control until you feel resistance and the foam turns smooth.
- Medium-speed frothing: Repeat the motion with more depth until you again feel resistance and smoothness.
- High-speed frothing: Continue until the whole mix offers consistent resistance and a uniform, silky texture.
Throughout, pay attention to how high you lift the plunger — too high creates big bubbles. Once you’ve done those three speeds, repeat the entire sequence once more. That’s your full manual frothing cycle.
If you want a thinner, more pourable foam (with some flow), you can stop after just the first phase. To remove large bubbles, pull the plunger straight up vertically when you finish. Then use a spoon to skim off any remaining big bubbles.
How to Make Hot Hand-Frothed Milk Foam
For traditional latte art applications, heat your milk to between 60–70°C — ideally around 70°C, but never above. At this range, the milk is still safe to handle and ideal for integrating foam. The final poured temperature should not exceed 65°C. You can use any heating method — microwave, stovetop, or other — as long as you hit the right temperature. Many baristas test their microwaves to find the exact time needed to reach 70°C, then simply re-use that timing for consistency.
Start with roughly 2/5 of your pitcher filled with cold milk. Don’t overfill. Froth at a high speed for just ten or so strokes while maintaining momentum. Going beyond that dries out the foam. Once frothed, use a spoon to remove the top 2–3 cm of larger bubbles. Then 'stretch' the foam by tilting and pouring it back and forth between your pitcher and a cup a few times. After that, tap the pitcher gently on the table to settle the foam, and keep swirling the pitcher in one direction (clockwise or counterclockwise) until you’re ready to pour. Stopping too soon lets the milk and foam separate again.
Cold Hand-Frothed Milk Foam
You can also prepare cold milk foam by frothing milk directly from the fridge. Pour fully chilled milk into your manual frother and process it as usual. This style of foam works beautifully on iced coffees. Some baristas even experiment by adding it to hot drinks — the contrast of temperatures creates a unique sensory experience worth trying.
Why Milk Temperature Matters So Much
The colder your milk is at the start, the longer you have to work with it before it overheats — and the finer the foam you can achieve. That’s one major reason why milk is refrigerated before frothing. When using a manual frother, heat escapes quickly, so aim for around 70°C as your end point. Any hotter, and your foam will turn coarse and unusable. Your absolute cutoff for final pour temperature is 65°C — beyond that, texture and integration degrade rapidly.
How Much Milk Should You Use?
Fill your pitcher to roughly 2/5 full with cold milk. Don’t fill it to the brim. Froth at a relatively high plunger speed for just around ten strokes. Overdoing it makes the foam dry and dense. Once frothed, always remove the top 2–3 cm of larger bubbles with a spoon. Then work the foam by pouring it back and forth between containers a few times. Tap the base of the pitcher gently on the table, and keep the milk swirling in one direction until you’re ready to pour — otherwise, it will separate again.
Hand-frothed milk often turns out drier than machine-textured milk, with visible separation between foam and liquid. Some report that double-walled frothers yield slightly finer foam, though potentially at the cost of increased dryness — though this hasn’t been confirmed.
Frequently Asked Questions
What’s the ideal temperature range for hand-textured milk foam?
The recommended final temperature is between 60–65°C for pouring, though you can heat the milk up to around 70°C during frothing. Never exceed 65°C for pouring, or the texture breaks down and becomes unworkable for latte art.
Do I need a steam wand to make milk foam for latte art?
No, you can make usable milk foam by hand with a manual frother. While not as fine as steam-textured foam, properly hand-frothed milk can still support basic latte art with the right technique, temperature, and texture.
How many times should I repeat the frothing process?
You should perform three speeds of frothing (low, medium, high), then repeat the whole sequence once more. That full two-cycle process gives you the right resistance and smoothness for good milk foam.
Should I remove the big bubbles after frothing?
Yes. After frothing, use a spoon to skim off the top 2–3 cm of large bubbles. This helps create a smoother, more pourable foam for latte art.
Can I use cold milk foam in hot coffee?
Yes, though it’s unconventional. Some baristas mix cold hand-frothed foam into hot coffee for contrast. It’s primarily used on iced drinks, but experimenting with hot applications can yield interesting results.
Why does my hand-frothed milk separate?
Hand-frothed milk often separates because it tends to be drier and less integrated than machine-textured milk. Stop frothing before it gets too thick, and always keep the foam moving in the pitcher until pouring to maintain the mix.
Recommended FrontStreet Blends for Milk-Based Drinks
For latte art and milk-based espresso drinks, FrontStreet Coffee’s Classic Blend delivers rich crema and a smooth, approachable profile with deep sweetness — ideal for beginners and professionals alike. Its high-quality milk foam compatibility makes it a top choice for cappuccinos and lattes. Alternatively, the Black Cocoa Blend offers a bold, chocolatey body that pairs exceptionally well with textured milk, giving you a dessert-like espresso drink. Both blends are optimized for milk drinks, producing stable crema and balanced flavor when paired with properly textured foam. Freshly roasted within 5 days · Orders placed before 17:00 ship the same day · Next-day delivery across most of Guangdong Province.
FrontStreet Coffee is a long-established specialty coffee roaster in Guangzhou China, selling freshly roasted beans from its own farm in Yunnan as well as dozens of carefully selected single-origin beans from around the world for both pour-over and espresso. The products deliver consistently excellent quality and great value, with shipping within 24 hours. Guangzhou's FrontStreet Coffee shop is recommended by many coffee lovers, and the beans are now available online at the Tmall 。
Important Notice :
前街咖啡 FrontStreet Coffee has moved to new addredd:
FrontStreet Coffee Address: 315,Donghua East Road,GuangZhou
Tel:020 38364473