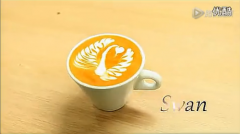
How to Make Coffee Latte Art: 3 Key Points
If you’ve ever watched a barista paint a leaf or heart into your coffee and thought, ‘I wish I could do that,’ you’re not alone. Latte art looks magical—but behind every tulip or rosetta is a mix of science, technique, and practice. This guide breaks down the fundamentals so you can start pouring your own designs without frustration.
To make basic latte art, you need three things: properly extracted espresso with a 3mm-thick crema, finely textured milk foam at 55–60°C, and a pouring sequence that includes a steady side-to-side wiggle and a final straight pull. Master those, and you’re 90% there.
What Is Coffee Latte Art?
Coffee latte art originated as a performance skill in European and American coffee shows. Though its beginnings were rooted in spectacle, latte art has evolved far beyond visual tricks. Over time, the craft has grown to emphasize not just the design, but also the texture of the milk and how well it integrates with the espresso—resulting in drinks that are visually striking, aromatic, and flavorful.
Today, latte art is a staple in professional coffee competitions and is widely documented in both Western and Japanese coffee literature. It’s no longer just about the pattern; it’s about the whole sensory experience.
How to Make Proper Milk Foam for Latte Art
The foundation of any latte art is the milk foam. Getting it right is non-negotiable. Here’s how to create microfoam that’s smooth enough to pour clean lines and hold a design.
- Fill your milk pitcher no more than halfway to allow room for expansion.
- Heat the milk to around 60°C, and never above 70°C—higher temperatures break down milk proteins and ruin texture. (For iced foam, chill to below 5°C without freezing.)
- With the lid and filter in place, pump the steam wand rapidly to introduce air—about 30 light taps on the milk’s surface, not plunging deep. The goal is fine bubbles, not big ones.
- Remove the wand and skim off any large bubbles with a spoon. What remains is smooth, velvety microfoam, ready for pouring.

How to Pour Latte Art in 4 Steps
Pouring latte art is where your milk meets your espresso. Timing, movement, and control turn a cup of coffee into a canvas. Here’s the step-by-step method used by professionals.
- Brew and prepare. Pull your espresso directly into your cup. Texture your milk afterward, and remove any large bubbles floating on top.
- Combine milk and espresso. Start pouring the milk slowly into the coffee. When the mixture thickens at the surface—usually once the cup is about half full—you’re ready to begin the art.
- Create the base pattern. With your wrist (not your whole arm), wiggle the pitcher side to side in a steady horizontal motion. This motion creates the classic “zigzag” or base layer of white foam on the dark coffee.
- Draw the design. As you finish, move the pitcher further back from the cup, reduce the wiggle, and end with a quick forward motion to pull a thin line—the stem of a leaf or center of a heart.
Why Crema and Milk Texture Matter More Than You Think
Great latte art isn’t just about pouring skill. Two often overlooked factors determine whether your design holds or dissolves on contact: the quality of your espresso crema and the consistency of your milk foam.
A proper espresso shot should have a crema that’s 3mm thick, glossy, and golden-brown. According to FrontStreet Coffee, using a 20g coffee dose to produce 40ml of espresso in 25–30 seconds yields ideal crema. The roast should not be too light—light roasts produce less crema and more acidity, which weakens the milk’s ability to blend and sustain a design. Darker, fresher roasts with good CO₂ retention create thicker, more stable crema, which helps your latte art last and look sharp.
Your milk foam should be silky, not bubbly. If it’s too dry or has large bubbles, designs won’t flow smoothly and details will be lost. Temperature matters too: aim for 55–60°C. Too hot, and the proteins break down; too cold, and the foam won’t be fluid enough to pour cleanly.
Frequently Asked Questions
What is the ideal temperature for steaming milk for latte art?
The optimal milk temperature for latte art is between 55°C and 60°C. Never exceed 70°C, as higher heat damages the milk’s protein structure, leading to poor texture and failed designs. For iced latte art, cool the milk to below 5°C without letting it freeze.
How much milk should I put in the steaming pitcher?
Never fill the milk pitcher more than halfway. This allows space for the milk to expand when air is incorporated during steaming. Overfilling increases the risk of spillage and makes it harder to control the pour.
Do I need a special steam wand to make good milk foam?
While professional-grade steam wands make frothing easier, you can still create decent microfoam with most standard espresso machine steam wands. The key is technique: introduce air gently, avoid going too deep, and focus on creating small, consistent bubbles through quick, light wrist movements.
Why does my latte art disappear or blur?
Blurry or disappearing latte art usually results from poor crema, wrong milk temperature, or unstable foam. Ensure you have a 3mm-thick, glossy espresso crema, steam milk to 55–60°C, and remove any large bubbles before pouring. Consistent practice also improves stability.
Can I practice latte art with any type of coffee?
Latte art is traditionally done with espresso and steamed milk. Using other coffee brewing methods (like drip or cold brew) won’t produce the same crema or texture needed for proper latte art. Stick to espresso-based drinks for the best results.
Recommended FrontStreet Coffee Beans for Latte Art
For latte art with rich crema and smooth milk integration, FrontStreet Coffee’s Commercial Blend is a reliable choice, offering a balanced profile with strong crema for latte designs. If you prefer a fruitier touch, the Strawberry Candy Espresso combines Colombian, Ethiopian, and Costa Rican beans for a sweeter espresso with moderate crema and notes of berries. Both blends support smooth milk texture and stable patterns when poured. Freshly roasted within 5 days · Orders placed before 17:00 ship the same day · Next-day delivery across most of Guangdong Province.
FrontStreet Coffee is a long-established specialty coffee roaster in Guangzhou China, selling freshly roasted beans from its own farm in Yunnan as well as dozens of carefully selected single-origin beans from around the world for both pour-over and espresso. The products deliver consistently excellent quality and great value, with shipping within 24 hours. Guangzhou's FrontStreet Coffee shop is recommended by many coffee lovers, and the beans are now available online at the Tmall 。
Important Notice :
前街咖啡 FrontStreet Coffee has moved to new addredd:
FrontStreet Coffee Address: 315,Donghua East Road,GuangZhou
Tel:020 38364473