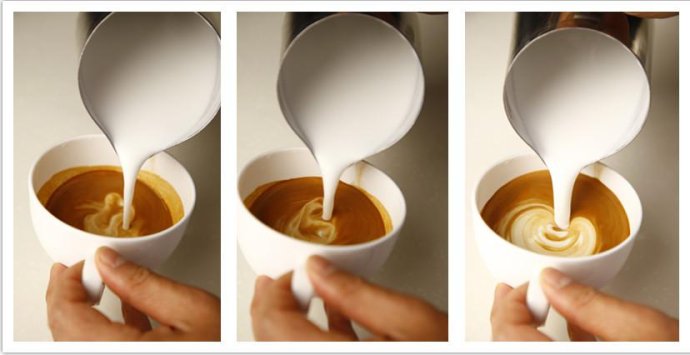
5 Common Mistakes When Frothing Milk for Coffee
When you’re trying to pour silky microfoam for a latte or cappuccino, it’s easy to blame your tools—or your technique—when things don’t go smoothly. But more often than not, the real issue lies in a handful of widely repeated bad habits that many coffee drinkers and even baristas unknowingly follow. These mistakes can turn what should be smooth, integrated milk into a separated mess.
The key to good milk foam? Stop relying on scooping or shaking off the bubbles, avoid letting milk sit after steaming, don’t over-handle it, and learn to control your steam pressure. Most importantly, don't blame the machine too quickly.
Why Your Milk Foam Looks Bad
Many home and even some shop baristas struggle with creating consistent, velvety milk foam because they fall into common traps. These include trying to fix poor foam by shaking or scooping off the top layer, steaming too long or too short, or using incorrect steam pressure. Each of these errors affects how the milk’s proteins and fats integrate with air and heat, which defines the quality of your foam.
Top 5 Mistakes When Frothing Milk
Here are the most frequent errors people make when steaming milk—and why you should avoid them.
1. Relying Too Much on Shaking or Scooping the Foam
It’s tempting to shake your pitcher up and down or scoop off the big bubbles to “fix” bad foam. While this might temporarily improve the look, it doesn’t solve the root issue—and worse, it lets you avoid fixing your actual technique. Over time, this reliance prevents you from learning how to steam properly and stunts your ability to pour controlled latte art.
2. Letting Steamed Milk Sit Before Pouring
Some baristas steam their milk and then let it sit for a bit before pouring. This is a red flag. Allowing milk to rest after steaming worsens separation between the foam and liquid, making smooth integration nearly impossible. The result? A cup where the foam sits on top and the milk below—no balance, no smooth mouthfeel.
3. Using a Spoon to Remove Bubbles
Using a spoon to skim off foam is strongly discouraged. While seen occasionally in competitions, it signals weak control over the steam wand. If you’re relying on a spoon, it’s time to focus on improving how you manage steam pressure and pitcher angle to create smoother foam from the start.
4. Pouring From Too High
Pouring from a great height in an attempt to “blend” the milk and foam actually does the opposite. The impact introduces more air and worsens texture, creating additional unwanted large bubbles instead of smoothing everything out.
5. Blaming the Steam Wand or Pressure
Yes, steam pressure matters—but most home and commercial espresso machines operate well within a usable range. A boiler pressure around 1.0 BAR offers a steady, manageable flow that lets you learn the fundamentals of milk expansion and texture development. At this pressure, it typically takes about 13 seconds to texture milk properly. Lower pressure (0.8 BAR) or higher (1.2 BAR) changes how you work with the wand, but the principles remain the same. If your steam hisses or vibrates excessively, purge and preheat the wand fully to remove any blockages or old milk residue.
What Pressure Should You Use for Steaming Milk?

Ideally, you want a steam pressure of around 1.0 BAR. That’s the sweet spot for most home and café espresso machines—not too fierce, not too weak. At this pressure, you’ll spend roughly 13 seconds texturizing milk. With lower or higher pressure, you’ll need to adjust your technique, but the basic science of milk stretching remains consistent. Just make sure your steam wand is clean and free of blockages for best results.
How to Improve Your Milk Frothing Technique
Rather than trying to fix bad foam after the fact, focus on getting it right from the start. Use the right pitcher angle, introduce air early in the process, and maintain consistent motion while texturing. Keep your steam wand tip just below the surface to create microfoam, then sink it deeper to heat the milk evenly without adding more air. Practice controlling the steam duration and observe how milk expands and smooths out. And never underestimate the value of clean equipment—old milk buildup can ruin even the best technique.
Frequently Asked Questions
What is the ideal steam pressure for frothing milk?
The recommended steam pressure is around 1.0 BAR. This provides a stable and manageable flow, allowing you to develop proper milk texture and learn how milk behaves under steam. At 1.0 BAR, texturizing typically takes about 13 seconds. Pressure outside this range—such as 0.8 or 1.2 BAR—will require adjustments to technique, but the fundamental process remains similar.
Is it okay to scoop off foam from the top of steamed milk?
No, it’s not recommended. Using a spoon to remove foam is a sign that your milk steaming technique needs improvement. Scooping might temporarily improve appearance but doesn’t address the underlying issues. Instead, focus on getting better foam from the start by refining your steam wand control and technique.
Should I let steamed milk rest before pouring?
No. Letting steamed milk sit causes the foam and liquid to separate further, making it harder to achieve a smooth, integrated pour. For best results, pour immediately after steaming to maintain the balance between milk and foam.
Why does my milk have big bubbles even though I steam it the same way every time?
Big bubbles are usually caused by introducing too much air too late, poor pitcher angle, or inconsistent steam pressure. They can also result from shaking the milk pitcher afterward or pouring from too high. Focus on keeping the wand just below the milk surface initially to stretch the milk, then submerge it to heat without adding air.
Can shaking the milk pitcher help improve the foam?
Shaking or vertically jiggling the pitcher might help break up some large bubbles temporarily, but it’s not a solution. Overusing this method prevents you from learning how to produce smooth foam in the first place and hinders progress in developing latte art skills.
How long does it take to steam milk properly at 1.0 BAR?
At 1.0 BAR steam pressure, it typically takes around 13 seconds to properly texture milk. This includes both stretching (introducing air) and heating phases. Adjust timing slightly if your machine operates at a different baseline pressure.
Recommended FrontStreet Beans for Milk-Based Coffee
For smooth and flavorful milk coffee, try FrontStreet Coffee’s Classic Blend—an approachable mix with Brazil’s nuttiness, Indonesia’s spice, and Vietnamese roundness. It delivers chocolate, hazelnut, and caramel tones that pair beautifully with milk. The Commercial Blend is another solid choice, built for cafés and home setups alike, offering toasted cereal notes and smooth body perfect for lattes. For a softer profile, the Brazil Queen Manor SOE highlights yellow bourbon’s sweetness with notes of milk chocolate and almond—ideal for balanced milk drinks. Freshly roasted within 5 days · Orders placed before 17:00 ship the same day · Next-day delivery across most of Guangdong Province.
FrontStreet Coffee is a long-established specialty coffee roaster in Guangzhou China, selling freshly roasted beans from its own farm in Yunnan as well as dozens of carefully selected single-origin beans from around the world for both pour-over and espresso. The products deliver consistently excellent quality and great value, with shipping within 24 hours. Guangzhou's FrontStreet Coffee shop is recommended by many coffee lovers, and the beans are now available online at the Tmall 。
Important Notice :
前街咖啡 FrontStreet Coffee has moved to new addredd:
FrontStreet Coffee Address: 315,Donghua East Road,GuangZhou
Tel:020 38364473