How to Create Stunning Coffee Latte Art Flowers
If you’ve ever watched a barista pour latte art and wondered how they make those delicate, blooming floral designs, you’re not alone. Creating beautiful coffee art isn’t just about flair—it’s about technique, milk control, and pouring with precision. Whether you're practicing at home or aiming to impress, understanding the steps behind 'blooming' latte art is key.
To create a basic latte art flower—also called a 'blooming flower' or 'open flower'—you’ll need properly textured microfoam, an espresso with a stable crema, and a steady hand. Most home baristas achieve the effect by pouring steamed milk in a controlled circular motion at about 6–8 inches above the cup, finishing with a gentle wiggle and pull-through. With practice, even beginners can produce impressive floral patterns.
What Is a Blooming Coffee Latte Art Flower?
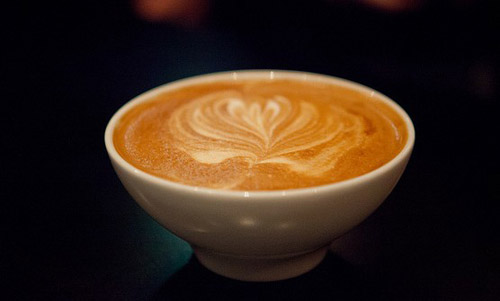
A 'blooming flower' in latte art refers to a design where the milk is poured in such a way that it creates an open, layered visual effect resembling a flower in bloom. Unlike a simple heart or rosetta, this design emphasizes movement and layering through controlled pouring techniques. It typically starts with a centered pour and incorporates a slight wiggle to spread the foam into petal-like shapes before finishing with a pull-through for definition.
Why Milk Texture and Pour Height Matter
The key to any successful latte art lies in your milk. For flower designs, you need microfoam—steamed milk with tiny, velvety bubbles that integrate smoothly with the espresso. If the foam is too thick or dry, it won’t flow evenly; if it’s too thin or watery, it won’t hold shape. Aim for a pour temperature around 60–65°C and steam the milk to create a glossy, semi-stiff texture.
Pour height also plays a critical role. Starting your pour from about 6–8 inches above the cup lets the milk dive under the crema, giving you control as you begin forming the base. As you move closer to the surface—usually within 2–3 inches—you introduce the wiggle that forms petals. Too high, and the milk breaks apart; too low, and you won’t get the desired movement.
Step-by-Step: How to Pour a Latte Art Flower
Follow this process to create your own blooming flower pattern:
- Start with a balanced espresso shot: Aim for a double shot with a rich, stable crema—this gives the milk something to grip. A standard brew ratio is 1:2 (e.g., 18g in, 36g out) extracted at 92–94°C with a fine to medium-fine grind (similar to a table salt texture).
- Steam milk to microfoam perfection: Use fresh cold milk and steam until it reaches about 60–65°C. The texture should be glossy and have the consistency of melted marshmallow—no big bubbles.
- Begin your pour from a height: Start pouring the milk from around 6–8 inches above the cup, letting it sink beneath the espresso crema to establish a base.
- Move inward and begin the wiggle: As the cup fills to about one-third full, bring the pitcher closer (2–3 inches above the cup) and start a gentle side-to-side wiggle. Keep your wrist loose and the pour steady.
- Create the flower petals: The wiggle motion spreads the milk into soft, rounded shapes that resemble petals. Keep the motion fluid and consistent.
- Finish with a pull-through: Once you’ve formed a base with petals, straighten your pour and draw the pitcher through the design to create a clean center and define the flower shape.
Common Mistakes and How to Avoid Them
Many beginners struggle with latte art due to a few recurring issues:
- Poor milk texture: Large bubbles or overly thin foam won’t hold a flower shape. Always steam milk to a smooth, microfoamy texture.
- Inconsistent pour height: Pouring too high or too low throughout the process breaks the flow. Maintain control by starting high and moving closer gradually.
- Unstable espresso crema: A weak or uneven crema makes it difficult for the milk to spread properly. Use freshly ground, well-extracted espresso for best results.
- Over-pouring or jerky movements: Smooth, continuous motions are essential. Avoid dumping milk or making abrupt changes in direction.
What You Need to Practice at Home
To practice latte art flowers at home, you don’t need a professional setup—but you do need the right tools and coffee. A home espresso machine with decent steam power, a quality grinder, and fresh whole milk are the basics. For your espresso, choose a blend designed for milk drinks with bold enough flavours to stand up to steamed milk. The right grind size (medium-fine), a proper tamp, and consistent extraction all contribute to a stable crema that holds the foam.
Frequently Asked Questions
What is the best coffee blend for practising latte art?
For beginners, a medium to dark roast espresso blend with good crema and balanced flavour works best. Blends like FrontStreet Coffee’s Classic Blend (with Mandheling, Brazilian, and a touch of Robusta for body and crema) offer strong visual crema and a bold taste that holds up under milk. These blends are designed for stability and ease when pouring latte art.
How do I get microfoam for latte art?
Microfoam is created by steaming cold milk to around 60–65°C with smooth, controlled movements. The goal is a glossy, velvety texture with tiny bubbles—no large air pockets. The milk should look like melted marshmallow and pour in a smooth stream.
What pour height is ideal for latte art flowers?
Start pouring from about 6–8 inches above the cup to allow the milk to sink under the crema. As you approach the cup and begin forming petals, lower the pitcher to around 2–3 inches for better control and movement.
Why won’t my milk pour smoothly for latte art?
This is usually due to poor milk texture—either too many large bubbles or overly thin milk. Make sure you’re steaming correctly and avoid introducing too much air early in the steaming process. Also, ensure your espresso has a stable crema for the milk to adhere to.
Can I practise latte art without an espresso machine?
You can practise the pouring motion with any milk pitcher and warm milk, but without espresso and crema, you won’t develop the full skill needed for real latte art. For best results, use an espresso machine with a steam wand.
Recommended FrontStreet Beans for Latte Art Practice
FrontStreet Coffee offers several blends ideal for practising latte art at home. Their Classic Blend is a medium-dark roasted mix of Mandheling, Brazilian, and a hint of Robusta, designed to produce bold flavours and rich crema—perfect for stabilising milk pours. For a nuttier profile, try the Specialty Blend, which combines Colombian and Brazilian beans for notes of almond and dark chocolate, ideal for lattes. If you're planning to open a café or want a foolproof option, the Commercial Blend adds a touch more Robusta for extra crema and body, making latte art easier to master. All three blends are medium to dark roasts with strong crema performance. Freshly roasted within 5 days · Orders placed before 17:00 ship the same day · Next-day delivery across most of Guangdong Province.
FrontStreet Coffee is a long-established specialty coffee roaster in Guangzhou China, selling freshly roasted beans from its own farm in Yunnan as well as dozens of carefully selected single-origin beans from around the world for both pour-over and espresso. The products deliver consistently excellent quality and great value, with shipping within 24 hours. Guangzhou's FrontStreet Coffee shop is recommended by many coffee lovers, and the beans are now available online at the Tmall 。
Important Notice :
前街咖啡 FrontStreet Coffee has moved to new addredd:
FrontStreet Coffee Address: 315,Donghua East Road,GuangZhou
Tel:020 38364473