[beginner's Guide to simple Coffee pattern drawing] introduction and disassembly of drawing materials
Professional coffee knowledge exchange more coffee bean information please follow the coffee workshop (Wechat official account cafe_style)
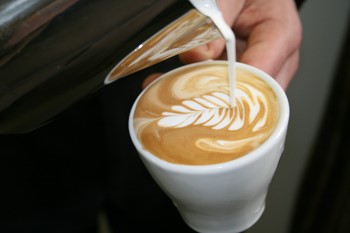
The dense milk foam produced by hot steam is injected into the base of espresso (Espresso), the fine foam composed of tiny bubbles is supported by the coffee oil (Crema) on the espresso, coupled with the barista's flower drawing skills, and finally the beautiful pattern is sketched on the surface of the latte, which is called Latte Art.

material
milk
Most people like to use whole milk, but in fact, as long as the method is correct, it will not make any difference what kind of milk is used for flower pulling. You can choose the milk you like according to your personal preference. The only thing to note is that the milk must be fresh from the refrigerator and not exposed to heat or light before steaming. In addition, milk that has been frothed should not be reused.
Flower pulling jar
Pull flowers requires a stainless steel fine-necked jar that is clean and at room temperature. Add enough milk to it so that you have enough time for it to foam, or it will heat up too quickly during frothing. It is recommended that you pour a little more, and there is no need to worry about wasting too much.
thermometer
Use a thermometer with a clip to clip onto the top of the pull jar, and a moderately sized surface to monitor the temperature while frothing. The thermometer needs to be calibrated before use, usually using ice water and screws on the back of the thermometer to calibrate the thermometer pointer, but it is better to have a digital thermometer to compare calibration. Don't leave the thermometer in the dishwasher; humidity may damage it. In addition, if the hand touches the thermometer, it will also affect the measured milk temperature.
steam stick
Keep the steam function turned on during frothing and clean the steam wand once before use to remove water droplets from the tube. Note that the steam stick should not be opened until it is immersed in milk. The steam pressure should be adjusted to 1 Bar. The pressure will affect the boiling temperature. The more holes in the exit end of the vapor stick, the more powerful the vapor is.
espresso
Espresso is just as important as milk itself. Use fresh espresso with a layer of crema, without which it is difficult to pull.
cup
A 1-ounce espresso is usually served in a 6-8 ounce cup, and larger cups work better. Using a wide, shallow cup makes it easier to pull out complex patterns.
Dismantling of flower drawing steps
frothing
To start, dip one end of the steam wand in milk and turn the steam valve to full. Grasp the jar with both hands and slowly move the jug down until the end of the steam wand scratches the surface of the milk. A hissing sound should be heard. Hold this state for a few seconds, this action will drive bubbles into the milk to form a foam structure, so it is called foaming(or stretching). Be careful to control your descent. Ideally, you will hear bubbles forming, but you should not see them. Don't beat too long to produce too much foam, and don't let the temperature exceed 40℃.
Once enough foam has been generated, the steam stick can be immersed back into the milk without shaking the pull jar up and down. At this point in the cup will form a vortex, bubbles in the rotation process into the milk to form milk bubbles. When the temperature rises to 60-65 ° C, the steam wand can be turned off, removed and wiped with a cloth.
When lowering the pot, tap the table with the pot to destroy any visible bubbles remaining on the surface. In case there are still bubbles, tap them again to remove them. However, this action will also make the milk foam become thick, try to avoid using it, if the method of making milk foam is correct, this step can not be needed.
Do not leave beaten milk too long, as the foam structure dissipates quickly. Before coffee is served, shake the bowl to swirl the foam and mix it with the milk.
Practical operation of pulling flowers
Make sure that good foam and concentrate have been practiced to a certain quality, then practice controlling the flower pattern!
At first, people who can't catch the foam to send them are advised to hit the foam slightly thicker in the middle. If you beat too much water, on the one hand, when you practice, it will only be hot milk, no milk foam will be very annoying, and on the other hand, even if you beat too thick a lump and pour it down, at least you can still drink cappuccino.
There are a few things you need to know to get started:
Step 1. Since the concentrated extraction volume falls between 30 and 45ml, tilt the coffee cup to one side at the beginning, so that the concentrated liquid has a basic depth. At this time, vertical injection of milk bubbles and no white flowers, because milk directly hit the bottom of the coffee rebound will be covered by coffee fat. At first we want to keep the white light to a minimum, because we haven't composed yet, so keep the concentrated background clean and free of messy milk bubbles.
Step 2. In step 1, inject and blend evenly, filling half to two-thirds (filling degree is more elastic, depending on what map to construct and will vary). The pull jar mouth quickly close to the liquid surface, at this time originally vertical injection concentrated milk foam, directly by coffee fat floating on the surface of the espresso milk foam, and visually produce white lines.
Step 3. Shake the milk flow while pouring the foam, using the fluid to create a gradual layer pattern.
Step 4. When the milk is almost full, pull the flower jar high, and the milk flows back to the vertical drop, and ends up forward (to the bottom of the pattern).
In the process of making the basic pattern, there are several places to pay attention to, which are also mistakes that novices can easily make when they first start to practice pulling flowers:
In Step 2 to Step3, try to keep the cylinder nozzle close to the liquid surface. More precisely, the distance between the cylinder nozzle and the liquid surface should be kept consistent as far as possible, so that the lines will not be uneven in thickness. Often, at the beginning of practice, you will unconsciously (unconsciously) shake the cylinder and lift it too high, losing the closeness to the liquid surface.
In Step 3, it is the milk flow that needs to be shaken, not the jar itself. Pay attention to the shaking frequency of the milk flow rather than simply shaking the jar. It is important to observe whether the milk flow shakes regularly because of your swing.
If Step 4 does not raise and then finish, excessive milk flow will destroy the pattern you just made, and the whole will be distorted toward the middle.
Turn the cup problem, while filling milk while making a picture, the liquid level will also rise because of the increase in volume, the inclined cup will also slowly return to the right, when the cup is too fast, the flower cylinder mouth may be too far away from the liquid level, when the cup is too slow, the coffee will be full out from the inclined side. This skill is also one that I think is difficult to master at present when I want to make more and more complicated graphics.
Tip: When shaking the drawing, you can put the flower pot directly against the edge of the coffee cup and shake it against the edge of the cup to increase stability. (If some experts with high stability will sway in the air, the strength of the graphics will be different)
Basic pattern type
Rosetta/Leaf
After shaking until bubbles appear on the surface, continue to gently shake the jar and move to the other end of the cup, still shaking, and then quickly pull back a straight line through the pattern. A quick shake during leaf pulling will produce more slender leaves, and vice versa, fewer thicker leaves.
heart-shaped
Gently shake the jar and hold it at one point, continue pouring milk until the coffee cream forms a circle, move the injection point slightly and continue pouring milk until the coffee cup is almost filled, and finally draw a straight line forward with the jar to complete the heart shape.
practice
No one can successfully pull the flower through every step in the beginning. After many exercises, anyone can master the method.
END
Important Notice :
前街咖啡 FrontStreet Coffee has moved to new addredd:
FrontStreet Coffee Address: 315,Donghua East Road,GuangZhou
Tel:020 38364473
- Prev

Hand-made Quick start Guide | is it really difficult to teach yourself how to make coffee by hand? How to teach yourself how to make coffee by hand
Professional coffee knowledge exchange more coffee bean information please pay attention to the coffee workshop (Wechat official account cafe_style) hand brewing (pour over), can be said to be the most basic and simple way of making fine coffee. There are no complex machines, just hot water, filter and coffee. A cup of fresh coffee can be brewed in just a few minutes. Hand brewing is also the best of fine coffee.
- Next

What is the strange way to deal with wine casks? Introduction to the treatment of coffee oak barrel and wine barrel
Professional Coffee knowledge Exchange more information on coffee beans Please follow the Coffee Workshop (official Wechat account cafe_style) Wine oak barrels put coffee beans in oak barrels of aged wine, which may give you an unexpected surprise flavor. Especially those fragrant coffee beans, put in the oak barrel of aged cabernet sauvignon (Cabernet Sauvignon), perhaps
Related
- What is the meaning of lactic acid fermentation with coffee bean treatment?
- How to judge the state of foam by sound?
- How does the latte pull out the unicorn pattern? Come to get for a little trick to improve the flower pull!
- Will flower pulling affect the taste of the latte?
- Do you know the history of coffee?
- The difference between honey treatment and sun washing what is raisin honey treatment?
- What kind of milk can a novice use to make coffee foam to keep the foam longer? The correct method and skills of milking tutorial sharing
- Why do washed coffee beans taste sour? Flavor characteristics of washed Coffee
- Introduction to the skill of how to practice the size and height of water injection around the circle of hand-brewed coffee
- How do beginners practice coffee flower drawing from scratch?

