The basic course of Coffee drawing: cups and cups

Tall cup
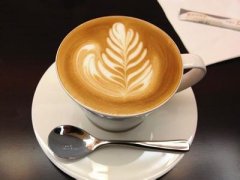
The tall cup is a perfect match with the thick foam. Use a tall cup to give you enough time to merge. Full fusion can not only make the coffee taste better, but also strengthen the shape when pulling flowers, resulting in a clear drawing of eucalyptus. But the prerequisite is that there is enough milk foam, some people will only pour hot milk into the cup before forming and keep the milk foam until the end for flower drawing, this is incorrect, Crema is washed away, and milk foam and coffee can not be mixed, not delicious ah.

Short square bottom cup
The square bottom of the cup, the bottom area will be larger, which will form two phenomena.
Crema is relatively thin.
It is easy to cause turbulence when pouring into the foam.
So it is common to tilt the cup and gradually lay it flat after laying the foam (there is another function of tilting the cup, pay attention to the following chapters, you will find it carefully)

Short round bottom cup
This is a kind that can be easily mastered. Eucalyptus urophylla is easy to appear, but because the cup body is shorter, the drawing time is shorter than the tall cup.
Tips
1. Beginners suggest that you first choose short, round-bottomed and large-caliber coffee cups to practice flower drawing, and then try other kinds of cups to feel the difference.
2. The material of the cup is also very important. It is necessary to choose some good heat preservation, which is also of great function to the preservation of Crema and the insulation of finished products.
3. Can't you find a short, round bottom and large caliber coffee cup to practice? Go to the kitchen and have a look. Are these adjectives appropriate for your rice bowl? But it should be noted that the general rice bowl is not very good heat preservation, as a practice tool.
Important Notice :
前街咖啡 FrontStreet Coffee has moved to new addredd:
FrontStreet Coffee Address: 315,Donghua East Road,GuangZhou
Tel:020 38364473
- Prev

Selection, purchase and grip of milk pot in the basic course of coffee flower drawing
There are many kinds of milk pots on the market, you can refer to the following points when choosing and buying ─. The common ones are 300ml, 350ml, 600ml, no matter how big they are, but they are generally not needed. The shape of the pot body ─ is generally a little wider at the bottom than at the top, but there are some wide and narrow in the middle, which is not conducive to milking, so it is recommended to be used as decoration. Spout groove ─ is divided into long groove type and
- Next

Six steps of coffee tasting General knowledge of fine coffee
Coffee tasting has six steps to describe the aroma, aroma, taste, smell, aftertaste and mellowness of coffee. 1. Fragrance: the first step in tasting is to evaluate the aroma of coffee beans. Grind 8.25 grams of coffee, put it in 3-5 sample cups, and then breathe hard at the gas released by the freshly crushed coffee cells. The characteristics of the aroma indicate the taste of coffee beans.
Related
- What is the meaning of lactic acid fermentation with coffee bean treatment?
- How to judge the state of foam by sound?
- How does the latte pull out the unicorn pattern? Come to get for a little trick to improve the flower pull!
- Will flower pulling affect the taste of the latte?
- Do you know the history of coffee?
- The difference between honey treatment and sun washing what is raisin honey treatment?
- What kind of milk can a novice use to make coffee foam to keep the foam longer? The correct method and skills of milking tutorial sharing
- Why do washed coffee beans taste sour? Flavor characteristics of washed Coffee
- Introduction to the skill of how to practice the size and height of water injection around the circle of hand-brewed coffee
- How do beginners practice coffee flower drawing from scratch?

