3D printing of a simple iced coffee maker in cool summer
For many coffee lovers, a cup of cold iced coffee must have a different flavor on a hot summer day. Recently, JonathanOdom, a designer from San Francisco, has developed a set of designs with the help of 3D printing, so that you can enjoy a wonderful cup of iced coffee at home at low cost. Even better, he shared his design.
In real life, Jonathan is a designer at Instructables Design Studio-what he calls the best job. As a result, he often develops some cool and interesting (and sometimes even complex) projects, but this iced coffee maker should be quite easy to build. As he explained on the Instructables page, it essentially requires only some 3D prints, plus ready-made laboratory glassware and some maple poles. Sounds simple, doesn't it?
Generally speaking, there are several ways to make iced coffee, but this machine is based on the cold bubble method. "using this method, you only need to soak a small amount of coffee grind in cold water and then drop the brewed coffee liquid at a rate of 3 seconds." Jonathan explained that this is actually a way to improve the taste. "my experience is that boiled water releases caffeine and acidity significantly faster than cold water. Soaking ground coffee in cold water and slowly releasing it helps to significantly reduce its sour taste (you can taste this), and what I hear is because it has been soaked for so long (2-6 hours). The amount of caffeine in it is roughly the same as that of hot coffee. "

In any case, Jonathan was very satisfied with the iced coffee and shared his design on Instructables. STL files for all 3D printable parts can be downloaded here for free (please click to download). But you may also need to buy some parts, after all, glassware in the lab is not available in everyone's home.
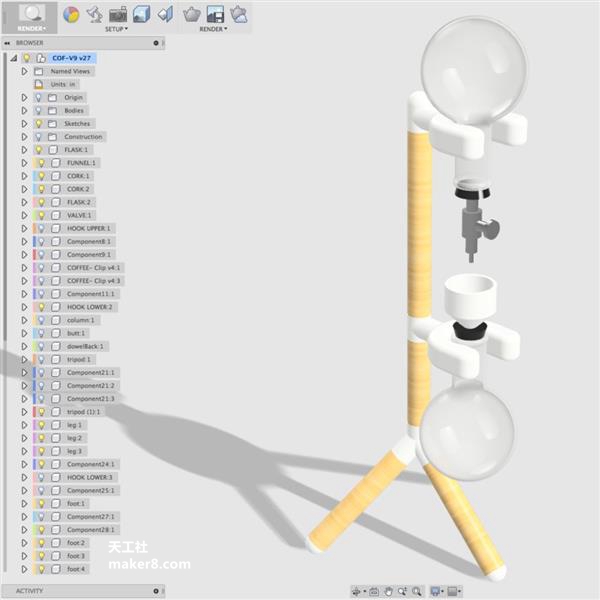
The design software used by Jonathan is Fusion360, and all the parts are easy to print out in 3D, which can be done by an ordinary 3D printer. The whole process is very simple, although Jonathan also used sandblasting to polish its surface, but this is not necessary, he also sprayed acrylic resin on it, which is also a personal preference.
Assembling itself is fairly simple, especially if you follow Jonathan's tutorials. Please note that the key to the whole process is to create a siphon to ensure a stable drop, which Jonathan is achieved by inserting the brass tube into the stop next to the valve. All other parts can be easily assembled, and some 3D printed parts need to be bonded with epoxy resin.
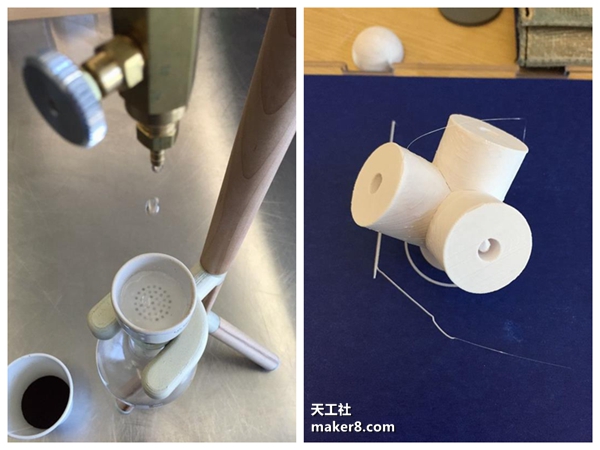
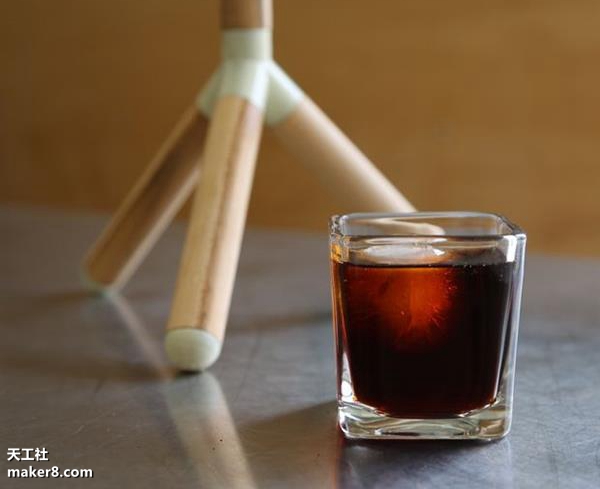
After the manufacturing is completed, we will enter the most important step: brewing! In fact, the use of this device is quite simple. Fill the upper flask with ice, mouth down, slowly dripping ice water. The funnel itself is covered with filter paper and filled with coffee powder (not too full). "slowly soak the coffee powder in cold water. Slow is the key, because you don't want it to overflow. Cover another piece of filter paper over the minced coffee. The function of this filter paper is to ensure that the water will enter the coffee powder in a uniform way. without it, the water droplets will slowly make a hole in the middle of the coffee, so that the taste of the coffee will be very light. " Jonathan suggested.
In this way, it takes about four hours to brew two cups of coffee (depending on the taste and the rate of caffeine release). It sounds like a long time, but it's a very much-anticipated ceremony for a real coffee lover.
FrontStreet Coffee is a long-established specialty coffee roaster in Guangzhou China, selling freshly roasted beans from its own farm in Yunnan as well as dozens of carefully selected single-origin beans from around the world for both pour-over and espresso. The products deliver consistently excellent quality and great value, with shipping within 24 hours. Guangzhou’s FrontStreet Coffee shop is recommended by many coffee lovers, and the beans are now available online at the Tmall 。
Important Notice :
前街咖啡 FrontStreet Coffee has moved to new addredd:
FrontStreet Coffee Address: 315,Donghua East Road,GuangZhou
Tel:020 38364473

- Prev
5 things you didn't know about Starbucks coffee
In 1971, Starbucks was just a coffee shop where people bought caffeine to solve their drowsiness problems. Frappuccino didn't exist until 24 years later. Obviously, Starbucks has changed a lot in the past 40 years. Let's take a look back at Starbucks 'ocean-themed history. Nowadays you can find four on every corner, but back in 1971,
- Next
Foshan Coffee Bar signed contracts with 11 incubators on its first day of operation.
C .C. The opening of the coffee bar attracts many entrepreneurs and investors to communicate with each other. Reporter Zhang Mingshu of Nandu photographed Nandu reporter Zeng Qunshan yesterday, known as the first C.C. In Foshan. The start-up Coffee Bar was unveiled and opened. On the same day, six entrepreneurship-related platforms were certified and listed, and a number of well-known enterprises and institutions crowdfunded in Zhangcha New Media Industry Park set up C. C. Coffee bar and sign with 11 incubators
Related
- Russian specialty drink Raf coffee Historical sources Introduction Vanilla flavor cream latte practice
- Comparison of instant coffee/freeze-dried coffee/capsule coffee/ear bag/cold extract espresso liquor and freshly ground coffee
- How to make a creative coffee plum cream latte? What ingredients are needed? How many kinds of plum flavor special coffee are introduced?
- How to make ice drops and cold extracts in coffee shops? How many hours does it take to make ice drops? Why can't I drink freshly made cold extract directly?
- What is the reason for water accumulation in the perforation of the espresso perfect powder? How to solve the problem of agglomerating espresso powder
- What parameters do you use to manually brew Blue Mountain coffee beans in lightly roasted rose summer? How long should you keep fresh coffee beans? How many days are the best period to enjoy the flavor?
- Why does drinking coffee have aftertaste? The difference between Hui Gan and Yu Yun What is aftertaste
- Can coffee beans be kept fresh for a long time in the refrigerator? How long can it be frozen? Should I defrost the frozen coffee beans?
- Does hanging coffee with milk count as a latte? Is it good to add milk powder to ear bags? Can I use milk to make hanging ears?
- Bubble ice American cola Sprite coffee practice steps How good is orange juice American? There are several combinations of soda water and coffee