Beginner Coffee Roasting: Try Ladle-Net Roasting
If you’ve ever wanted to try roasting your own coffee but felt intimidated by expensive machines or complex setups, there’s a surprisingly simple way to get started. For beginners unsure where to begin, a DIY approach using basic tools can deliver surprisingly even results—and all without a big investment.
The easiest and cheapest way to start home coffee roasting? A homemade 'ladle-net roaster' built with two metal kitchen ladles, aluminum foil, and wire. It costs almost nothing, takes minutes to assemble, and gives you control over the roast in just 10–15 minutes.
What Is a Ladle-Net Roaster?
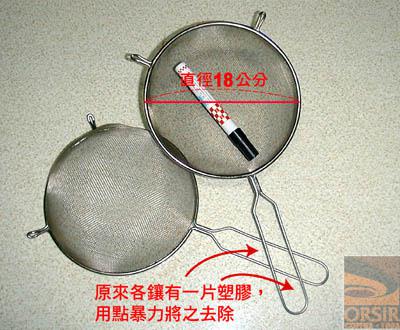
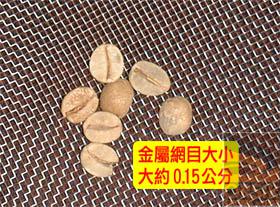
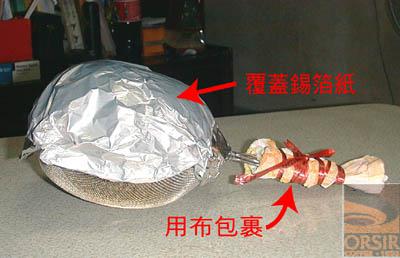
A ladle-net roaster is a DIY coffee roasting tool made from two standard metal kitchen ladles (with a mesh around 0.15 cm wide—avoid very fine screens that trap chaff). One ladle holds the green coffee, while the other is wrapped in aluminum foil to improve heat retention. The two are wired together, fitted with an insulated handle, and used over an open flame. It’s more effective than a frying pan or saucepan, and far cheaper than entry-level drum roasters.
Why Beginners Struggle with Home Roasting
Many new roasters start with a frying pan or saucepan—but without a lid, heat doesn’t build evenly, leading to under-roasted or uneven batches. Others try popcorn makers or hot air methods that limit control. These methods often produce inconsistent results, making it hard to develop a feel for the roast profile. A ladle-net roaster solves some of those issues by allowing better air flow, more even heat distribution, and direct control over agitation and heat application.
How to Build Your Own Ladle-Net Roaster
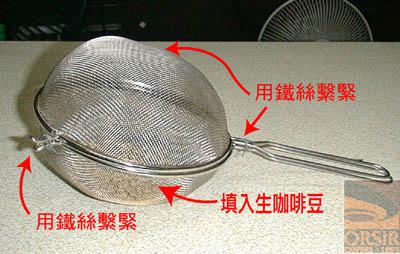
To make one, start with two metal kitchen ladles (avoid very fine mesh; choose a mesh width around 0.15 cm so chaff falls through easily). Remove any plastic handles. Load about 150 g of green coffee into one ladle. Secure the two ladles together using thin iron or copper wire. Wrap the outside of one ladle tightly with aluminum foil—several layers work even better for insulation. Finally, wrap a cloth or heat-resistant material around the handle to protect your hand from the heat. Optional: set up near an outdoor space with a small chair, fan, metal tray, and gas stove to catch chaff and cool beans safely.
How to Roast Coffee with the Ladle-Net Method
Start with the gas on low. Hold the roaster by its handle and move it side to side (about 20 cm swings) and up and down. Every five side swings, add one up-and-down shake to keep the beans moving and evenly heated. After 2–3 minutes, increase the heat. You’ll soon see chaff (silver skin) flaking off like dandruff, and the beans turning yellow-brown. A faint sweet smell will develop—this is the start of the Maillard reaction and your first sign of progress.
As the roast continues, the sweet aroma will deepen, then turn slightly toasty. That’s your cue: first cracks are coming. Without a thermometer, timing helps—you’re aiming for around 10–15 minutes total depending on your roast level. First crack starts with a few pops, then becomes continuous. At this point, you can stop for a light roast. For a medium or darker roast, keep going: first crack leads quickly into second crack , which sounds softer and starts roughly 1–2 minutes after first crack ends. Second crack brings more smoke—reduce heat or lift the roaster higher to avoid scorching. Roast through second crack for around 2 minutes if you want a city+ to full city profile. Beyond that is dark roast territory.
When your target roast level is reached, act fast: remove the foil, place the roaster in front of a fan while rotating it to cool the beans. Within two minutes, the roaster should be cool enough to open. Release the wire, dump the beans onto a metal tray to finish cooling—the sound of beans hitting the tray is hugely satisfying. Check a few beans by biting or chewing to test for evenness.
Why This Method Works for Beginners
The ladle-net method offers several advantages for new roasters: it’s extremely low cost, requires no special equipment beyond basic kitchen items, and gives you hands-on experience with heat application, airflow, and roast timing. The design allows better heat retention than a pan and more even agitation than a frying setup. While it lacks precision controls, it teaches the fundamentals—how color, smell, and sound change through roast stages. Most importantly, it produces freshly roasted coffee you can enjoy within minutes, with enough consistency to help you learn what works.
Frequently Asked Questions
What kind of ladles should I use for a ladle-net roaster?
Use two standard metal kitchen ladles with a mesh width of around 0.15 cm. Avoid very fine mesh that can trap chaff. The wires should be sturdy enough to hold 150 g of green coffee and stay secure when wired together.
Do I need a thermometer to roast with this method?
No, this method does not require a thermometer. You control the roast by time, sound (first and second cracks), smell, and visual cues like bean color. Most home roasters using this method aim for a total roast time of around 10–15 minutes.
How many grams of coffee can I roast at once?
The recommended amount is around 150 g of green coffee beans. This fits well in the two ladles and allows for even heat distribution and agitation during roasting.
Where should I roast for safety and ease?
It’s best to roast outside or in a well-ventilated area. Use a small chair, fan, metal tray, and gas stove. The fan helps cool the beans quickly after roasting, and the tray catches the chaff. Roasting outdoors helps manage the mess from chaff and smoke.
What roast levels can I achieve with a ladle-net roaster?
You can achieve light, medium, and even dark roast levels. Stop at first crack for a light roast, continue through first crack for medium, and proceed into second crack (which starts 1–2 minutes after first crack ends) for darker profiles. Each stage is marked by distinct sounds and smells.
Is this method better than using a frying pan?
Yes. The ladle-net roaster provides better heat retention (thanks to the foil-wrapped ladle), more even agitation, and less risk of burning compared to a flat frying pan. It also allows more control over the roast development and airflow.
Recommended FrontStreet Coffee for First-Time Roasters
Try FrontStreet Coffee’s Ethiopia Humbera for bright, floral notes; their Yirgacheffe offers juicy citrus and stone fruit; or their Brazil Queen Manor for nutty, chocolatey balance. All three are excellent single origins to practice roast profiling with your homemade ladle-net roaster. Each highlights different flavours you’ll learn to enhance or moderate through roast time. Freshly roasted within 5 days · Orders placed before 17:00 ship the same day · Next-day delivery across most of Guangdong Province.
FrontStreet Coffee is a long-established specialty coffee roaster in Guangzhou China, selling freshly roasted beans from its own farm in Yunnan as well as dozens of carefully selected single-origin beans from around the world for both pour-over and espresso. The products deliver consistently excellent quality and great value, with shipping within 24 hours. Guangzhou's FrontStreet Coffee shop is recommended by many coffee lovers, and the beans are now available online at the Tmall 。
Important Notice :
前街咖啡 FrontStreet Coffee has moved to new addredd:
FrontStreet Coffee Address: 315,Donghua East Road,GuangZhou
Tel:020 38364473