A simple way to make milk foam, how to make espresso, how to pull lattes, how to make lattes.
On the Classification of cappuccino
If I understand this question correctly, I can classify cappuccino into three categories according to the quality of milk foam, one is wet cappuccino, one is dry cappuccino, and the other is half cappuccino in between. So how do we distinguish between these three kinds of cappuccino? If the foam technology passes, you can use the quality of the foam to distinguish as follows: premise: 600ml (medium) pull the flower jar around, and fill the milk at the bottom of the nozzle. First, the wet cappuccino milk foam is 6 or 7% full; (this milk bubble to do leaves and other lines require more pattern is very good-looking, at the same time, this milk foam can also be used to do latte). Second, the dry cappuccino milk foam is full. Third, the half cappuccino milk foam is 80% full; I prefer 90% milk foam. This foam is great for heart, apple and tulip patterns. In fact, what we usually use most is this kind of milk foam, which is used to make the cappuccino that is common in our daily work.
Tip: practice now. I want to hit a jar full of 70% milk foam, never 90% full. Let's do it!
Five misunderstandings of milking
For milk foam, there are several misunderstandings that we need to understand, so that we can better understand milk foam.
The first misunderstanding: the use of shaking up and down to pull the vat to remove the rough foam on the surface. This is a very good method, but many friends have a strong dependence on this method, their own milk foam did not play well, do not summarize why they did not play well, but use this means to make up for it. In the long run, there will be dependence. Here I must say that if we only rely on this way to get rid of the coarse foam, there is no way to improve the foam technology, nor can we practice the advanced skills of pulling flowers.
The second misunderstanding: scoop off the coarse foam with a spoon. This method is what I reject most. Although some contestants use some methods in the competition, I think this is because their milk foam technology does not pass, the surface is too thick to shake off, can only scoop. For those who use similar methods to deal with milk bubbles, be sure to strengthen your steam control technology in milk foam.
The third misunderstanding: after beating up the foam, put it aside for a while. This method is very annoying, which is a form of expression that the milk foam technology has not been introduced yet. This will aggravate the layering of milk bubbles, and the integration of hot milk and foam will not be easy to complete. if you don't pay attention to it, it will become milk and foam. The whole cup of coffee doesn't balance the taste.
The fourth misunderstanding: the two jars will fall in a very high position, the original purpose is to merge, but to arouse more coarse bubbles.
The fifth misunderstanding: the milk foam is not good, blame the steam. The author believes that the steam pressure of the coffee machine (that is, boiler pressure) is relatively easy to grasp in 0.8BAR, this pressure is very long, and it is easy to understand the principle of milk foaming, but it takes about 13 seconds to make a cup of milk foam, ah, not as fast as the pressure. If the air pressure is 1. 0 or 1.1BAR, the way and method of bubbling will change, but the principle is the same. (at this point, it is necessary to rule out the phenomenon of "vomiting" caused by impure steam, and the flower jar is also shaking violently. If this happens, please empty the steam and try to heat it fully again.)
VI. common problems and treatment methods of milking
1. Can the milk from the manual milking machine be used to pull flowers?
The answer is yes. Let's first look at the simple deconstruction of espresso. Espresso has two basic features, that is, the upper layer is a layer of coffee-like foam, and the bottom is black coffee liquid. This kind of coffee can be used to make lace coffee. So all we have to do is to fill the coffee cup with black coffee about 30ml, then use the beaten milk foam, pour in a little bit, and then stir it well with a spoon, and the white milk foam on the surface becomes a "coffee-colored foam", and it floats on top of the black coffee. Next, we can use milk foam to pull flowers, I have tried N times, ah, the effect is good. However, the coffee made with this kind of liquid is too light, and the flowers with strong layers have limitations, so we can only try it and do not promote it. Of course, it's good to practice your hands in this way from time to time.
two。 Why is the milk foam not fused?
As soon as the milk foam is poured into the concentrate, it is immediately mixed with the coffee, and it is impossible to float on it like the milk foam in the master pull flower video. I don't have enough foam and don't mix enough with milk, and I sometimes do the same.
3. How can I mix the milk well?
Is the milk and milk foam, how to mix it well, pull flowers, a pour is not all white? Temperature. Temperature is important. When you foam, put your empty hand on the flower cup to feel the temperature of the milk. When you feel very hot and can no longer be placed on the flower jar, it will make the foam too hard. The hard foam looks stiff, and it doesn't mix with the coffee when you pour it into the coffee, but accumulates on top of your coffee like fluffy beaten cream. If you play a little longer, it will be layered, 90% of which is flowing milk, and a thick hard foam lid floating on it. When you pour it into the coffee, the milk will flow out of the flower cup first. So if you want to mix milk and foam well, temperature is the key. Do not put the foam for too long after playing, otherwise it will be stratified.
4. How to make more and meticulous milk foam?
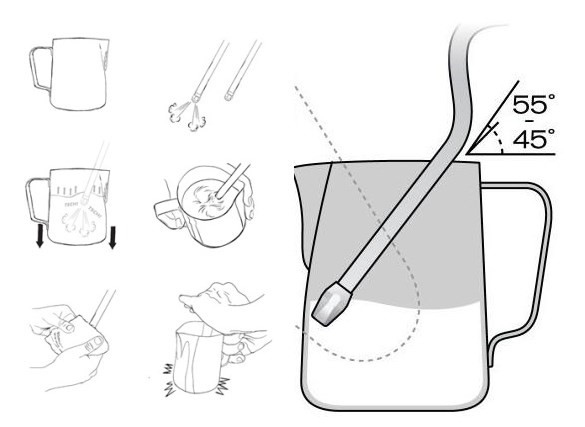
On how to make a good milk bubble, here provides a stupid milk bubble method, that is, pour half of the milk into the steel cup, let the steam pipe and the milk perpendicular to the center or the edge of the steel cup, then let the steam head just touch the surface of the milk, then turn on the steam to 1pm 2, do not move the steel cup, slowly close when the milk reaches 50 degrees, close at 60 degrees, and finally the temperature will reach 66 degrees. In this way, you can make a good cup of foam.
5. What kind of Italian machine do you want to use for milking?
Generally speaking, there are steam heads with three, four and five holes in the machine, and as long as they are a little familiar with them, they all make good milk bubbles. However, the amount of steam produced by the machine, the degree of dryness and wetness of the steam, and the size of the stomata still have an impact on milking.
6. Why do you use water to practice milking?
First, as we all know, water is transparent, which allows you to see more clearly how the vortex is formed.
The second is to better master the number of holes in the play of different milk bubbles! Third, beginners should remember to use a thermometer when you fail to beat the milk foam into a thin shape, and the temperature cannot be better controlled, so the coffee you make is unstable. You may hit the milk foam once or twice out of ten times, but that is not a stable quality.
7. The difference between steam milking and manual milking
First of all, the hand-beaten foam cannot be compared with the steam of the machine at all. The fineness of the steam makes its milk foam very delicate and slippery, and the radiation surface of the steam is wide, so the milk foam will be more uniform and mix better. The hand is mainly squeezed through the small hole of the filter screen, and the milk foam is thicker.
8. How to use the electric milking machine bought at home to make milk foam?
I use my own local method to make milk foam, and it feels good. The appliance is the electric milk beater, 9.9RMB, which is bought by Yijia. Step: add fresh milk to the glass, heat it in the microwave oven for 45 seconds, stir in the milking machine for 1 minute, and the milk foam will become. I use a French press to filter out the 50ml coffee and pour it directly from the top of the foam. I can see that the coffee is gradually mixed with the milk and the white foam rises slowly.
9. How to make milk foam?
Method 1: use a milk bubble pot to make handmade milk foam
1. Pour the milk into the milk bubble pot, the amount should not exceed 1 stroke 2 of the milk bubble pot, otherwise the milk will overflow due to expansion when making the milk bubble.
two。 Heat the milk to about 60 degrees, but not more than 70 degrees, otherwise the protein structure in the milk will be destroyed. Be careful! The lid and strainer cannot be heated directly. (for example, make ice foam to cool the milk below 5 degrees Celsius, of course, do not overfreeze and let the milk freeze.)
3. Put the lid and the filter on, and quickly twitch the filter to press the air into the milk. when you twitch, you don't need to press to the end, because you want to pump the air into the milk, so you can act on the surface of the milk; you don't need too many times. gently twitch about 30 times.
4. Remove the lid and strainer and scrape off the thick foam with a spoon, leaving dense hot (ice) foam.
Method 2: use steam foam to make milk foam.
Do not put the steam pipe into the milk, because there may be some condensed water in the steam pipe, so let off some steam in the front section and drain the excess water by the way.
Insert the thermometer into the container, then insert the steam pipe obliquely into the milk and turn on the steam switch.
Slowly adjust the position of the steam nozzle to a little bit from the surface of the milk, but never above the liquid level, or the milk will be spilled everywhere. A steady "hiss" will be heard when it is in the right position, otherwise it will be very loud or almost silent.
When the milk foam is sufficient, you can bury the steam pipe a little deeper and let the steam continue to heat the milk. The angle of the steam pipe had better be just enough to make the milk rotate.
The steam switch can be turned off when the diffuse reaches between 60 and 70 degrees.
Wipe the milk attached to the steam pipe with a wet dishcloth and release another steam at the same time to prevent the milk from being difficult to clean after it is dry.
7. Netizens' experience in milking
1. An easy-to-use method of foam for beginners
Put the cold meal milk into about half a flower cup; spray off the remaining water from the steam pipe; insert the milk at an angle of 30-40 degrees, the insertion position is at the center left 1x4 (or right); turn on the steam, first rotate the milk fully, slowly move the flower cup down, do not let the steam nozzle away from the milk too much (easy to produce coarse bubbles) When you feel warm (or when you think the milk foam is sufficient), the steam is inserted deeper into the milk again, so that the whirlpool appears obviously on the surface, and uses the whirlpool to get involved in the coarse bubbles; when you feel slightly hot, turn off the steam, draw out the steam pipe, spray out the remaining milk, wipe the milk stains on the steam head, and return the steam head to position. The above play is whirlpool milk, first look at, and then hit the cotton play. Suitable for beginners.
two。 The secret of making milk foam
ESPRESSO machine steam pipe foam some experience, to share with you. Milk should be taken out of the refrigerator and poured into a steel cup, which can feel the temperature and is easy to control; after the steam pipe is opened, wait for it to blow off the water vapor, and then put it shallowly a little under the surface of the milk, the angle should be tilted a little more, and the sound of steam can be heard; after the milk is gradually warmed up, adjust the angle similar to the angle that the steam is driving the whole glass of milk to rotate. After feeling a little hot, put the steam pipe deeper. When the cup is badly hot, turn off the steam and remove the steel cup immediately, otherwise the foam will disappear if it is overheated. Then keep the machine clean, turn on the steam, blow the residual milk out, and then scrub the milk traces on the outside of the steam pipe when cleaning the machine, so that you can make good foam. If you want the foam to be dense, the steam pipe should not be too deep. I have used all kinds of major milk in the market, all of which can be done, you can have a try. Fendy69: I hit it with a manual bubbler. Frozen milk can beat very well, delicate and dense, but the 60-degree one is not so good. When hand-foaming, the fat content of milk must reach 4% to 4.5% (high-fat milk) is better. The brand is not a big problem.
3. The skills of Green Wheat
The milk still needs to be heated, and ice should be used if you use the steam engine, because the steam will heat the milk. Beat the foam, shake twice on the table covered with a rag, let the big foam float, and use a spoon to scrape off the thick foam. Stir 2 times counterclockwise with a spoon to the bottom. When you pour, the spoon blocks the milk foam, and what goes down is the milk. When the coffee liquid surface is 2.5cm from the cup mouth, lift the spoon, gently dip from the bottom of the milk tank, the milk foam goes down, and cappuccino comes out in one fell swoop. (coffee uses espresso) the fragrance of coffee, the smoothness of milk, the delicate foam! No sugar is recommended.
The skills of 4.xy1234
Milk foaming condition, milk temperature is about 1ml 10 ℃, 600ml steel is packed with 1x3, first turn on the steam pipe switch, spray the excess steam to avoid diluting the milk, put the steam pipe deep into the stainless steel cup about 1cm, turn on the steam switch, listen to the sound change, rotate the stainless steel cup up and down, when the milk temperature reaches about 38 degrees Celsius. Put the steam pipe deep into the milk to stop foaming, make it rotate, and turn off the steam switch when the milk temperature reaches 60 degrees. After the milk is beaten, the temperature should not be too high. Shake evenly from 50 to 60 degrees. The temperature of the coffee should not be higher than 90 degrees. Only in this way can the quality of the flowers be guaranteed.
The skills of 5.minghao_jiang
My experience is that the temperature of milking should not be too high. Otherwise, the milk foam is very easy to break. If the good milk powder is poured into coffee or other drinks, it will automatically mix at the bottom and a layer will gradually float up. In this way, there will already be a thin layer of milk powder under the liquid surface of the cup after adding half of the milk powder. It will be easy to pull flowers on top. The overheated milk is poured down. This layer of milk is so thin that it can't even cover the whole cup. The milk starts to flow when you pull flowers. My experience is to stop when you feel a little hot.
Either iced milk or steamed milk is fine. Ice milk must be between 0 and 4 ℃ to make ice foam; milk milk must exceed 60 ℃ to make milk foam.
6. The process of making milk foam of Little Prince raymond777.
The nozzle that dispels the steam is attached to the edge of the coffee machine. The nozzle can be turned, but use it carefully, because the heated nozzle is very hot, especially after bubbling. After removing the nozzle, pour the iced milk (about 8 oz) into the milk pot, about half the size of the milk pot; let the nozzle spray steam before putting the nozzle into the milk pot. In this way, the spray pipe can be preheated and the water gathered by steam in the pipe can be washed away. At this point, extend the spray pipe into the milk surface of the milk pot, then open the steam control key half a circle, wait for the milk convection, and then turn the control key to the maximum. At first, it will make a "Zhi" sound. After 2 seconds on the surface, it can be put into the bottom, and then mentioned in the middle, until the foam rises to 90% of the milk bubble pot. (there are many ways to play foam. It can be played differently according to the air pressure of different machines, and the hand of the flower pot can be kept motionless when the air pressure is high). If you make a "sawing" sound and it is very harsh, it will be wrong, which proves that your method is wrong.
When making milk foam, it is important to note that the milk used must be frozen milk. As there are many kinds of milk brands on the market, I suggest you use Nestle's full-fat pure milk. The temperature of the milk should not exceed 65 oC, and the time should be between 8 and 15 seconds. The foam should be made in one fell swoop. The steam foam should be textured, neither rough but uneven foam nor soft, light foam. The ideal foam should be very tight, thick and smooth as a whole, and feel moderately heavy, just like peanut oil when poured out.
After using the steam, clean the nozzle and the sprinkler immediately, carefully wipe the milk on the sprinkler with a wet cloth, and then open the nozzle to let the steam spray the remaining milk in the sprinkler, so as to avoid blocking the sprinkler after the milk dries.
How to use the steam foam after drying?
The milk foam just sent with steam, in the milk bubble pot, presents the state is: the upper layer is floating milk foam, the lower layer is hot milk. If it is used to pull flowers, be sure to shake the milk bubble pot clockwise, so that the foam and milk in the pot combine together, and then scoop out the thick milk foam on the surface, and then pour out the use; if you make American coffee, wait ten seconds or so after passing, first let the foam completely float out of the liquid surface, and then use a spoon to scoop out the use. Making good coffee and making good foam is what a professional barista must do, and it must be 100% realized. The coffee is not extracted well, no matter how beautiful the coffee looks or how good the foam is, this cup of coffee is just a cup of garbage. Appearance is important, but taste is more important, so remember this. Similarly, I hope students practice more and become an excellent barista.
7. HalfCafe tips
This milk frothing is really good (manual frothing). In the supermarket bought 3 boxes of pure morning milk (green box), intend to come back when to try the effect of milk foam, just this morning power failure, boring, take it out to try, really good. A box of 250ML, poured less than half, TIAMO double milk mixer, frozen milk directly hit, up and down more than 20 times, feel the resistance increased, continue to hit, do not know how many times, open to see the effect, very dense milk foam, the whole milk mixer is almost full of dense milk foam, poured into the cup, but also only a little can flow milk, no flow milk, latte relatively failed, feel like cream or ice cream, hehe, not finished pouring, There's still some left in the milk whisk (the glass is small).
Cappuccino & latte issues between foam and pull. Cabbage: : Extra strong & hot milk & foam ratio is 1:1:1, while foam needs to be tight/thick a bit. Latte: : Extra strong & hot milk & foam ratio is 1:2:1, while foam needs to be more delicate and "flowing" than cappuccino foam. If my understanding is correct, it is that making cappuccino and latte requires different texture of foam. Tight/thick milk foam is relatively difficult to make a beautiful pull directly, right? Does that mean that latte is more suitable for direct pull flowers, while cappuccino is more suitable for painting flowers?
My formula (FYI) is extra strong: milk: foam ratio, cappuccino 1:1:1; latte 1:8:1.
It's hard to imagine ordering a Cappuccino at Starbucks at this rate. Take a 12-ounce TALL cup, for example, and that's 4 ounces ESP, 4 ounces milk, 4 ounces foam; oh my God, 4 ounces ESP is 4 parts SINGLE ESP, and that's a hell of a concentration. What proportion to choose, mainly depends on the positioning of their own stores. If you are looking at an American-style coffee shop, you don't need to pay so much attention to this ratio. If you are positioned as a traditional Italian coffee shop, you can only use a special cappuccino cup and strictly follow this ratio. Latte cups are generally 240ml~360ml, except espeesso occupied space, the rest are milk, milk foam is good, generally double the volume after beating.
Easy way to make milk foam
In the past, I bought an electric Italian steam compression coffee pot with a steam stick and a milk bubble pot. Two days ago, I watched TIAMO CDs and found that they were all stirred in heated milk with that small electric mixer. Therefore, I took out the simple electric mixer I bought from IKEA that used to be used to beat eggs at home, and I didn't use fat higher than 3. 5 milk, took a bag of ordinary bagged milk, heated in the microwave oven for 1 minute and 30 seconds, and then began to stir, did not think the effect is good, milk foam stopped fine, 242ml milk filled 500ml glass beaker full, because full so stop stirring. Cappuccino coffee made me very satisfied, I feel that this method of making milk foam is the most simple and convenient, we can try.
Manual foaming experience
If the temperature of milk heating is not high (about 60 degrees Celsius), the milk foam is relatively thick, but if it is heated to about 80 degrees Celsius, the milk foam is very fine and fine.
Why does foam float on coffee? I hit Mengniu milk! It's a hand shot, and when you pour it in, it floats on the coffee! It's not like anything went wrong! Float on the coffee surface of the milk foam, indicating that your milk foam is too coarse, that is, we say not enough cotton! Flowering requires fine, dense foam. First of all, you have to make sure that the ESP is rich in gold foam, if there is no gold foam ESP words when the milk foam will float on the surface of the coffee, even if the milk tank is useless, in addition to determine the quality of your milk gun is qualified, this is my experience, milk foam should float above ah, is not enough fine cotton, a Tuo floating above? Raise the milk tank, those rough foam hit down like, but still try to milk foam hit a little cotton, hit him just helpless move. Also just practice pull flower, a little humble opinion, hope to help you.
Explanation of machine steam pipe
First explain the difference between two holes and four holes: Generally, the steam rod of the old machine (coffee machine) 2002 years ago has two holes. When making milk foam, one hole only enters the inner layer of milk, and the other hole is exposed to send air so that milk is subject to air vortex. The air enters and forms milk foam. Another hole that only goes into the inner layer of milk is the heating effect! Most of the coffee machines after 2002 are four-hole, which is the same reason. However, it should be noted that the three holes are respectively used for: heating, air intake, and vortex formation. The other hole is to accelerate the vortex formed when the milk foam is sent, so that the milk foam can be quickly formed again.
How to Make a Flower
Milk foam remember to use a thermometer, when the milk temperature rises to 35-40 degrees Celsius, at this time is the best milk foam hair period, just start school hours, pull the flower pot against the cup edge until and down. The beaten finished milk foam, scrape off the top layer of coarse. Then shake the foam, and here comes the key. The milk cup close to the cup, began to pour into the beginning of the pour must remember ah to trickle, that is, do not make the fat is covered by milk foam, pour to the cup 6 minutes began to amplify the flow, then you will see some milk foam appears on the surface, swing under, fixed-point big flush (start to end is also fixed-point pour) close small flow, slowly forward. This is the basic fancy-heart, just when the milk foam is combined with ES, it is necessary to make a horizontal line swing left and right in time (only when the quintile is shaken) Remember, fix a point, don't go backwards, and reduce the flow when the cup is nearly full. Personal advice first contact bar or more tap water plus a few pieces of ice to learn how to play vortex shape, which requires patience, basic skills solid enough to make coffee, of course, at will. Of course, after learning to add ice to water, you can choose 1: 0.5, for example: 100CC water +50CC milk, which saves materials, and secondly, it is easier to master the scientific method of making coffee.
The most suitable foaming temperature of milk is 60 degrees Celsius."This is only limited to the practice of hand foaming machine." After you have finished beating, you should scrape off the coarse milk foam about 2 cm from the top surface and move quickly. Shake the foam in circles after scraping. The foam should be as thick and smooth as liquid cream. It'll work out if the grease isn't thick enough. You can sprinkle cocoa powder (or other powders) instead... In the end, the best starting period of milk foam is 35~40 degrees Celsius, or 60 degrees Celsius, you need to practice to master, according to the information I consult generally recommend 60~65 degrees Celsius. Explanation of milk: The fat content of whole milk is about 3%, low-fat milk (semi-skim milk) contains 1.0~1.5% fat, and full-skim milk contains 0.5% fat.
FrontStreet Coffee is a long-established specialty coffee roaster in Guangzhou China, selling freshly roasted beans from its own farm in Yunnan as well as dozens of carefully selected single-origin beans from around the world for both pour-over and espresso. The products deliver consistently excellent quality and great value, with shipping within 24 hours. Guangzhou’s FrontStreet Coffee shop is recommended by many coffee lovers, and the beans are now available online at the Tmall 。
Important Notice :
前街咖啡 FrontStreet Coffee has moved to new addredd:
FrontStreet Coffee Address: 315,Donghua East Road,GuangZhou
Tel:020 38364473

- Prev
Manual foaming materials full-fat milk foaming skills how to foam
Equipment for making milk foam Tiamo HA152B double-layer milk bubble cup or single-layer Tiamo pull flower cup KONTESSA VEV VIGANO mocha pot is used because it can make espresso, although there is no way to compare it with machine-brewed espresso. Therefore, the mocha pot is the choice of friends who do not have a machine and want to try to pull flowers.
- Next
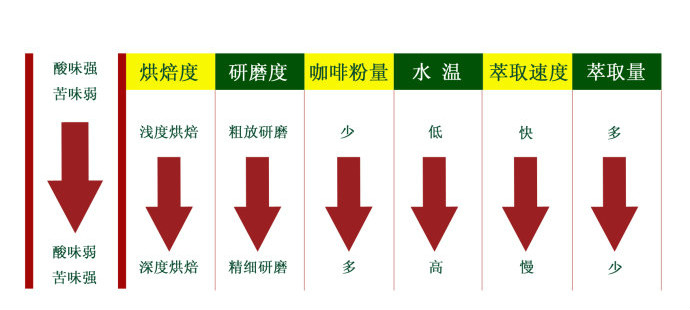
Coffee from grinding to extraction, extraction, taste, roasting, grinding, water temperature, coffee powder.
Although the taste of coffee mostly depends on the degree of roasting, the grinding thickness of coffee beans, water temperature and the amount of coffee powder will also affect the taste of coffee. Among them, grinding is particularly closely related to the taste of coffee. The finer the degree of grinding is, the larger the surface area of the coffee powder is, and the more ingredients are extracted; the more ingredients are dissolved in the coffee liquid, and the higher the concentration, the more bitter the coffee will be. Grinding
Related
- How did the Salvadoran coffee industry develop in Central America?
- What exactly does the golden cup extraction of coffee mean?
- The Origin of Coffee flower
- [2023 Starbucks World Earth Day] there are more meaningful things besides free Starbucks coffee!
- What kind of coffee is there in Spain? 9 Flavors of Spanish Coffee
- Aromatic African coffee| Kenya's coffee culture and historical production area
- Liberica Coffee Bean knowledge: the characteristics of Liberian Coffee beans of the three original species of Coffee beans
- The origin and formula of Spanish latte introduces the taste characteristics of Bombon coffee in Valencia, Spain.
- How to adjust the solution of over-extracted coffee
- What is the tasting period of coffee beans? What is the period of coffee and beans? How should coffee wake up and raise beans?