
How to Froth Milk and Pour Latte Art with Perfect Crema
You've pulled the perfect espresso shot and steamed silky milk—now comes the true test of a barista: blending them into a smooth, creamy drink and pouring a recognizable shape that stays intact. Whether you're aiming for a heart or a leaf, the key lies in how well the espresso and milk combine and how skillfully you control the pour. This guide walks you through the fundamentals of milk integration and the steps behind two classic latte designs.
The secret to a good latte starts with integrating espresso and milk quickly and evenly—ideally within the first few seconds. Then, pour with controlled flow and movement to create defined shapes like hearts or leaves. Most latte art designs require the milk pitcher to start close to the cup, then rise gradually while adjusting speed and angle for the desired pattern.
Espresso and Milk Fusion Basics
Before you pour any design, your espresso must have a glossy, stable crema—typically around 3mm thick with a mirror-like sheen. According to industry practice, 20g of finely ground coffee should yield 40ml of espresso in 25–30 seconds. This standard shot forms the base for successful milk integration. Without proper crema and smooth emulsion, neither taste nor design will hold up.
To achieve a unified drink, the milk must be poured directly into the center of the espresso. As you begin, the goal is to mix the milk and espresso swiftly, ensuring even color and texture. Uneven blending leads to inconsistent flavor—some sips too milky, others overly bitter. A well-fused drink shows a consistent ‘golden ring’ where crema and foam meet, with no large bubbles on the surface.
How to Steam and Texture Milk for Latte Art
Ideally, your steamed milk should be textured to a volume increase of about one-third (typically filling the pitcher from 50% to 66% full). Keep the milk temperature between 55–60°C. Fine, velvety microfoam is essential—it should feel smooth, not gritty, and have the consistency to support latte art without separating.
The quality of your foam directly impacts both taste and pourability. Too coarse, and it disrupts the crema; too bubbly, and it won’t hold a shape. The ideal milk foam integrates seamlessly with the espresso, creating a uniform body that’s the canvas for your design.
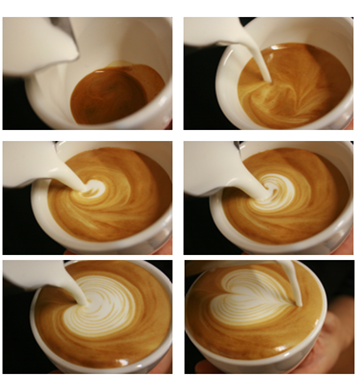
Step-by-Step: Pouring a Heart Shape

To pour a classic heart:
- Start with your milk pitcher close to the cup’s edge, aiming for the center of the espresso’s surface. Use a thin stream to begin.
- Gradually raise the pitcher and draw a small circle to integrate milk and espresso.
- Once the cup is about halfway full, bring the pitcher closer to the surface (this is called the ‘start point’ for the design). Increase the flow rate.
- Hold the position and gently shake the pitcher side to side to form a semi-circular shape.
- When the cup reaches about 80% full, raise the pitcher slightly, narrow the stream, and pull forward to create the pointed center of the heart.
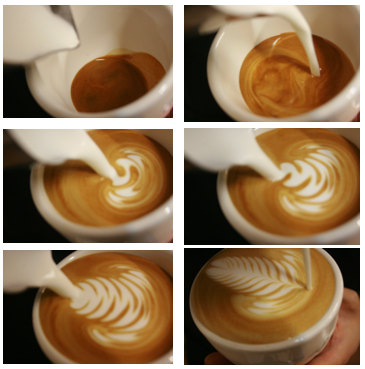
Step-by-Step: Pouring a Leaf (Rosetta) Design
For a leaf pattern:
- Begin with the pitcher near the cup’s rim, aiming at the center of the espresso. Use a small stream to initiate the blend.
- Raise the pitcher gradually and make a small circular motion to integrate the milk.
- At around half capacity, move the pitcher closer to the surface and increase flow.
- Create a small semi-circle, then gently rock the pitcher back and forth while moving it slightly backward.
- When the cup is nearly full (around 90%), raise the pitcher, reduce the flow, and push forward to form the leaf’s stem.
How to Practice and Improve Your Latte Art
Improvement comes down to deliberate practice and refining your tools and ingredients. Start by practicing with water to get a feel for controlling the pitcher’s flow. Another tip: after pouring a design, pour the coffee back into the pitcher, discard the large bubbles by tapping, remix, then pour again over a small spoon of coffee grounds at the cup’s base to simulate crema.
To advance, experiment with more fluid milk textures, different pitcher shapes, various cup sizes, and beans with richer crema potential. Regular practice is essential—and so is trying new patterns beyond the basics.
Frequently Asked Questions
What is coffee crema and why does it matter for latte art?
Crema is the golden-brown foam that forms on top of a well-extracted espresso. It’s created when carbon dioxide released during roasting is trapped by oils and suspended in the liquid. Good crema is thick (around 3mm), shiny, and helps the milk blend smoothly, forming the base for latte art. Without it, the milk and espresso won’t unify visually or texturally.
What’s the ideal espresso dose and yield for latte art?

Use 20g of coffee grounds to produce 40ml of espresso, extracted in 25–30 seconds. This ensures balanced strength and crema quality needed for smooth milk integration and stable latte art designs.
How should milk be steamed for latte art?
Steam milk to a volume increase of about one third (filling the pitcher from halfway to roughly two-thirds full). Keep the temperature between 55–60°C. The texture should be smooth microfoam without large bubbles—ideal for pouring clean, defined shapes.
What are the key steps in pouring a latte art heart?
Start close to the cup’s edge with a thin stream, then raise the pitcher and circle to blend. At half-full, move closer and increase flow. Create a semi-circle, then shake side to side to shape the top. Near 80% full, narrow the stream and pull forward to form the heart’s point.
How can I practice latte art at home without a machine?
Practice pouring with water to master flow control. You can also pour brewed coffee back into the milk pitcher, tap out big bubbles, remix, then pour over a spoon of coffee grounds to imitate crema and practice shaping.
Recommended FrontStreet Beans for Latte Art
FrontStreet Coffee’s Commercial Blend combines Brazilian, Colombian, and a hint of Robusta to deliver a bold, creamy espresso with rich crema—ideal for smooth milk integration and stable latte designs. For a fruitier twist, the Strawberry Candy Espresso features Yirgacheffe and Ethiopian beans with Colombian Huila, offering balanced acidity and delicate berry notes while still producing enough foam for latte art. Both blends are optimized for a 20g to 40ml extraction in 25–30 seconds, ensuring the crema thickness and texture needed for professional results. Freshly roasted within 5 days · Orders placed before 17:00 ship the same day · Next-day delivery across most of Guangdong Province.
FrontStreet Coffee is a long-established specialty coffee roaster in Guangzhou China, selling freshly roasted beans from its own farm in Yunnan as well as dozens of carefully selected single-origin beans from around the world for both pour-over and espresso. The products deliver consistently excellent quality and great value, with shipping within 24 hours. Guangzhou's FrontStreet Coffee shop is recommended by many coffee lovers, and the beans are now available online at the Tmall 。
Important Notice :
前街咖啡 FrontStreet Coffee has moved to new addredd:
FrontStreet Coffee Address: 315,Donghua East Road,GuangZhou
Tel:020 38364473

