Teaching beginners how to make dense and meticulous milk bubbles
Professional coffee knowledge exchange more coffee bean information please follow the coffee workshop (Wechat official account cafe_style)
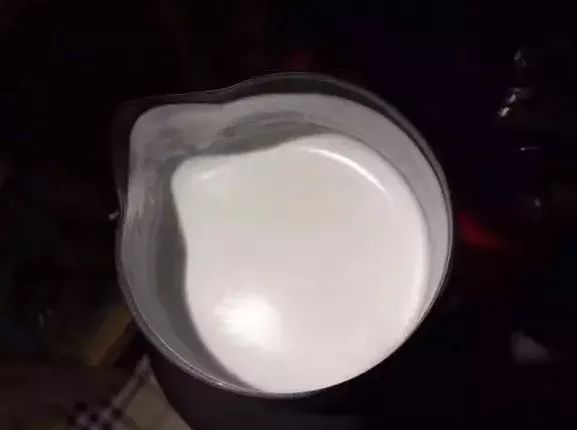
What is dense milk foam?
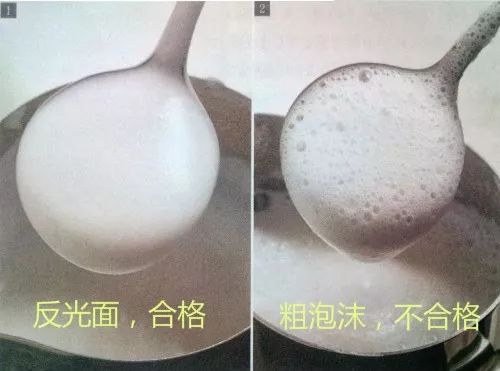
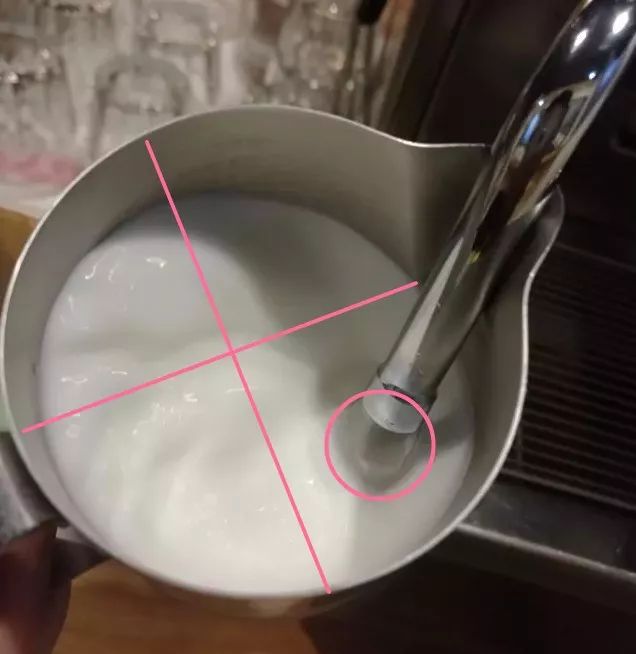
The first standard is that the surface should be reflective. This statement is very objective and direct, at least it can be used as a standard to be seen by the naked eye.
The second criterion is that there is no coarse foam on the surface. This requires a lot of foam control ability, of course, this is also the premise of reflection. So what is a coarse bubble? If we have to give it a definition, I think anything larger than the diameter 1mm is called coarse foam.
The more delicate the milk foam is, the less air is contained in a single milk bubble, the higher the density and the less buoyancy is; the rougher the milk foam is, the less air is contained in the single milk bubble, the lower the density and the greater the buoyancy. If the milk foam is relatively rough, the milk foam will float quickly on the surface of the milk and the degree of fusion is lower; if the foam is more delicate, the speed of the foam floating on the surface of the milk will be slow and the degree of fusion will be higher.
The third standard is: in the case of the same amount of milk (all added to the position at the bottom of the cylinder mouth), regardless of whether it is 60% full or 70%, 80%, 90% or full, the temperature should be the same, and the number of milk bubbles cannot be adjusted by the temperature.
How to make dense and meticulous milk foam
Finally, we will show you how to make dense and detailed milk bubbles. There are many different ways to make good milk foam tissue, but they all include two stages:
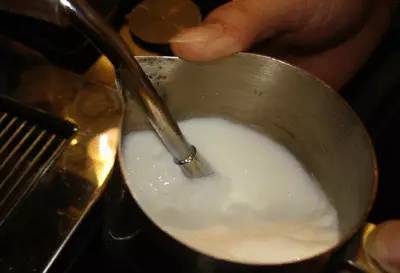
The first stage is to get rid of, that is, to put in steam to make the volume of milk foaming. The position of the steam stick is shown in the picture below. We should grasp the position of the steam stick when we dispose of the milk, so that we can get twice the result with half the effort.
How to find the angle of the steam stick when beating milk foam? many people are used to placing the steam stick at 2-3 o'clock or 9-10:00 in the milk tank (based on the nozzle as 12:00).
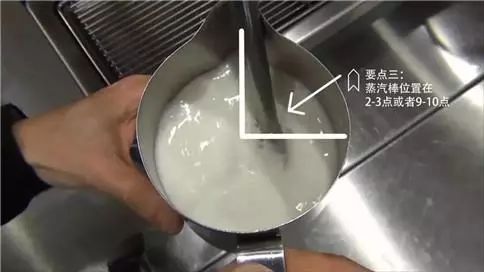
Photo Source: Holam
Find the angle of the steam rod in addition to placing the correct position of the steam rod, the angle between the steam rod and the liquid level is also very important.
The steam stick is so vertical that most of the steam is ejected downward, making it difficult for the milk to form a small whirlpool: if the steam rod is too flat, most of the steam will be ejected in a parallel direction, making the small whirlpool too large to form turbulence that is difficult to control or milk spill.
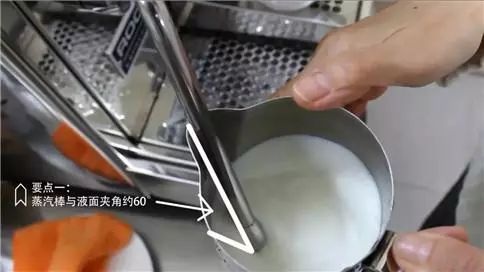
Photo Source: Holam
The second stage is to soak the foamed milk into the air in a swirling way, and make the larger foam break, decompose into fine foam, and let the milk molecules bond with each other, making the foam tissue more compact.
There are many ways of foaming milk on the market, but it can be roughly divided into two categories: one is the combination of milk and milk foam. The other is to separate the stages of getting rid of and beating off, that is, to send the milk first and then beat the milk foam.
When we dispose of the milk, we should use steam to make it spin as soon as possible and form a small whirlpool. In this way, the thicker milk bubbles can be involved in the milk, so that the milk has a dense state after being sent away.
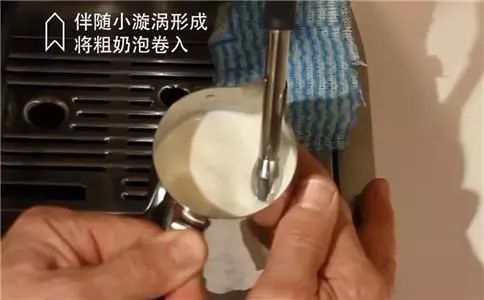
Photo Source: Holam
[air intake]: turn on the steam to start air intake and observe the surface of the milk. if the milk rotates and does not hear the sound of nourishment, it means that the air has not been breathed, and then you need to lower the milk tank a little bit and expose the nozzle for air intake. When you hear the sound of nourishing air, stop lowering the milk tank and keep it in place. At this time to observe the state of milk movement, the normal situation should be to enter the air while the liquid rotates, forming a whirlpool.
The air intake action of moving down the milk tank must be subtle and gradual, not too violently, and the sound should be stabilized and stopped when it is almost in the air intake state.
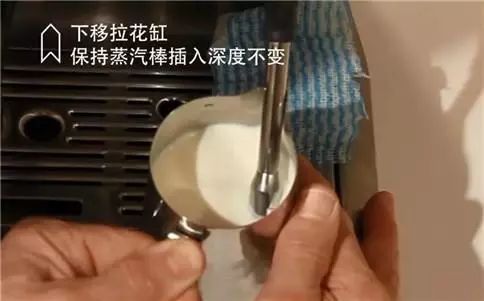
Photo Source: Holam
Beat the foam first and then get laid.
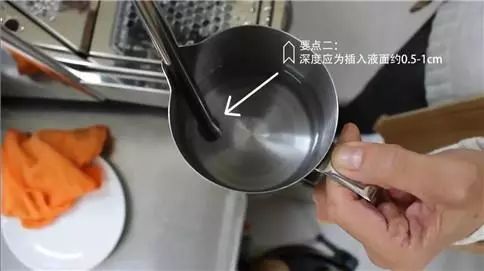
1. Place the steam pipe at the center of the steel cup, tilting 45 degrees to the upper right and near the edge of the steel cup, with a depth of about 1 cm. This depth will be more common, but when it comes to coffee machines with different steam intensities, this is just a suggestion. )
2. Turn on the steam pipe, move the steel cup down slowly, and roll the milk up and down and slowly let the volume expand.
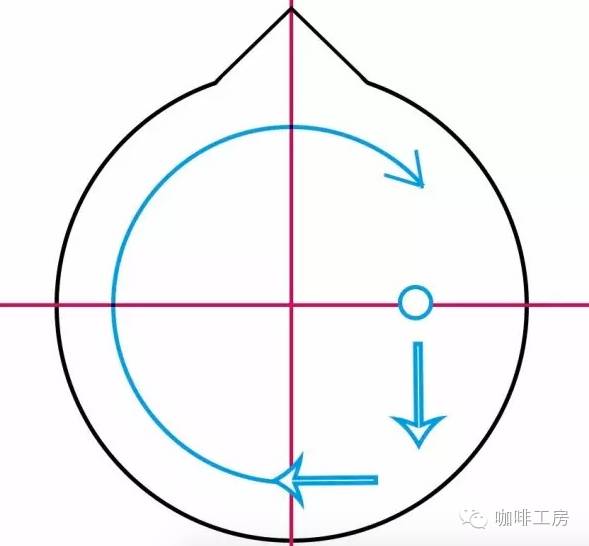
3. When the foam expands to eight minutes full, pull the steam pipe obliquely to the center point of the steel cup to the right near the edge of the steel cup, so that the milk bubble rolls in a vortex way.
4. Control the angle and depth of the steel cup to involve the thicker milk foam and stop beating to the desired temperature.
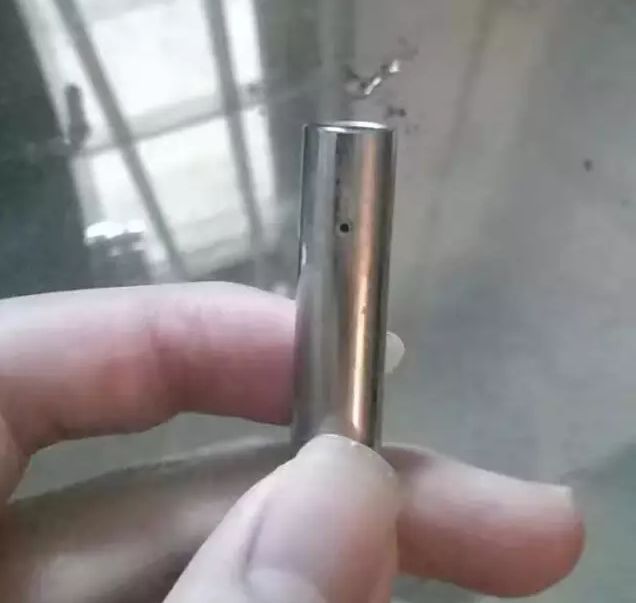
For those of you who use the home coffee machine to play with flowers, if you can't make even and delicate milk foam all the time, please don't be depressed. If your steam stick is similar to the one in figure 1 with a shell without a nozzle, and you can observe a small hole in the steam rod shell (pictured), then your position of bubbling may need to be different from that of ordinary nozzles-when you foam, you don't need to insert the liquid surface, enter the air, or think about the wheezing noise, just bury the milk from beginning to end and stir up the whirlpool.
How to solve the problem of hitting milk foam in layers:
1. Put the pull vat containing milk bubbles vertically and collide with the table, so that the big milk bubbles will burst into small ones. After the big milk bubbles are burst, shake the flower jar horizontally and let the foam rotate and collide, which will also eliminate some large milk bubbles. The dense milk bubbles are as smooth and shiny as the mirror.
2. Use a spoon to scrape off a large layer of milk foam above the foam, leaving the dense foam below.
3. Pour the flower jar with milk foam into another flower jar, which is called "sub-cylinder" in the industry.

[recommended]
Illustration of flower-drawing skills | take-out cup flower-pulling "empty heart"
Learn the preparation, skills and practical lessons of making Coffee Coffee from scratch
FrontStreet Coffee is a long-established specialty coffee roaster in Guangzhou China, selling freshly roasted beans from its own farm in Yunnan as well as dozens of carefully selected single-origin beans from around the world for both pour-over and espresso. The products deliver consistently excellent quality and great value, with shipping within 24 hours. Guangzhou’s FrontStreet Coffee shop is recommended by many coffee lovers, and the beans are now available online at the Tmall 。
Important Notice :
前街咖啡 FrontStreet Coffee has moved to new addredd:
FrontStreet Coffee Address: 315,Donghua East Road,GuangZhou
Tel:020 38364473

- Prev

Novice coffee jacquard common problem analysis and treatment Daquan! Jitter is the secret of coffee flower pulling?
Professional coffee knowledge exchange more coffee bean information Please follow the coffee workshop (Wechat official account cafe_style) there is a lot of controversy about coffee flower pattern, such as: does the taste of milk affect the taste of coffee? Will the coffee flower improve the quality of the coffee, or will it destroy the original delicate taste of the coffee? But there are still a lot of problems that have been ignored, when we talk about
- Next
The skills that beginners must learn to pull flowers and milk foam! How does the dense milk foam come out?
Professional coffee knowledge exchange more coffee bean information Please follow the coffee workshop (Wechat official account cafe_style) many people want to learn good flower drawing skills when learning to make coffee, but they do not realize that playing milk foam is also a very important part of learning to make coffee! Many people do it once or twice, but some people practice it more than ten times without success. In fact, they are milking.
Related
- What is the meaning of lactic acid fermentation with coffee bean treatment?
- How to judge the state of foam by sound?
- How does the latte pull out the unicorn pattern? Come to get for a little trick to improve the flower pull!
- Will flower pulling affect the taste of the latte?
- Do you know the history of coffee?
- The difference between honey treatment and sun washing what is raisin honey treatment?
- What kind of milk can a novice use to make coffee foam to keep the foam longer? The correct method and skills of milking tutorial sharing
- Why do washed coffee beans taste sour? Flavor characteristics of washed Coffee
- Introduction to the skill of how to practice the size and height of water injection around the circle of hand-brewed coffee
- How do beginners practice coffee flower drawing from scratch?