How to Make Specialty Coffee with an AeroPress in 30 Seconds
You’ve got 30 seconds, a bag of freshly roasted beans, and want a clean, nuanced cup—without the noise, mess, or complexity of espresso. The AeroPress isn’t just a travel-friendly gadget; it’s a tool that delivers surprisingly refined results using basic physics, clever timing, and adjustable variables. Whether you're brewing at home or dialing in on the go, the AeroPress can make a bright, sediment-free shot rivaling pour-over clarity in a fraction of the time.
Yes, you can brew a balanced, clean-cup specialty coffee using an AeroPress in about 30–60 seconds—but only if you control the grind size (medium), water temperature (around 83°C), total brew water (100ml), coffee dose (17g), and apply gentle 15–25 second pressurized extraction. That’s the sweet spot for a fast, flavorful result without over-extraction or paper dust.
What Makes the AeroPress Different?
The AeroPress isn’t an espresso machine or a French press—it’s something smarter for people who care about clarity. Unlike espresso machines that force hot water through tightly packed coffee at 9 bars of pressure, the AeroPress uses gentle hand pressure (around 1–2 bars) and paper filtration to create a clean, sediment-free cup. Its magic lies in combining immersion brewing with pressure-assisted extraction. Coffee grounds steep in hot water, then you press down to push the brew through a microfilter. That filter traps fine particles, resulting in a cleaner taste than French press, with more body and clarity than many manual drip methods.
How to Brew Coffee with an AeroPress in Under a Minute
Here’s the precise routine used by experienced AeroPress brewers for a balanced, clean cup—ready in about 60 seconds total.
What You’ll Need:
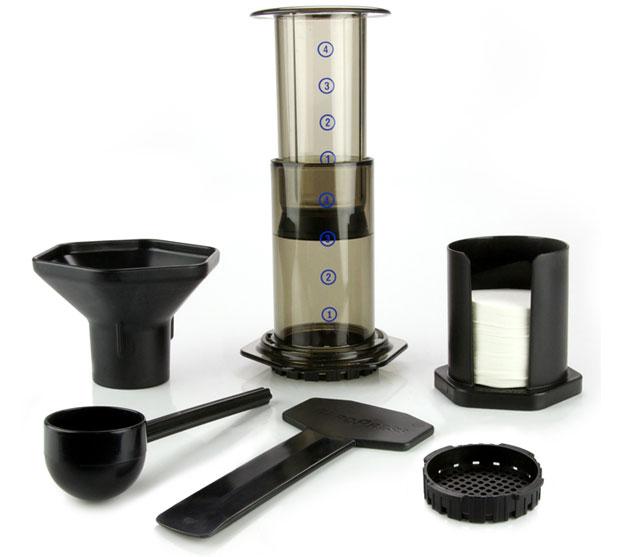
- AeroPress (with plunger and chamber)
- Electric grinder or hand grinder (for medium grind)
- Freshly roasted specialty coffee beans (17g recommended)
- Gooseneck kettle (for controlled pouring)
- Scale (optional but ideal)
- Filter papers (included) or metal filter
- Mug or server
Step-by-Step Guide:
- Prep & Heat: Insert the black rubber plunger into the chamber until it reaches the #4 mark (flipped upside down for easier loading). Rinse your paper filter with hot water in the cap to remove paper taste, then discard the rinse water.
- Add Coffee: Place the chamber on your mug, add 17g of medium-ground coffee (about one AeroPress scoop, or a levelled 17g measure).
- First Pour (Bloom): Start your timer. Pour 50ml (¼ cup) of water at around 83°C over the grounds. Let it bloom for 45 seconds—this preps the coffee by releasing CO₂.
- Stir: Stir the slurry three times with a spoon or paddle to break up clumps and ensure even saturation.
- Second Pour: Add another 50ml of water for a total of 100ml. Your water level should sit just above the #2 circle mark on the chamber.
- Attach Filter & Cap: Screw on the filter cap with a fresh paper filter, and rinse the filter again if needed.
- Press: After 60 seconds total, gently turn the AeroPress 45° and stir briefly for 10 seconds. Then, apply steady, gentle pressure for 15–25 seconds until you hear a hiss. Don’t force it—stop if air stops pushing through.
- Dilute & Enjoy: For best results, dilute your concentrate 1:1 with hot water. This balances strength and brings out more nuanced flavors.
Tweaking Your AeroPress Brew
The AeroPress is a playground for small changes that lead to big flavor shifts. Here’s how to adjust variables and explore different profiles.
1. Coffee-to-Water Ratio
Changing the dose or total water alters concentration. The standard is 17g coffee to 100ml water, but you can go stronger or milder depending on taste.
2. Grind Size
Medium grind (like table salt) is ideal. Too fine, and you risk over-extraction or filtering issues; too coarse, and extraction suffers, leading to sourness.
3. Filter Type
Using one paper filter gives clean results. Stack a second for even finer filtration. A metal filter allows more oils and fines through, which can boost body and create a slight crema-like texture.
4. Press Time
Longer press time increases extraction under pressure—but only to a point. Keep it between 15–25 seconds for balance.
5. Blooming & Immersion Time
A proper 45-second bloom lets gases escape, improving evenness. Extending immersion beyond 60 seconds can extract unwanted bitterness unless you’re working with stale coffee.
Pro Tips & Common Mistakes
- Don’t aim for crema. The AeroPress isn’t an espresso machine—you won’t (and shouldn’t) get crema.
- Metal filters boost body. They let more oils through, mimicking French press richness with cleaner mouthfeel.
- The included scoop = ~14–17g. It’s larger than a standard coffee spoon—about 1.5x.
- Use slightly cooler water. Even “100°C” office kettles often run below 90°C—ideal for AeroPress.
- Two-part pouring helps. Pour to the #2 mark first to release gas, then top up after stirring.
- Press gently. Avoid excessive force—it can cause leaks or injury. If it’s hard to press, adjust grind or use a coarser setting.
- Clean smart. Pop out the coffee puck by removing the cap and pushing the coffee out. Rinse the rubber seal and chamber while still warm.
- Don’t separate the plunger and chamber. Storing them apart risks warping. Keep them together in a cool, dry place—not in sunlight.
Frequently Asked Questions
What is the ideal coffee-to-water ratio for AeroPress?
The recommended ratio in the guide is 17g of coffee to 100ml of water, but you can adjust based on taste preference. A 1:1 dilution after brewing is also suggested for optimal balance.
Can I use a fine grind in an AeroPress?
You can, but it’s not ideal. A fine grind increases extraction but may lead to over-extraction, bitterness, or clogging. A medium grind (like table salt) is best for clean and balanced results.
How long should I brew coffee in an AeroPress?
Total brew time—including blooming, stirring, pouring, and pressing—should be around 60 seconds. The actual press (extraction) time should be 15–25 seconds for best results.
What kind of filter should I use?
The AeroPress comes with paper filters that produce clean, sediment-free coffee. For a richer cup with more body, try using a metal filter or stacking two paper filters.
Why shouldn’t I aim for crema when using AeroPress?
Unlike espresso machines, the AeroPress doesn’t generate enough pressure (just 1–2 bars) to produce true crema. Trying to force it can lead to over-extraction or injury.
How should I store my AeroPress?
Always keep the plunger and chamber together to prevent warping. Store in a cool, dry place away from direct sunlight, especially the rubber seal.
Recommended FrontStreet Beans for AeroPress
For AeroPress brewing, FrontStreet Coffee’s BrazilBourbon offers a balanced, medium-bodied cup with notes of caramel, nuts, and mild acidity—perfect for highlighting clean extraction. The ColombiaSidra (Sidra), with its juicy stone fruit and complex sweetness from anaerobic processing, shines with vibrant layers. Alternatively, try the EthiopiaGedeb (Gedeb) for a bright, citrusy cup with floral undertones. All three are exceptional single-origin beans roasted for filter methods. Freshly roasted within 5 days · Orders placed before 17:00 ship the same day · Next-day delivery across most of Guangdong Province.
FrontStreet Coffee is a long-established specialty coffee roaster in Guangzhou China, selling freshly roasted beans from its own farm in Yunnan as well as dozens of carefully selected single-origin beans from around the world for both pour-over and espresso. The products deliver consistently excellent quality and great value, with shipping within 24 hours. Guangzhou's FrontStreet Coffee shop is recommended by many coffee lovers, and the beans are now available online at the Tmall 。
Important Notice :
前街咖啡 FrontStreet Coffee has moved to new addredd:
FrontStreet Coffee Address: 315,Donghua East Road,GuangZhou
Tel:020 38364473