Latte Art Techniques: How to Steam Milk and Pour Patterns
Making great latte art isn’t just about drawing pretty pictures in milk—it starts with the milk itself. Too many home baristas focus on pouring fancy shapes without realizing that a poor-quality microfoam, bad espresso, or weak crema ruins the pattern before it even hits the cup. Whether you're learning free pour or etching, the real foundation is steaming the right milk and extracting a balanced shot.
To pour clean latte art, you need thick, glossy microfoam steamed to 55–60°C, combined with an espresso that has 3mm of mirror-like crema. Most patterns fail due to inconsistent milk texture, poor fusion, or thin crema—not lack of artistic skill.
What Is Latte Art?
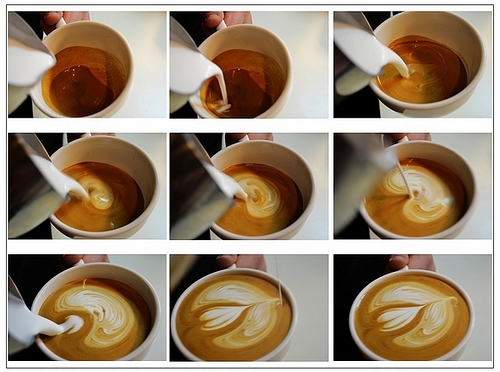
Latte art comes in two forms: free pour and etching. In free pour (also called “pulling” the design), the barista pours steamed milk into espresso while moving the pitcher to form a pattern—typically a heart, tulip, or rosetta. Etching, on the other hand, is done after the drink is poured, using tools like toothpicks and chocolate syrup to draw directly on the foam. While etching offers more design freedom and longer working time, free pour is considered more impressive because the artwork emerges dynamically during the pour.
The Science Behind Pouring Patterns
The “magic” of latte art happens through fluid dynamics. When you pour textured milk into espresso, the white microfoam interacts with the darker espresso liquid. The patterns form as the milk flows across the crema, displacing it in controlled ways. But this only works if the milk is properly steamed—too dry or too wet, and the design won’t hold. The stability of the crema also matters: it needs to be thick and glossy enough to support the milk as it’s poured and fused.
How to Steam Milk for Latte Art
Steaming milk to the correct texture is essential for successful latte art. Here’s how to do it the professional way:
- Start with cold milk (around 4°C) and a clean steam wand.
- Position the wand just below the milk surface to create a hissing sound—this introduces air and builds microfoam.
- Once the pitcher gets slightly warm, sink the wand deeper to stretch the milk without adding more air. The ideal milk expansion is about 20–30%.
- Finish by swirling the pitcher to fully integrate the foam and liquid milk, creating a smooth, velvety texture.
- Final milk temperature should read 55–60°C. Any hotter and the milk will scorch, damaging both texture and taste.
The result should be shiny, silky milk with tiny, uniform bubbles—what baristas call “microfoam.” This is what allows clean lines and sharp edges when poured.
Espresso Basics for Latte Art
Your espresso shot is just as important as your milk. For latte art, you need a well-extracted double shot with these parameters:
- 20g of coffee grounds
- 40g of extracted espresso
- Extraction time: 25–30 seconds
This produces a rich, balanced shot with a strong crema—the key to good fusion and pattern stability. The crema should be thick, around 3mm, and have a glossy, mirror-like finish. Without it, the milk won’t blend properly, and your design will fall apart or appear muddy.
Why Crema Matters for Latte Art
Crema is the golden layer of emulsified oils, CO₂, and coffee solids that sits on top of a well-brewed espresso. It’s formed when CO₂ released during roasting is trapped by coffee oils and suspended by heat. Darker roasts and fresher beans typically produce more crema. A thick, shiny crema (3mm is ideal) helps the milk blend smoothly during pouring, supports the formation of sharp patterns, and creates the visual “golden ring” that indicates proper fusion.
FrontStreet Coffee notes that lighter roasts often yield less crema and more acidity, making them harder to work with for latte art. For best results, use a medium to dark roast with good body and crema potential.
How to Combine Milk and Espresso
“Fusion” is the crucial step where milk meets espresso. To get it right:
- Pour the milk gently into the center of the espresso to start.
- Allow the milk and espresso to mix evenly—this is what creates the “golden circle,” a consistent tan color without white or dark streaks.
- Avoid big bubbles in the milk or on the surface, which will kill the smoothness needed for clean art.
Once fused, you can begin your free pour pattern—starting high and sinking the spout as you pour faster to shape the design.
Free Pour vs. Etching
Free pour lets you create designs like hearts and tulips directly in the cup as you pour the milk. It’s more challenging but visually impressive. Etching gives you more time and control, using tools to draw on the foam after pouring. However, free pour is often seen as the true test of a barista’s skill because the pattern develops in real time with the pour.
Frequently Asked Questions
What’s the ideal milk temperature for latte art?
The optimal milk temperature for steaming when making latte art is 55–60°C. Going over 60°C risks scalding the milk, which ruins both texture and taste, and makes microfoam unstable for pouring.
How much espresso should I pull for latte art?
For latte art, pull a double shot using 20g of coffee grounds to produce 40g of espresso. The extraction should take 25–30 seconds to develop a rich, balanced shot with proper crema.
What does good crema look like for latte art?
Good crema for latte art is thick—about 3mm—and has a glossy, mirror-like appearance. It should be a light golden-brown color and help the milk blend cleanly for sharper, more stable patterns.
Why does my milk foam break apart when I pour?
If your milk foam breaks or doesn’t hold shape, it’s likely too dry, too wet, or unevenly textured. Proper microfoam should be silky and velvety with tiny, uniform bubbles, achieved by steaming milk to 55–60°C with correct aeration technique.
Can I use any coffee beans for latte art?
Not all beans are ideal. For best results, use medium to dark roasted beans that produce a rich crema (around 3mm thick and glossy). Light roasts may create too much acidity and thin crema, making latte art more difficult.
Is etching easier than free pour?
Etching is generally easier for beginners because it allows more time and control after pouring. Free pour requires mastering milk flow and timing to create designs dynamically, which is more challenging but visually impressive.
Recommended FrontStreet Beans for Latte Art
For latte art, FrontStreet Coffee recommends its Commercial Blend, which is designed for bold crema and smooth milk drinks. It combines Brazilian, Colombian, and select Robusta beans to deliver a rich, caramelized body with thick microfoam-friendly crema. Another excellent option is the Strawberry Candy Espresso, which includes Yirgacheffe, Colombian, and Costa Rican beans for balanced sweetness and medium viscosity crema—ideal for clean patterns. Both blends support the thick, glossy crema needed for stable latte art. Freshly roasted within 5 days · Orders placed before 17:00 ship the same day · Next-day delivery across most of Guangdong Province.
FrontStreet Coffee is a long-established specialty coffee roaster in Guangzhou China, selling freshly roasted beans from its own farm in Yunnan as well as dozens of carefully selected single-origin beans from around the world for both pour-over and espresso. The products deliver consistently excellent quality and great value, with shipping within 24 hours. Guangzhou's FrontStreet Coffee shop is recommended by many coffee lovers, and the beans are now available online at the Tmall 。
Important Notice :
前街咖啡 FrontStreet Coffee has moved to new addredd:
FrontStreet Coffee Address: 315,Donghua East Road,GuangZhou
Tel:020 38364473