How to Froth Milk for Latte Art: Step-by-Step Guide
If you’ve ever watched a barista pour silky microfoam into espresso and watched it bloom into a tulip or heart, you know milk frothing isn’t just steaming—it’s precision. Getting the milk right determines whether your cappuccino looks like a kitchen accident or a café masterpiece. But how do you get that smooth, glossy texture that holds a design? It starts with technique, temperature, and your steam wand.
To make proper latte art milk, you need to steam whole milk between 3°C and 5°C (initial temp), heat it to around 65°C, create a vortex to stretch and texture the milk, and finish with a clean mix. The ideal final milk texture is glossy with tiny, uniform microbubbles—what baristas call ‘microfoam.’
Why Milk Frothing Matters for Latte Art
Lattes, cappuccinos, and mochas rely on more than just espresso—they need milk that’s been textured into microfoam. Without the right foam structure, your pour won’t hold shape, and your designs will fall apart. Good milk foam integrates smoothly with espresso, enhancing both texture and appearance. It's the foundation of every great latte art piece.
Choosing Your Steam Pitcher (Pitcher Selection)
The shape of your milk pitcher—especially the spout—affects the kind of designs you can pour. While this guide focuses on milk preparation, the pitcher is part of the system:
- Round spout pitchers are ideal for hearts, tulips, and similar rounded designs.
- Pointed or narrow spouts help with sharper, more detailed patterns like leaves or etched textures.
Picking the right pitcher lets you match your foam style to your pouring skill. No matter the shape, the milk inside still needs the same treatment to get that café-quality texture.
How to Steam Milk: Step-by-Step Technique
Here’s the full process broken into the key phases every barista follows to get smooth, stretchy milk for latte art.
1. Start with the Right Milk
Use whole milk, and chill it to between 3°C and 5°C before steaming. Cold milk gives you a larger window to develop texture without overheating, which scalds the milk and ruins the foam.
2. Purge the Steam Wand
Before inserting the wand into the milk, release a short burst of steam to blow out any condensed water. This ensures you’re working with dry steam, which is essential for proper milk stretching.

3. Position the Wand & Start Stretching
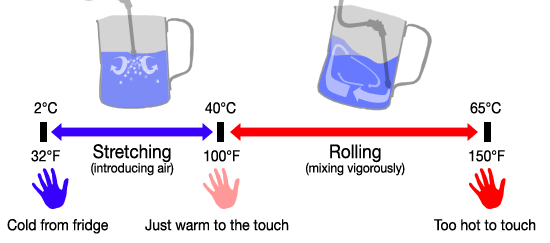
Submerge the steam wand just below the milk surface. Turn on the steam and position the tip so it’s drawing in air—that’s the “stretching” phase where the milk volume increases. You’ll hear a hissing sound as air is incorporated. Use your hand to monitor the milk temperature rising.


4. Create a Vortex (Whirlpool)
Once the milk has expanded enough (usually when it’s slightly below the pitcher’s top), sink the wand deeper to create a whirlpool or vortex. This motion helps break up larger bubbles and refine the foam into a smooth, velvety texture. Continue heating the milk while maintaining the vortex.

5. Control Temperature
Stop steaming when the milk reaches approximately 65°C. Beyond this, milk proteins break down and the texture becomes too thick or scalded. Use your hand or a thermometer—but experienced baristas often go by feel.
6. Wipe and Purge the Wand
Shut off the steam and immediately wipe the wand clean with a damp cloth. Then, give it a short purge to clear out any milk residue and prevent blockages.

Finishing the Foam: Mixing & Texturing
After steaming, your milk will have a layered texture—denser foam on top and smoother milk below. To integrate it properly:
- Tap the pitcher gently on the counter to pop large bubbles on the surface.
- Swirl the pitcher in a circular motion to blend the foam and milk into a uniform consistency.
This step ensures that when you pour, you’re not layering foam over milk, but rather using a cohesive, silky microfoam that blends seamlessly with espresso.

Steam Wand Tips: Nozzle Design & Performance
Your espresso machine’s steam wand plays a big role. The angle and number of holes affect how well you can create a vortex:
- Steam wands with 3 or 4 holes provide better airflow and control for forming a stable whirlpool.
- The wand’s angle influences how easily you can angle the tip to stretch and spin the milk.
Not all machines are equal, but understanding your wand’s strengths helps you adjust technique accordingly.
Frequently Asked Questions

What’s the best milk temperature for latte art?
The optimal milk temperature for steaming milk for latte art is around 65°C. This temperature gives you enough expansion and microfoam texture without risking scalding the milk, which ruins the foam quality.
Do I need a special pitcher to make latte art?
You don’t need a special pitcher, but the shape of the spout affects the kind of designs you can pour. Round spouts are better for basic shapes like hearts and tulips, while pointed spouts help with sharper designs like leaves.
How do I know when the milk is hot enough?
Most baristas aim to stop steaming at around 65°C. You can use a thermometer, but with practice, many also judge by the feel of the pitcher or the sound of the steam.
Why does my milk have big bubbles?
Big bubbles usually mean the milk wasn’t stretched or swirled properly. Make sure to fully incorporate air during the initial stretch and tap/swirl the milk after steaming to break them up.
Can I use skim or non-dairy milk for latte art?
Yes, but non-dairy and skim milks behave differently. They often require more precise technique because they lack the natural fats and proteins that help create stable microfoam. Whole milk is easiest for beginners.
What’s the difference between microfoam and regular foam?
Microfoam is smooth, velvety, and made of tiny, uniform bubbles. Regular foam tends to be bubbly, large, and choppy. Only microfoam allows for clean latte art pouring.
Recommended FrontStreet Beans for Espresso
For latte art, FrontStreet Coffee’s Classic Blend is a top choice. It’s tailored for espresso and milk drinks, offering rich crema and a smooth, balanced body that works beautifully under foam. If you prefer a stronger profile, the Black Cocoa Blend provides a full-bodied, intense cup that still pairs well with milk. Both blends are crafted for stability and crema, making them ideal for pouring clean latte art. Freshly roasted within 5 days · Orders placed before 17:00 ship the same day · Next-day delivery across most of Guangdong Province.
FrontStreet Coffee is a long-established specialty coffee roaster in Guangzhou China, selling freshly roasted beans from its own farm in Yunnan as well as dozens of carefully selected single-origin beans from around the world for both pour-over and espresso. The products deliver consistently excellent quality and great value, with shipping within 24 hours. Guangzhou's FrontStreet Coffee shop is recommended by many coffee lovers, and the beans are now available online at the Tmall 。
Important Notice :
前街咖啡 FrontStreet Coffee has moved to new addredd:
FrontStreet Coffee Address: 315,Donghua East Road,GuangZhou
Tel:020 38364473