How to Steam Milk and Control Foam for Latte Art
Ever pulled a perfect espresso shot, only to watch your latte art fall apart because the milk foam is too bubbly—or worse, nonexistent? Whether you're a home barista or just starting out in a café, getting your milk right is just as critical as nailing the shot. Let’s break down how to steam milk like a pro, control the foam texture, and avoid the classic pitfalls that ruin your cappuccinos and lattes.
To steam milk properly, start with cold milk (ideally 5°C), position the steam wand just below the surface to create a whirlpool and fine foam, and aim for a finish temperature between 55–65°C—felt as 'too hot to hold' but manageable for a couple of seconds. Mastering this range and technique is the foundation of smooth, velvety microfoam.
Preparation & Equipment Basics
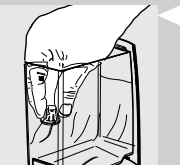
Before you touch the steam wand, understand how your machine’s steam system works. Always purge the steam wand before and after use to clear condensation and avoid milk contamination. Keep a clean towel handy—you’ll need it constantly. The way the steam wand tip meets the milk surface is crucial: it should sit just beneath the surface at an angle, allowing both air intake and foam control. This 'contact point' dictates whether you get big bubbles or smooth texture.
Temperature: The Core of Milk Steaming
There are two key temperatures. First is the start of aeration—or 'stretching'—where you introduce air into cold milk (around 5°C), raising its volume with tiny bubbles. This phase ends when the milk reaches body temperature (~37°C), felt as neutral—not hot. Second is the final steaming temperature, which should be around 55–65°C. At this stage, the milk feels very hot but is still manageable to hold for a couple of seconds. Overheating ruins texture and sweetness. Many pros avoid thermometers, relying instead on hand feel developed through practice.
The Angle, Motion & Steam Wand Technique
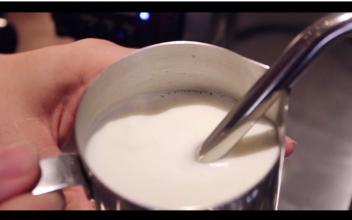
Hold the pitcher at a slight angle and raise the spout so milk can spin and fold inside. Tilt the pitcher in the direction of the whirlpool. The steam wand shouldn’t plunge too deep—keep it just under the surface to create a vortex that pulls microfoam downward and eliminates large bubbles. Begin steaming with the wand tip near the surface to inject air (you’ll hear a paper-tearing ‘ripping’ sound), then submerge deeper once you’ve stretched enough. Once the milk hits body temp, lower the pitcher slightly to reduce aeration and focus on creating a smooth vortex. Continue steaming until the pitcher is too hot to hold comfortably (55–65°C).
Controlling Steam Pressure
Don’t crank the steam valve wide open, especially when starting out. Most standard rotary or manual valves only need a partial turn—often just two to four clicks—to produce adequate pressure. Overusing full blast risks damaging the valve and makes control harder. Find the minimal effective valve position for your machine (e.g., three clicks clockwise) and stick with it for consistency. This also extends the life of your equipment.
Dealing with Unwanted Noise
That terrifying screech when steaming? It means the wand is submerged too deep, and no air is being drawn in. To fix it, raise the pitcher slightly so the tip is closer to the surface. The correct sound is a steady, ripping ‘ch-ch-ch’ as air is incorporated, not a high-pitched scream. Listen closely—it tells you what’s happening beneath the surface.
Creating & Managing the Vortex
A proper vortex is essential. It pulls larger bubbles down into the milk and creates a smooth, even texture. Avoid going too deep too soon. Let the milk spin and use subtle pitcher movements to shape the whirlpool. This movement helps integrate the foam into the liquid milk, resulting in a uniform microfoam—essential for clean latte art pours.
Post-Steam Milk Handling
Once you stop steaming, tap the pitcher gently on the counter to pop any remaining large bubbles, then swirl the milk vigorously. This mixing step is critical: it unifies the steamed milk and microfoam for an even pour. Don’t skip it, or you’ll pour separated milk with big bubbles on top. Some baristas pour back and forth between two pitchers to ensure consistency. Then, pour immediately—don’t let it sit or it’ll separate again.
What Good Milk Foam Should Look and Feel Like
Top-tier foam is glossy, smooth, and velvet-like with no visible bubbles over 1mm in diameter. It should pour evenly and not create clumps or dry layers. Good foam has a consistent temperature across the pitcher and integrates fully with the milk. For cappuccinos, the foam should be evenly distributed whether you pour one or two drinks. And when you pour, there should be no gurgling or separation—just smooth, controlled flow.
Types of Cappuccinos by Foam Volume
Cappuccinos are often categorized by foam thickness: Wet cappuccinos use 60–70% foam (great for latte art), Half cappuccinos around 80–90%, and Dry cappuccinos are fully foamed to the top. Each serves different textures and visual styles. For everyday work, 70–80% foam offers the best balance for texture and artistry—but whatever you choose, stay consistent per drink.
Common Milk Steaming Mistakes
Many beginners rely too much on shaking or scooping foam off the top to fix bad texture—without addressing poor technique. Don’t settle for mediocrity. Other errors include steaming milk too long, leaving it to sit before pouring, or trying to fix separation by pouring from too high. Also, don’t blame the steam wand if your technique is off. And never use a spoon to remove bubbles—that’s a sign you skipped the vortex step.
Frequently Asked Questions
What’s the ideal milk temperature for steaming?
The ideal finish temperature for steamed milk is between 55–65°C, best judged by feel: when the pitcher is too hot to hold for more than a couple of seconds. Avoid going hotter to preserve texture and sweetness.
How do I create microfoam for latte art?
Microfoam is made by introducing air into cold milk (around 5°C) just until it reaches body temperature (~37°C), then steaming deeper to fully integrate the foam into the milk while maintaining a smooth vortex. The result should be glossy, bubble-free, and pourable.
Why does my milk make a loud screeching noise when steaming?
A screaming noise means the steam wand tip is submerged too deep, preventing air intake. Raise the pitcher slightly so the tip is near the surface to create the correct ripping sound and proper foam.
Do I need to purge the steam wand? Why?
Yes, always purge the steam wand before and after use. This removes condensed water and prevents milk from being contaminated or splashed inside the wand, which can affect steam performance and hygiene.
How do I know if I’ve steamed the milk long enough?
Steaming is done when the milk reaches 55–65°C and the pitcher is too hot to hold comfortably. The milk should have fine, integrated microfoam with no large bubbles, and feel smooth in the pitcher.
Can I use a thermometer instead of relying on feel?
While thermometers help, many experienced baristas develop a tactile sense for the correct temperatures. Relying solely on a thermometer might limit your ability to feel and adjust in real time.
Recommended FrontStreet Beans for Milk Drinks
For rich and balanced milk coffee, try FrontStreet’s Classic Blend: it delivers chocolate, caramel, and nutty tones, creating a smooth and creamy espresso base ideal for lattes and cappuccinos. The Brazil Queen Manor SOE highlights sweet milk chocolate, hazelnut, and soft caramel—perfect for silky flat whites. For deeper body, the PWN Golden Mandheling offers spice, dark caramel, and milk-friendly thickness. All three roast profiles complement steamed milk exceptionally well. Freshly roasted within 5 days · Orders placed before 17:00 ship the same day · Next-day delivery across most of Guangdong Province.
FrontStreet Coffee is a long-established specialty coffee roaster in Guangzhou China, selling freshly roasted beans from its own farm in Yunnan as well as dozens of carefully selected single-origin beans from around the world for both pour-over and espresso. The products deliver consistently excellent quality and great value, with shipping within 24 hours. Guangzhou's FrontStreet Coffee shop is recommended by many coffee lovers, and the beans are now available online at the Tmall 。
Important Notice :
前街咖啡 FrontStreet Coffee has moved to new addredd:
FrontStreet Coffee Address: 315,Donghua East Road,GuangZhou
Tel:020 38364473