Coffee pull: a guide to making milk foam
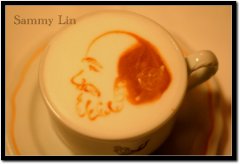
Have you ever had such a cappuccino? It looks like a cup of art and tastes silky? I hope you have, because that's what a cappuccino is all about. If you've ever had a cappuccino like this, I think you'll probably agree with me: it's hard to drink any more bubbly, fluffy cappuccinos.
So what makes a "real" cappuccino so delicious? Of course it's the skill of a barista. The skill of milking is not so easy. But with some good advice and some training, you will immediately impress your cappuccino enthusiasts.
Let's start with a little guide.
Let's get started
Okay, what do we need? Here are some suggestions:
Espresso machine
At present, all espresso machines on the market have steam pipes for foaming. Some manufacturers decide to put turbo nozzel on their steam pipes to help their customers. If you have something like this on your machine, please take it off as much as possible, because it won't help us with what we're going to do next.
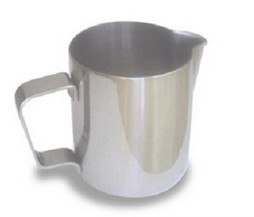
Flower cup
It is better to have a stainless steel flower cup with a water outlet. You need the kind of flower cup whose temperature can change with the milk, so you can feel the temperature of the milk at any time without steaming it too hot. Stainless steel happens to have this property. The outlet can help you when you pull flowers.
milk
The milk used in lattes has a fat content of about 3%. The less fat, the harder the foam. What you want is smooth foam (so forget about fat-free cappuccinos).
About milk foam
The main thing to keep in mind when foaming is to stop when the temperature reaches the right point. The appropriate temperature refers to 55-65 °C, depending on your taste. Foaming for too long will condense the milk and change its taste (and cappuccino will be too hot). Overheated milk can also make the foam too hard. How different will the foam be? Here are some typical examples:
Blistering
If you are distracted or distracted when foaming, it is easy to cause the steam pipe to be above the surface of the milk rather than just below the surface of the water. The result is milk spatter and larger milk bubbles. Of course you can still get a lot of foam in the flower cup, but it will taste bad.
Too hard
The hard foam looks stiff, and it doesn't mix with the coffee when you pour it into the coffee, but accumulates on top of your coffee like fluffy beaten cream. If you play a little longer, it will be layered, 90% of which is flowing milk, and a thick hard foam lid floating on it. When you pour it into the coffee, the milk will flow out of the flower cup first. You must scoop the foam into the coffee cup with a spoon.
Smooth
If you do everything right, when you pour it out, the milk looks smooth and creamy, a bit like pouring yogurt. Milk your espresso will mix perfectly, and crema will color the surface of the milk to form a typical brown edge of cappuccino.
Milk that has been beaten again often makes hard foam. The trick is to beat the right quantity and quality of foam in the flower cup at the right temperature. To foam well, you need to know how quickly your machine heats up the amount of milk you want.
A good advice is not to take less than two cappuccinos at a time when you start learning to foam.
Steam
1. After the machine reaches the correct temperature, turn on the steam switch, release the water that always exists in the steam pipe, and then turn off the steam switch.
two。 Put the nozzle below the surface of the milk and turn on the steam. If you turn on the steam when the nozzle is above the liquid level, you will get larger bubbles, and it will take a lot of effort to get rid of these bubbles.
3. Slowly take the nozzle to the surface of the milk. Stop (stop just as it breaks the surface) just as the nozzle is about to come off the surface. Now that the air is sucked into the milk, you will hear a typical hiss. If you accidentally take the nozzle out of the water, the pressurized air will blow on top of the milk instead of into the milk, resulting in large bubbles.
4. At this stage, there is no doubt that you have formed small and medium-sized bubbles on the surface of the milk. Now we will try to get rid of them. There will be a whirlpool where the air blows into the milk. All the bubbles on the surface will be pulled into this whirlpool and disappear. It is still important to put the nozzle in the right place to avoid new bubbles.
5. Now you have a texture made of tiny bubbles. Put your empty hand on the flower cup to feel the temperature of the milk. When the foam rises, you lower the steam pipe carefully so that it touches the milk. If you are satisfied with the amount of foam and the milk is not warm enough, you can lower the nozzle into the milk. Now the milk is beginning to swirl. By doing so, the milk can be evenly heated by steam. When your hands feel a little hot, keep the nozzle below the liquid level and turn off the steam.
Whirlpool and pour

There are still bubbles in your foam a lot of times. A good way to get rid of these bubbles is to tap the flower cup on the workbench. Don't knock too many times so as not to cause too much foam.
A good way to judge whether the milk is thick enough is to rotate the flower cup so that the milk begins to form a whirlpool. You have to make more cappuccinos to learn what milk should look like.
But here are some suggestions:
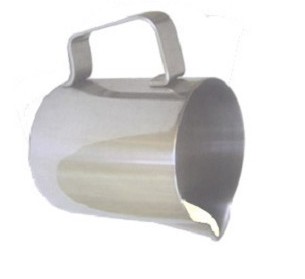
You can also tilt the flower cup to see how thick the milk is in the outlet. Look at the following example:
Milk should not be too thick, because if it is too thick, it will not mix well with coffee.
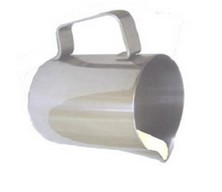
Milk should look like you're pouring yogurt (it may sound like a strange metaphor, but it is)
Pour the milk slowly. If it looks easy to flow, just wait a few seconds. By waiting for the air that has been blown into the milk to rise to the surface, the milk can be layered and the foam floats on it. It's like what happens after the black beer is poured out. In order to get the correct cream properties, you now need to blow the milk out of the whirlpool to mix it. You may get a nice cappuccino by doing this, but it may not be two.
All right, that's all the basics. Now it's time for you to take some time to practice and improve your skills. I have to write a new article about lattes. This one is long enough.
Good luck to you and your cappuccino!
FrontStreet Coffee is a long-established specialty coffee roaster in Guangzhou China, selling freshly roasted beans from its own farm in Yunnan as well as dozens of carefully selected single-origin beans from around the world for both pour-over and espresso. The products deliver consistently excellent quality and great value, with shipping within 24 hours. Guangzhou’s FrontStreet Coffee shop is recommended by many coffee lovers, and the beans are now available online at the Tmall 。
Important Notice :
前街咖啡 FrontStreet Coffee has moved to new addredd:
FrontStreet Coffee Address: 315,Donghua East Road,GuangZhou
Tel:020 38364473

- Prev

Drinking coffee is also a culture.
The ancient Arabian coffee culture when Europeans first came into contact with coffee, they called this seductive drink Arabian wine, and when conservative Catholics cursed coffee as the drink of the devil Satan, they would never think of what a precious thing they inherited from the pagans. As the first place in the world to drink and produce coffee
- Next
The concise and concise idea of coffee flower drawing.
Concise, concise and then concise. If I blindly pursue the effect of gorgeous patterns, then I am obsessed with it. Coffee is a drink, pull flowers or any Design is just the icing on the cake, never put the cart before the horse, this is what I and all friends who are interested in studying the art of coffee should always keep in mind. The Lion King is a red line, and my new design will not exceed it in the future.
Related
- Beginners will see the "Coffee pull flower" guide!
- What is the difference between ice blog purified milk and ordinary milk coffee?
- Why is the Philippines the largest producer of crops in Liberia?
- For coffee extraction, should the fine powder be retained?
- How does extracted espresso fill pressed powder? How much strength does it take to press the powder?
- How to make jasmine cold extract coffee? Is the jasmine + latte good?
- Will this little toy really make the coffee taste better? How does Lily Drip affect coffee extraction?
- Will the action of slapping the filter cup also affect coffee extraction?
- What's the difference between powder-to-water ratio and powder-to-liquid ratio?
- What is the Ethiopian local species? What does it have to do with Heirloom native species?