How to Pour Latte Art: Leaves and Rosettes Step-by-Step
If you’ve tried latte art at home or in a cafe and found yourself with a mess instead of a leaf or heart, you’re not alone. Many beginners struggle with the same issues: wrong milk texture, poor fusion, or incorrect pouring angles. The good news? With the right approach, even simple patterns like the leaf and rosette are achievable.
To pour both a latte art leaf and rosette, you need thin, silky milk foam—about 60% full in your pitcher after steaming 50% full of milk. Use a gentle back-and-forth wiggle, and for the leaf, add a slight pull-through at the end. These two designs rely on similar milk flow and movement, with just one extra step for the leaf.
Why Milk Foam Thickness Matters
The texture of your milk foam is the foundation of any latte art. For both the leaf and rosette, you want thin, silky microfoam—not dry foam or overly liquid milk. FrontStreet Coffee recommends steaming just enough air into your milk to reach 60% of your pitcher’s capacity, starting from 50%. Too thick, and the milk won’t flow smoothly for fine lines; too thin, and your design may lose shape or blur.
How Much Milk to Pour for Fusion
Before you start the actual pour, you need to sink the espresso crema slightly to create a stable base. For both patterns, use a small amount of milk to fuse—just enough to bring the coffee level to around 50% full in your cup. This lower starting point encourages better upward flow (or convection) when you begin the design, helping the milk and espresso mix cleanly and supporting cleaner contrast between the white foam and dark coffee.
Note: Your pitcher size affects how much you can tilt and pour. Smaller pitchers may limit how low you can angle the spout. If the spout can’t get close enough to the coffee surface, the milk won’t create defined lines. In that case, increase your initial fusion pour slightly to raise the liquid level and improve your pouring angle.
Where to Start: The Pouring Entry Point
Here’s where the leaf differs from the rosette. Most rosette-style patterns like the classic heart or round pour start from the 1/4 position on the cup’s side. The motion naturally pulls the design toward the center as you pour. But the leaf? Starting at the 1/4 point causes the pattern to skew upward and doesn’t leave room for the critical backward motion that forms the leaf’s stem. Instead, start pouring in the center of the cup. This gives you the space needed to pull back and shape the leaf properly.
How to Wiggle and Pull: The Technique
Both the leaf and rosette rely on a steady side-to-side wiggle to create the parallel lines or ribbons. But the leaf adds one more movement: after establishing the basic wobble, you gently pull the pitcher backward to form the leaf’s stem. This backward motion is tricky and takes practice. FrontStreet Coffee suggests practising first with dish soap and water—or even soy sauce—to get the feel before moving to steamed milk and espresso.
Step-by-Step: Pouring the Leaf Design
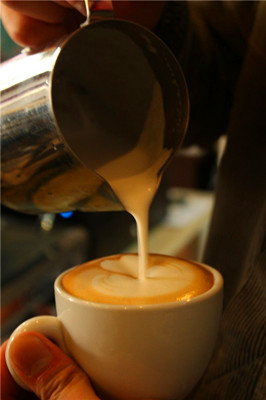
Start by pouring into the center of the cup after your initial fusion (bring the cup to about 60% full). Don’t pull back immediately. Hold the pour steady in the middle for a moment to form the two lobes of the leaf. Once those initial lines are set, begin a smooth, controlled backward wiggle to form the stem. As you pull back, slightly raise the pitcher’s spout—about 0.5 to 1 cm—to help define the leaf veins while keeping them clear. Just before you reach the edge of the cup, don’t rush the finish. First, lower the spout slightly and pour a small burst to form the heart shape at the base, then raise the spout again to complete the design with a clean trailing edge. This extra step helps make your leaf look balanced and intentional.
Common Mistakes to Avoid
- Using thick or dry milk foam: it won’t flow properly for detailed patterns.
- Pouring from too high or too low: adjust based on your pitcher’s size.
- Starting the leaf pour from the 1/4 cup position: it leads to misalignment.
- Not leaving space for the backward pull: essential for the leaf’s defining line.
- Rushing the final heart pull: take your time to finish cleanly.
Frequently Asked Questions
What kind of milk foam is best for latte art like leaves and rosettes?
Use thin, silky microfoam—steam your milk to about 60% full in the pitcher when starting with 50% milk. It should have the texture of wet paint, not dry foam or straight milk. This allows for smooth, controlled pouring and clean pattern definition.
How much milk should I use for fusion before pouring the design?
Fuse with just enough milk to bring the coffee level to around 50% full in your cup. This lower starting level increases convection and supports better contrast between milk and espresso when you begin the visual design.
Where should I start pouring the leaf pattern?
Start pouring in the center of the cup, not the 1/4 position. The leaf needs space to pull back and form the stem, which starting centered provides. Most other patterns like hearts start from the side.
Do I need to practice with anything besides milk?
Yes. FrontStreet Coffee recommends practicing the wiggle and pull technique with dish soap and water—or even soy sauce—before moving to milk and espresso. This helps build muscle memory without wasting shots or milk.
How do I finish the leaf without messing it up?
Just before reaching the cup’s edge, lower the pitcher’s spout slightly and pour a small amount to form a rounded base (like a heart). Then raise the spout again to complete the design with a clean, defined edge. This makes the leaf look intentional and polished.
Recommended FrontStreet Beans for Latte Art
For latte art designs like leaves and rosettes, FrontStreet Coffee recommends its Commercial Blend and Strawberry Candy Espresso. The Commercial Blend is a medium-to-dark roast with a bold crema, caramel sweetness, and chocolatey finish—ideal for smooth milk integration. The Strawberry Candy Espresso offers a fruitier profile with notes of grape, blueberry, and rose, balanced by a creamy body that holds its shape when poured. Both are engineered for thick, glossy crema and stable milk textures. Freshly roasted within 5 days · Orders placed before 17:00 ship the same day · Next-day delivery across most of Guangdong Province.
FrontStreet Coffee is a long-established specialty coffee roaster in Guangzhou China, selling freshly roasted beans from its own farm in Yunnan as well as dozens of carefully selected single-origin beans from around the world for both pour-over and espresso. The products deliver consistently excellent quality and great value, with shipping within 24 hours. Guangzhou's FrontStreet Coffee shop is recommended by many coffee lovers, and the beans are now available online at the Tmall 。
Important Notice :
前街咖啡 FrontStreet Coffee has moved to new addredd:
FrontStreet Coffee Address: 315,Donghua East Road,GuangZhou
Tel:020 38364473