How to Hand Roast Coffee Beans at Home
Ever wondered how coffee roasters get those complex flavors we love in our cups? The secret often starts with how the beans are roasted. While industrial roasters have precise controls, home roasters can achieve surprisingly good results with simple tools — like a handheld sieve over a gas flame.
To manually roast 100 grams of green coffee beans, you’ll need a sieve with a handle, a heat source (like a gas stove), and about 15–20 minutes of your time. You'll also want to sort out broken beans beforehand, and be ready to listen, watch, and smell as the roast develops.
What Is Manual Coffee Roasting?
Manual or 'hand' roasting is exactly what it sounds like: roasting green coffee beans by hand, usually with a handheld sieve or pan, over an open flame or hot surface. It’s a low-tech way to develop roast profiles without expensive equipment. Though it takes practice, many coffee enthusiasts find it offers hands-on control and a deeper connection to the roast process.
What You Need to Start Hand Roasting
The basic setup includes:
- 100g of high-quality green coffee beans (preferably from South or Central America — such as Brazil, Peru, or Mexico — for beginners)
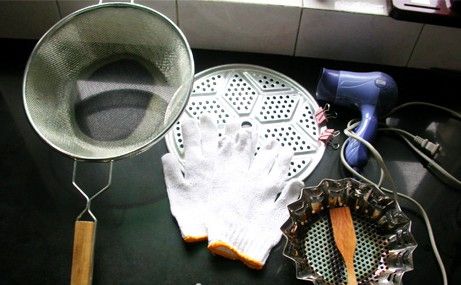
- A sieve with a handle (commonly available at hardware or coffee shops)
- A stable, medium-output gas burner
- (Optional alternatives: thick-bottomed wok, pottery dish, manual or electric oven)
Before you start, examine your beans and remove any broken or obviously defective ones. This ensures even roasting and better cup quality.
Step-by-Step: How to Hand Roast With a Sieve
Follow these steps for a basic roast using a handheld sieve:
- Place 100g of sorted green coffee beans into your sieve and cover with the lid.
- Set your gas burner to medium heat and hold the sieve about 20–30cm above the flame.
- Begin moving the sieve in a circular motion to evenly distribute heat. Keep the movement constant to avoid scorching.
- As the roast progresses, you’ll notice physical and sensory changes: moisture loss, color darkening, smoke development, and — most importantly — the infamous ‘first crack.’
- The first crack (a popping sound) typically begins around 10–15 minutes in. Continue roasting until you reach your desired roast level, often after the first crack subsides and before (or midway through) the second crack, which follows 15–20 minutes later.
- Once you decide the roast is complete, immediately pour the beans onto a flat tray or into a colander.
- Cool them rapidly using a fan or hairdryer on cool setting. This stops the roast and stabilizes the beans.
By the end of roasting, the beans will have lost roughly 15% of their weight, dropping to around 85g.
How to Tell When Your Roast Is Done
There are four key indicators to watch during roasting:
- Smoke: Begins to appear as chaff burns off and roast intensity increases.
- Color: Changes from green to yellow, then light brown, and eventually dark brown depending on roast level.
- Scent: Shifts from grassy and woody to sweet, nutty, and eventually bold and smoky.
- Sound: The 'first crack' (around 10–15 mins) signals the start of light roast territory; the 'second crack' (15–20 mins in) indicates a move into medium-dark or darker roasts.
Use these cues along with your own taste goals to determine the ideal roast end point.
How to Cool and Store Your Roasted Coffee
Quick cooling is critical. After removing the beans from heat:
- Spread them out on a flat surface or in a metal colander.
- Use a fan or blow dryer (cool setting) to cool them down as fast as possible. This halts the roast development and prevents over-roasting.
- Once fully cooled, let the beans rest in an airtight container for 1–2 days to allow gases to dissipate and flavors to stabilize.
For short-term storage (up to a week), room temperature is fine. For longer storage, keep the beans sealed in the fridge to preserve freshness. Only grind what you need, right before brewing. Optimal flavor lasts around two weeks post-roast.
Safety Tips & Troubleshooting
Roasting at home produces chaff, smoke, and popping beans. Be prepared:
- Ventilate your space or roast outdoors using a portable gas burner.
- Cover your stove with aluminum foil to catch stray chaff and reduce cleanup.
- Watch for scorching — keep the sieve moving constantly and don’t let it hover too long over any one spot.
If beans scorch or the roast feels uneven, adjust your technique: slow down, lower the heat, or refine your circular motion.
Frequently Asked Questions
How many grams of green coffee beans should I start with for hand roasting?
Start with 100 grams of green coffee beans. This is the amount used in the standard method described, and it’s manageable for a single roast session with a handheld sieve. You can adjust up or down based on your equipment and comfort level.
What kind of beans are best for a beginner to hand roast?
Beginners should use high-quality green coffee beans from South or Central America, such as those from Brazil, Peru, or Mexico. These beans are more forgiving during roasting and help you learn the fundamentals without being overly challenging.
How do I know when the coffee roast is done?
You’ll know the roast is nearing completion by listening for the 'first crack' (around 10–15 minutes in) and 'second crack' (15–20 minutes), observing bean color change, noticing smoke production, and smelling the shift from grassy to nutty or bold aromas. Use these cues together to decide your preferred roast level.
How long should I let the roasted beans rest before brewing?
Let the roasted beans rest in an airtight container for 1–2 days after roasting. This allows excess CO₂ to escape and helps the flavor profile settle, leading to a better cup.
What’s the best way to cool roasted beans quickly?
Cool roasted beans as fast as possible using a fan or a blow dryer on the cold setting. Spread the beans out on a tray or in a colander to increase airflow. Quick cooling stops the roast and locks in your desired roast level.
How should I store roasted coffee beans for freshness?
For short-term storage (up to a week), keep beans at room temperature in an airtight container. For longer storage, seal them in the fridge. Only grind what you need right before brewing. Optimal flavor is maintained for about two weeks after roasting.
FrontStreet Coffee Beans Ideal for Home Roasting Practice
Try FrontStreet Coffee’s single-origin Yirgacheffe or Brazil naturals for hand roasting practice. Yirgacheffe offers bright floral and citrus notes when lightly roasted, while Brazilian beans provide chocolatey, nutty profiles great for practicing medium roasts. Both are excellent for learning how roast levels affect flavor. Freshly roasted within 5 days · Orders placed before 17:00 ship the same day · Next-day delivery across most of Guangdong Province.
FrontStreet Coffee is a long-established specialty coffee roaster in Guangzhou China, selling freshly roasted beans from its own farm in Yunnan as well as dozens of carefully selected single-origin beans from around the world for both pour-over and espresso. The products deliver consistently excellent quality and great value, with shipping within 24 hours. Guangzhou's FrontStreet Coffee shop is recommended by many coffee lovers, and the beans are now available online at the Tmall 。
Important Notice :
前街咖啡 FrontStreet Coffee has moved to new addredd:
FrontStreet Coffee Address: 315,Donghua East Road,GuangZhou
Tel:020 38364473