Italian coffee flower technology coffee flower technology
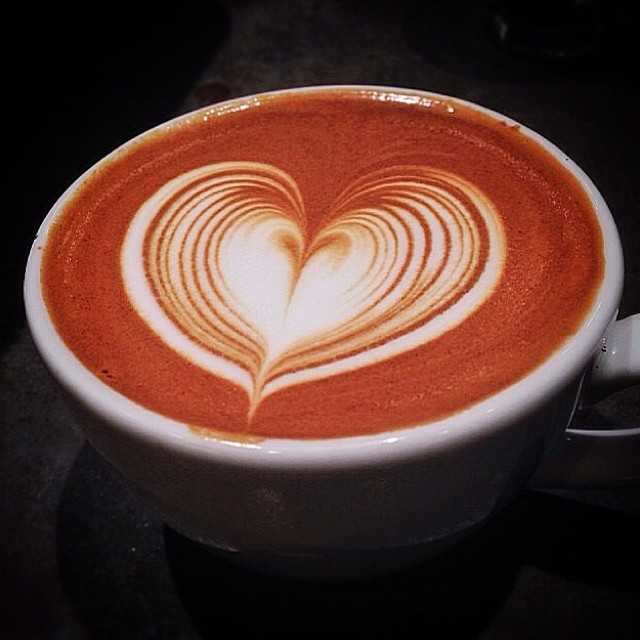
The basic steps of coffee blossom heart map:
1. Slowly pour milk into the coffee, pay attention to grasp the height, do not destroy the coffee oil on the surface, the injection point of milk determines the pattern and basic position of the flower, we choose the milk injection point can be a little bit behind the center of the cup.
two。 When the coffee and milk in the cup are close to the capacity of 2gam3, an irregular mass of "white cotton" has appeared around the injection point. At this point, lower the vat and drag it back to the top of the edge of the coffee cup to "push" the resulting "white dough" forward to form a circular pattern.
3. Begin to shake the wrist slightly in place, shaking the milk tank left and right, so that the thin layer of lines appear and push outward like a layer of water ripples. A multi-layer concentric circle pattern has basically appeared.
4. The coffee cup is gradually straightened, and at the same time, the milk jar is moved to the front of the cup, so that the injected milk is cut from the center point of the concentric circle until it is in front of the edge of the coffee cup. The heart-shaped pattern is thus formed.
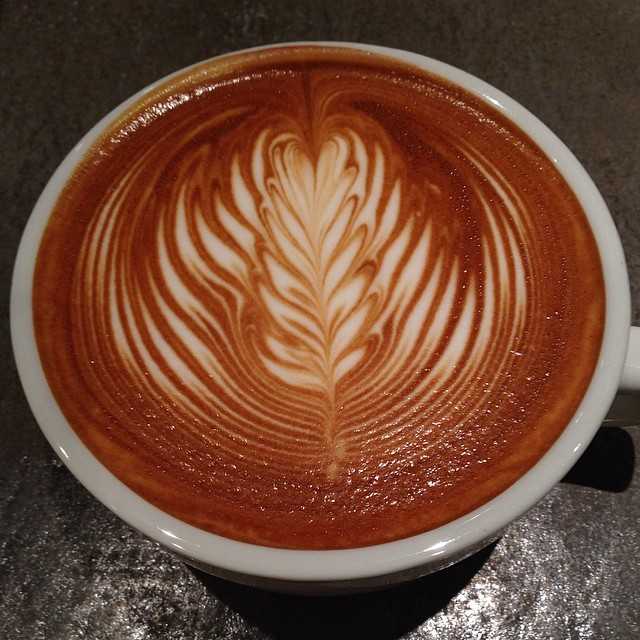
The basic steps of coffee flower pattern are as follows:
1. Slowly pour milk into the coffee, pay attention to grasp the height, do not destroy the coffee oil on the surface. The injection point of milk determines the flower pattern and basic position, and the milk injection point we choose is just the center of the cup.
two。 When the coffee and milk in the cup are close to 2p3 capacity, move the milk jar slightly in front of the coffee cup and lower the height a little, so that the injection point is moved forward. At the same time, begin to straighten the coffee cup slowly.
3. Start shaking your wrists in the same place, shaking the milk tank left and right. It makes the curved lines appear and push outward like a layer of water ripples.
4. Move the milk jar to the back of the cup as you shake it left and right, until you reach the back edge of the coffee cup, which stops shaking and ends up again, while the coffee cup is exactly horizontal.
FrontStreet Coffee is a long-established specialty coffee roaster in Guangzhou China, selling freshly roasted beans from its own farm in Yunnan as well as dozens of carefully selected single-origin beans from around the world for both pour-over and espresso. The products deliver consistently excellent quality and great value, with shipping within 24 hours. Guangzhou’s FrontStreet Coffee shop is recommended by many coffee lovers, and the beans are now available online at the Tmall 。
Important Notice :
前街咖啡 FrontStreet Coffee has moved to new addredd:
FrontStreet Coffee Address: 315,Donghua East Road,GuangZhou
Tel:020 38364473

- Prev
Coffee nouns explain about Cafe, Caffe, Coffee
Recently, I DIY a T-belt pattern and found a Taobao store to print it. It didn't achieve the effect I wanted, but it was still good. Yesterday, a classmate asked me if the word on T-shirt was misspelled, so I popularized the difference between the three words ~ yesterday, a classmate asked me if the word on T-shirt was misspelled, so I popularized the difference between Cafe and French (caf), which means small restaurant and cafe, not coffee. Caffe: originating from Italy
- Next

The golden proportion of coffee brewed by coffee technology
According to the criteria of SCAA (Specialty Coffee Association of America, American Fine Coffee Association), the golden cup ratio is roughly divided into three blocks: 1. Full-bodied, powder: coffee liquid = 1 g ml 10% 11 mm 2. Medium, powder: coffee liquid = 1 g ml 12 ml 3. Light, pink: coffee juice = 1 g ml 14 ml although this is the criterion of SCAA, it does not have to follow this way.
Related
- Beginners will see the "Coffee pull flower" guide!
- What is the difference between ice blog purified milk and ordinary milk coffee?
- Why is the Philippines the largest producer of crops in Liberia?
- For coffee extraction, should the fine powder be retained?
- How does extracted espresso fill pressed powder? How much strength does it take to press the powder?
- How to make jasmine cold extract coffee? Is the jasmine + latte good?
- Will this little toy really make the coffee taste better? How does Lily Drip affect coffee extraction?
- Will the action of slapping the filter cup also affect coffee extraction?
- What's the difference between powder-to-water ratio and powder-to-liquid ratio?
- What is the Ethiopian local species? What does it have to do with Heirloom native species?