How to make a good jar of milk foam in the teaching of Italian coffee mechanism?
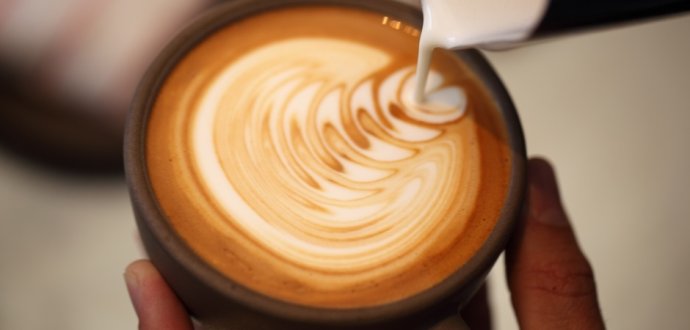
How to make a good jar of milk foam? Before making a good bottle of milk foam, you must have a deep understanding of milk foam, and have a good teacher by hand, mouth and heart can be mastered in a short period of time, from shallow to deep to master the essentials of making milk foam, and then keep practicing to absorb the experience of making milk foam every time.
First, Chongqing Brista Coffee West Point training Institute adopts the following methods when teaching espresso mechanism to make milk foam.
The first step: let the students understand the correct operation flow of the coffee machine steam system, understand the purpose of the empty steam pipe before and after foam, and understand the importance of towels and handy cleaning in coffee making.
The second step: let the students learn how to use the sprinkler to touch the milk noodles, the location and depth of the selected points.
The third step: let the students know the two important temperatures when making milk foam. One is the initial temperature of foaming, and the other is the temperature at which the foam is made. These two temperatures are important for students who have just come into contact with the making of milk foam, which is directly related to whether they have mastered the principle of milk foam. When it comes to foaming, the milk is cold at first (preferably refrigerated at 5 ℃ for more than 3 hours), which can prolong the foaming time and make it foamy and delicate, and then open the steam valve to foaming the milk. When foaming is consistent with our body temperature (feel neither hot nor cold), foaming ends before 35 ℃.
Next, let's talk about the temperature at the end of milking. There are many theoretical theories about this temperature. It is not detailed here. We will talk about the feeling when we discuss the flavor of liquid milk in the future. I just want to talk about what the temperature feels like on the hand. This temperature is hot when we feel it with our hands (in continuous heating), but we can stand it for two or three seconds; stop heating as soon as the temperature feels warm (the back end of the heating feels very hot on the hand, but can hold it). It is recommended to stop the temperature at 55 ℃. In the initial practice, use a thermometer to measure it, and then feel it with your hands.
Step 4: get to know a dead angle between a foam-drawing cylinder and the steam pipe of a coffee machine. Probably the cylinder mouth of the flower-pulling jar must be lifted, and the cylinder body should be tilted according to the rotation direction of the foam.
Step 5: find the vortex. The function of this vortex is to pull the coarse foam below the liquid surface through the vortex to make the surface clean. There are many states of a vortex, each of which needs to be observed and remembered.
Step 6: the problem of the downward and upward movement of the flower cylinder. Sprinkler contact with milk, that is, open the steam valve, then pull the vat down very slowly down, you will hear the "cici" sound, commonly known as "air intake sound". The sound of air intake to human body temperature can no longer appear, otherwise, there will be a lot of coarse foam on the surface.
At this point, move the flower jar up a little so that you can't hear the sound of "cici". At this time, by adjusting the angle of the vat, you can find the vortex, pull the coarse foam off the surface in the foaming stage, and continue until the temperature reaches the hot temperature.
Step 7: know the state of milk after being steamed and how to deal with milk bubbles.
After the milk is dismissed, it is not the ideal foam, but in a layered state. The lower layer is the heated milk, and the upper layer is the "foam" after the milk is dismissed, so we have to deal with the milk after discarding.
1. Shake up and down to remove the coarse foam on the surface.
2. Shake and let the hot milk be fully mixed with the upper foam to form foam. This step can also be achieved by reversing two jars (I prefer this method).
This step is very critical, some friends do not attach great importance to this point, then all previous efforts will be wasted.
Step 8: before pulling flowers, the milk foam has been shaking in the flower jar to avoid the stratification caused by this to appear again, this is a professional habit, which must be developed.
FrontStreet Coffee is a long-established specialty coffee roaster in Guangzhou China, selling freshly roasted beans from its own farm in Yunnan as well as dozens of carefully selected single-origin beans from around the world for both pour-over and espresso. The products deliver consistently excellent quality and great value, with shipping within 24 hours. Guangzhou’s FrontStreet Coffee shop is recommended by many coffee lovers, and the beans are now available online at the Tmall 。
Important Notice :
前街咖啡 FrontStreet Coffee has moved to new addredd:
FrontStreet Coffee Address: 315,Donghua East Road,GuangZhou
Tel:020 38364473

- Prev
Hand brewing, Ailo pressure, American style, ice drop coffee making
Hand drip filter coffee: the production process of hand drop filter coffee is slow, the basic principle is to pour hot water on the coffee powder in the filter paper, and let the coffee slowly soak and filter. Hand-brewed coffee has a bright taste, a stronger aroma, and can highlight the sweetness of coffee. If the skill is skillful enough, the quality of hand-brewed coffee is absolutely one of the best. Philharmonic pressure: Philharmonic pressure is really wrong.
- Next
SCAA Coffee extraction and TDS Water quality requirements Coffee extraction skills
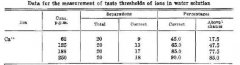
Water with the same TDS (total amount of dissolved solids, English: Total dissolved solids) will not contain the same composition of soluble solids, so is it possible to be the same in flavor? The problem may come back to the minerals themselves. Because there are many metal cations and anions in the water, the common salty taste is mainly sodium ions, according to the cycle.
Related
- Detailed explanation of Jadeite planting Land in Panamanian Jadeite Manor introduction to the grading system of Jadeite competitive bidding, Red bid, Green bid and Rose Summer
- Story of Coffee planting in Brenka region of Costa Rica Stonehenge Manor anaerobic heavy honey treatment of flavor mouth
- What's on the barrel of Blue Mountain Coffee beans?
- Can American coffee also pull flowers? How to use hot American style to pull out a good-looking pattern?
- Can you make a cold extract with coffee beans? What is the right proportion for cold-extracted coffee formula?
- Indonesian PWN Gold Mandrine Coffee Origin Features Flavor How to Chong? Mandolin coffee is American.
- A brief introduction to the flavor characteristics of Brazilian yellow bourbon coffee beans
- What is the effect of different water quality on the flavor of cold-extracted coffee? What kind of water is best for brewing coffee?
- Why do you think of Rose Summer whenever you mention Panamanian coffee?
- Introduction to the characteristics of authentic blue mountain coffee bean producing areas? What is the CIB Coffee Authority in Jamaica?