How to Steam Milk at Home for Latte Art
If you’ve ever tried pouring latte art at home and ended up with big bubbles or separated milk, you’re not alone. Getting smooth, glossy microfoam is tricky without the right tools—or know-how. The good news? You don’t need a fancy machine to start. With the right milk, technique, and a bit of practice, you can steam milk that’s worthy of a cappuccino or latte at home.
To make decent milk foam at home, use whole milk with 4–4.5% fat and either a moka pot (like the KonTessa Vevvigano) or an espresso machine with a steam wand. For manual frothing, aim for a temperature between 60–70°C; with a steam wand, target 60–65°C. Key steps include proper pitcher movement, controlling steam pressure, and properly integrating milk and foam.
What You Need to Make Milk Foam at Home
There are two common setups for foaming milk at home: manual (without a machine) and machine-assisted (with a steam wand). Each requires different tools but shares the same goal—creating stable, velvety microfoam for latte art.
Manual Tools
For hand-frothing, you’ll need:
- Tiamo HA152B double-layer or single-layer milk jug
- Tiamo latte art pitcher
- KonTessa Vevvigano moka pot (to brew espresso-like coffee)
Moka pots like the KonTessa can produce a strong brew similar to espresso, though not as refined as machine-extracted shots. They’re a solid stand-in if you lack an espresso machine but want to practice latte art.
Machine Tools
With an espresso machine, you’ll need:
- Tiamo latte art pitcher
- An espresso machine with a steam wand
The steam wand is what makes machine-steamed milk far easier and more consistent than manual methods.
Milk Choices
Your milk choice matters a lot. The recommended milk is full-fat (4–4.5% fat), with Nestlé whole milk being the top pick. Alternatives include President, President (Fa Xhi), Baishi, Chengguang (green box), Wandashan (pure milk), Bright Optimum, New Green Garden, Vitasoy, and Xiangmanlou. Fat content is critical—even if the brand varies, aim for that 4–4.5% fat range.
How to Make Manual Milk Foam (Without a Machine)
If you don’t have a steam wand, you can still foam milk manually—but it takes practice. There are two ways: hot and cold.
Hot Milk Foam
Heat your milk (preferably Nestlé whole milk) to between 60–70°C—the ideal range for frothing. Don’t rely on guesswork: use a microwave (time it until it reaches the right temp), or another method that gets you consistent results. The milk should be hot but still comfortable to handle.
Frothing itself involves “low,” “medium,” and “high” strokes with a hand pump. Start with low speed until you feel resistance and smoothness, then repeat at medium and high speeds. The idea is to build a fine, stable foam. Keep your strokes controlled and avoid over-pumping, which can make the foam too thick. To reduce thickness, skip the high stage. When done, pull the plunger straight up to release larger bubbles. Tap and swirl the pitcher before pouring.
Tip: Only fill the milk jug about 2/5 full to leave room for expansion. Stop pumping before the foam gets overly dry. After foaming, remove the top 2–3 cm of larger bubbles with a spoon, then tap and swirl the milk to integrate layers. Keep swirling until pouring to avoid separation.
Cold Milk Foam
Cold foam uses chilled milk and a hand frother. This style is often used for iced coffees but can be experimented with in hot drinks too. Pour cold milk directly into the frother and whip until fluffy. Though not traditional for hot lattes, it’s a fun variation worth trying.
Temperature & Quantity Tips for Manual Frothing
The colder the milk starts, the longer you have to work with it and the finer the foam you can achieve—that’s why refrigerated milk is ideal. For hand methods, heat to around 70°C max. The final serving temperature shouldn’t exceed 65°C. Start with roughly 2/5 of the pitcher filled. Don’t overfill or over-process, or the foam will dry out. Always remove large bubbles and integrate foam and milk thoroughly before pouring.
How to Steam Milk with an Espresso Machine Steam Wand
Using a steam wand is the easiest and most consistent way to get great milk foam at home. Here’s how to do it right.
Preparation
Before you steam, understand your machine’s steam system. Know how to purge the wand before and after use (to clean it and avoid old milk residue). Always have a cloth ready—you’ll need it to wipe the wand and clean splashes. Learn the correct angle to place the wand tip into the milk and how deep to insert it.
Temperature Guidelines
Two temperatures matter most:
- Start temp: Begin with cold milk, ideally around 5°C (straight from the fridge). This gives you a longer window to create microfoam.
- End temp: Stop steaming when the milk is hot but still tolerable to hold for a couple of seconds—around 60–65°C. If it’s too hot (above 65°C), the milk can scorch and the foam will break down.
Don’t rely solely on a thermometer. Learn to judge by touch: when it’s too hot to hold comfortably for more than a couple seconds, it’s done.
Steam Wand Angle & Position
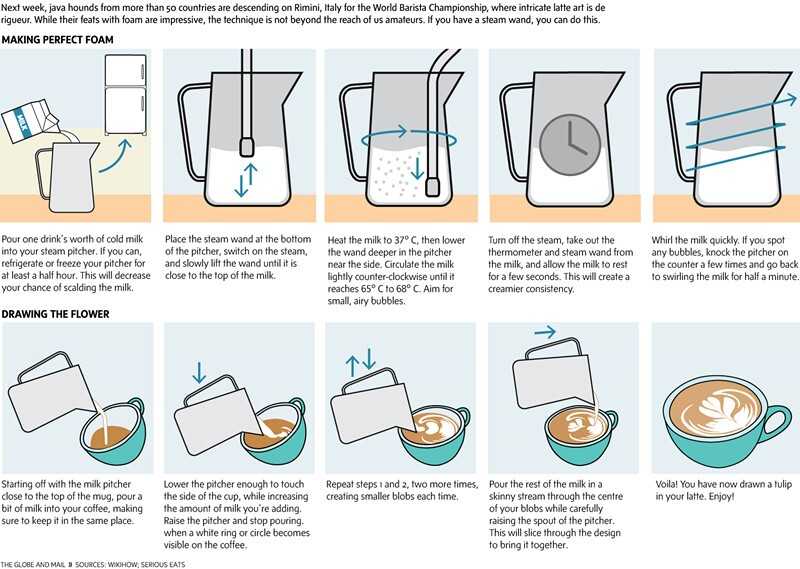
The pitcher’s angle is crucial. Tilt the milk jug so the wand tip sits just below the surface, creating a vortex. The wand should not be plunged too deep—keep it near the surface to develop a whirlpool that pulls bubbles downward. The exact angle takes practice, but think: wand slightly submerged, jug tilted, and vortex forming.
Creating the Vortex
The vortex helps incorporate large bubbles into the milk and creates a smooth texture. To form it, lower the pitcher slowly as you start steaming—you’ll hear a tearing or “ripping” sound (the “inflation noise”). Once the milk warms to body temperature (~37°C), raise the jug slightly so the wand is no longer cutting through milk. Adjust your angle to create a whirlpool and use it to break down any remaining large bubbles. Keep steaming until the milk reaches 60–65°C.
Steam Pressure Control
Don’t crank the steam valve wide open, especially if you’re new. Many guides tell you to open it all the way—but that’s risky. Over time, you’ll wear out the valve or lose control. Instead, find the minimum valve opening (usually around three clicks on a typical knob-style wand) that gives you enough steam pressure. Use that same setting every time. This extends the life of your valve and gives you consistency.
Common Steam Wand Sounds & Issues
A loud, screeching noise usually means the wand tip is too deep in the milk. Fix it by raising the pitcher slightly so the tip is closer to the surface. This sound means you’re not creating a proper vortex, and you’ll end up with big bubbles on top.
Advanced: Controlling Foam Volume & Distribution
Experienced baristas can control how much foam goes into each cup—and make sure both cups in a double have the same foam thickness. This comes down to managing the vortex and where the foam sits in the pitcher. Before pouring, gently swirl the milk to integrate foam and liquid. Keep the pitcher in motion until the pour. Avoid letting it sit still, or layers will separate again.
Milk Foam Processing & Pouring Tips
Once steamed, your milk still isn’t quite ready. It’ll likely be layered: hot milk on the bottom, foam on top. To fix this, you must integrate the layers.
Tap the pitcher lightly to pop big bubbles, then swirl vigorously to mix foam into the milk. Many home baristas skip this step—and it ruins the pour. For best results, pour back and forth between two jugs a few times, then do a few gentle swirls. This ensures even texture. Before pouring, keep the milk moving in the jug to prevent separation. Right before pouring, test the flow by pouring a little off to the side—this helps you gauge texture.
Quality Standards for Good Foam
- Surface should be shiny, smooth, and velvety—like satin.
- No visible large bubbles (over 1mm diameter).
- Consistent temperature across different pours.
- When pouring two cappuccinos (WBC standard), no milk should be left in the jug.
Also, good foam makes little to no hissing sound when poured into espresso. That steady flow helps the milk integrate better and last longer in the cup.
Fixing Common Cappuccino Issues
Sometimes milk won’t pour smoothly into espresso. Common fixes:
- If foam is too dry (too much air), reduce foam volume by stopping steaming earlier.
- If espresso crema is too shallow, tilt the cup more and pour deeper into the coffee.
- If the pour is too close to the cup’s edge, the milk may not pierce the crema properly. Aim for the center and pour with control.
Frequently Asked Questions
What’s the best milk fat percentage for steaming milk at home?
Use whole milk with 4–4.5% fat content. This fat level creates the best microfoam for latte art. Brands like Nestlé whole milk are ideal, but the key is the fat percentage, not the brand.
Can I make latte art with a moka pot?
Yes, you can use a moka pot (like the KonTessa Vevvigano) to brew espresso-like coffee, then foam milk with a hand pump or steam wand if available. The coffee won’t be as rich as machine espresso, but it’s usable for practicing.
What’s the ideal milk temperature for steaming?
For manual frothing, aim for 60–70°C. With a steam wand, the optimal range is 60–65°C. Going over 65°C risks scorching the milk and breaking down the foam structure.
How do I create a whirlpool when steaming milk?
Tilt the milk pitcher and position the steam wand just under the milk’s surface—not too deep. As you steam, lower the pitcher to create a tearing sound, then raise it slightly to form a vortex that pulls bubbles downward.
Do I need to remove foam before pouring?
Not entirely. After steaming, remove the top 2–3 cm of large bubbles with a spoon, then swirl the milk to integrate foam and liquid. This step is essential for smooth, pourable microfoam.
Why does my milk make a screeching noise when steaming?
A loud, high-pitched sound means the steam wand tip is submerged too deep. Raise the pitcher slightly so the tip is closer to the milk’s surface to create a proper vortex and eliminate the noise.
Recommended FrontStreet Coffee Blends for Milk-Based Drinks
For creamy cappuccinos and lattes, try FrontStreet Coffee’s Classic Blend, known for its smooth body and excellent crema—perfect for latte art. The Black Cocoa Blend offers a rich, chocolatey profile that pairs beautifully with steamed milk, while the Commercial Blend delivers consistent performance and balanced flavor at a great value. All three roasts are optimized for milk drinks, with smooth mouths and strong crema. Freshly roasted within 5 days · Orders placed before 17:00 ship the same day · Next-day delivery across most of Guangdong Province.
FrontStreet Coffee is a long-established specialty coffee roaster in Guangzhou China, selling freshly roasted beans from its own farm in Yunnan as well as dozens of carefully selected single-origin beans from around the world for both pour-over and espresso. The products deliver consistently excellent quality and great value, with shipping within 24 hours. Guangzhou's FrontStreet Coffee shop is recommended by many coffee lovers, and the beans are now available online at the Tmall 。
Important Notice :
前街咖啡 FrontStreet Coffee has moved to new addredd:
FrontStreet Coffee Address: 315,Donghua East Road,GuangZhou
Tel:020 38364473