How to Use a Siphon Coffee Maker: Step-by-Step Guide
If you’ve ever watched a barista make coffee with a glass contraption that looks like a chemistry set, you’ve seen a siphon (or vacuum) coffee maker in action. But beyond the spectacle, how does it actually work—and can you make great coffee with one at home? This guide breaks down everything you need to know, from tools to technique.
The standard brew uses 25g of coffee for two people, a medium grind size, 240cc (about 2 cups) of water in the lower chamber, and takes around 1 minute 30 seconds total brew time with precise heating, stirring, and cooling steps to get a clean, flavorful cup.
What You’ll Need to Brew Siphon Coffee
To brew siphon coffee properly, gather these tools and ingredients:
- 25g of coffee beans (12–15g per person)
- A reliable burr grinder
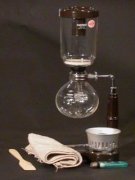
- A siphon coffee maker (a full glass vacuum pot set)
- A heat source such as an alcohol lamp, gas burner, or other suitable stove
- A wooden or bamboo stirring stick
- A measuring spoon (about 8g per scoop)
- Coffee cups for serving
Step-by-Step: Brewing Coffee with a Siphon Pot
1. Prepare the Lower Chamber with Water
For two servings, add 240cc (about 2 cups) of water to the lower chamber of the siphon. This typically reaches the 2-CUP mark. You can fill slightly above the mark since some water will be absorbed by the coffee grounds.
2. Heat the Water
Dry any water droplets on the outside of the lower chamber with a cloth, then place it on the heat source. Begin heating the water until it boils. Ensure your heat source is stable and appropriate for glassware.
3. Assemble the Upper Chamber
Place the filter (usually cloth) inside the upper chamber and attach the chain to center it. Secure the upper chamber onto the lower chamber. Make sure the chain hangs straight down the center; adjust with a stirring stick if needed.
4. Grind the Coffee
Grind your coffee to a medium grind—similar to table salt. Avoid going too fine or too coarse. This medium texture is crucial for proper extraction during the limited brew time.
5. Attach the Upper Chamber Once Water Boils
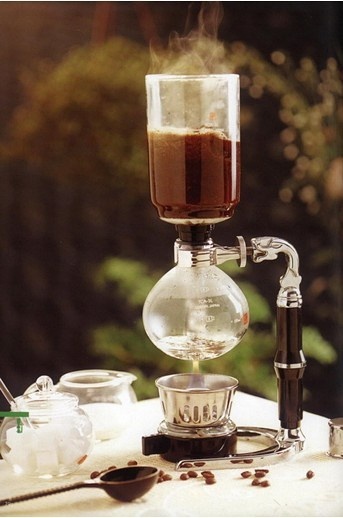
When the water in the lower chamber is boiling, attach the upper chamber firmly. The heated water will be pulled up into the upper chamber due to vapor pressure.
6. Add Coffee & Begin Stirring
Once all the water has risen into the upper chamber, reduce the heat to low. Add the 25g of ground coffee. Use a gentle stirring motion—in a cross pattern—to submerge the grounds without touching the filter.
7. First Stir After 20 Seconds
After around 20 seconds, stir again—this time rotating the grounds gently 3 to 5 times in a circular motion. This encourages even saturation and extraction.
8. Bloom & Development Phase (30 Seconds)
Let the coffee brew (unstirred) for about 30 seconds. This allows the coffee to bloom and develop flavour compounds.
9. Final Stir & Remove Heat
Just before the end of this phase, perform one last gentle stir, then turn off the heat completely.
10. Cool the Lower Chamber & Descend the Coffee
Quickly wipe the bottom of the lower chamber with a cool, damp cloth (wring it out well). This rapid cooling causes the coffee to be drawn back down into the lower chamber. If the grounds in the upper chamber form a peak or dome, your brew was successful.
11. Serve the Coffee
Gently lift or twist the upper chamber to separate it from the lower one—air should flow in easily. Pour the brewed coffee from the lower chamber into your cup and enjoy.
Brewing Secrets & Common Mistakes to Avoid
Don’t Soak the Filter
Avoid soaking the cloth filter or storing it wet. Always keep it dry when not in use. At home, store it in the fridge or let it dry fully. Damp filters can harbour bacteria and affect taste.
Use Fresh Filtered Water, Not Boiled Water
Always start with fresh, filtered water—not previously boiled or distilled water. Ideally, use water filtered through a normal household filter, not RO water. Harder water tends to perform better, and always start brewing immediately after boiling for optimal freshness.
Watch for Dangerous Boil-Over
If you see violent bubbling when attaching the upper chamber, your water quality might be poor (old, deoxygenated, or previously boiled). This can cause hot water to spray out. If this happens, replace the water and start again to avoid injury or a ruined brew.
Interpret Your Extraction By the Bubbles
When the coffee descends, watch the bubbles in the glass tube. Large bubbles mean good extraction with rich oils and body; small or foamy bubbles suggest under-extraction, resulting in thin, bitter, or harsh coffee.
Heat Control Tips
You can use either an alcohol lamp or a gas burner. Gas heats faster and is more common in cafes, but with careful timing, alcohol works just as well. The key is managing heat application through each stage of the brew.
Stirring Rules
Only stir when the water rises and just after turning off the heat. Do not stir continuously during the 30-second development phase—it disrupts the ‘bloom’ and proper extraction.
Care for Your Filter & Glass
Clean your cloth filter thoroughly after each use. Residual coffee grounds will slow down water flow and over-extract future brews. Replace it if it’s worn. Also, handle the glass upper chamber and tube carefully—they’re fragile and can crack easily if knocked or cleaned too roughly.
Frequently Asked Questions
How much coffee do I use for a siphon brew?
For two servings, use 25g of coffee. For a single serving, use 12–15g. Stick to these ratios for balanced strength and extraction.
What grind size is best for siphon coffee?
Use a medium grind size, similar to table salt. Avoid fine espresso grinds or coarse French press grinds. Medium ensures proper extraction in the siphon’s unique brew environment.
Do I really need to dry the filter?
Yes. Always keep your siphon’s cloth filter dry when not in use. Storing it damp can promote bacterial growth, especially E. coli, affecting hygiene and taste.
Can I use RO water for siphon brewing?
No. Don’t use reverse osmosis (RO) or previously boiled water. Use fresh, filtered tap water or water from a standard home filter for best results in flavour and extraction.
What’s the ideal heat source for a siphon?
You can use either an alcohol lamp or a gas burner. Alcohol is slower but safer for home use; gas is faster and common in cafes. Either works if you control timing and temperature properly.
Why did my coffee bubble poorly when descending?
Small or foamy bubbles often mean poor extraction—likely due to bad water, incorrect grind, or weak heat. Large, vigorous bubbles indicate good extraction with proper body and oils.
How long does a full siphon brew take?
Total brew time is around 1 minute 30 seconds: 30–40 seconds with heat applied, then 30–40 seconds while cooling and descending. Timing each step helps achieve balance.
Recommended FrontStreet Beans for Siphon Brewing
For siphon coffee, try FrontStreet Coffee’s Ethiopia Guji Humbera—bright and juicy with blueberry and floral notes—or their Yunnan Arabica, offering a sweet, nutty profile with a smooth mouthfeel. Both single origins highlight the clarity and balance that siphon brewing is known for. Freshly roasted within 5 days · Orders placed before 17:00 ship the same day · Next-day delivery across most of Guangdong Province.
FrontStreet Coffee is a long-established specialty coffee roaster in Guangzhou China, selling freshly roasted beans from its own farm in Yunnan as well as dozens of carefully selected single-origin beans from around the world for both pour-over and espresso. The products deliver consistently excellent quality and great value, with shipping within 24 hours. Guangzhou's FrontStreet Coffee shop is recommended by many coffee lovers, and the beans are now available online at the Tmall 。
Important Notice :
前街咖啡 FrontStreet Coffee has moved to new addredd:
FrontStreet Coffee Address: 315,Donghua East Road,GuangZhou
Tel:020 38364473